It's an age-old argument among garden experts: is it better to plant a tree in spring, or fall?
That's something of a trick question, because the answer is both. Fall is a good time because a freshly planted tree can put its energy into root growth, not foliage, and establish itself before winter. But spring is also a fine time to plant, and offers one big advantage, say tree experts we spoke with: much better selection.
"At those big retailers, you usually get the best quality material in spring," says Carrie Hennessy, a horticulturist at Johnson’s Nursery, in Menomonee Falls, Wisconsin. In fall, garden centers and nurseries often offer sales, but you'll be choosing from the trees that are left over from spring orders. Some may have been containered most of the summer and could be less healthy. Spring offers the best selection of freshly dug trees from suppliers.
But won't summer's heat stress spring-planted trees before they're established? Not so, according to Joey Barton, a second-generation plantsman at Barton Nurseries in Edison, New Jersey, and Sarah Elvington at the Plant Oregon nursery in Talent, Oregon. Both said the spring months gave trees plenty of time to prepare for summer.
It's inadvisable to plant in summer, but you can still do it, as long as you pay close attention to watering. The only time you absolutely don't want to plant? Late fall into winter. Trees are largely dormant then and won't spread roots, and the ground can freeze. But whether you plant a tree in spring or fall, there's still only one way to do it right.
Step 1: Assess Your Yard
Start by sending a soil sample to the nearest Land-Grant University extension office—every state has one. For about $20 to $40, they will tell you the nitrogen, phosphorus, potassium, pH, and organic material levels so you’ll know what tree species might be well suited to the conditions, or if your ground needs soil amendments when you plant.
While you’re waiting for the results, check the soil depth in your potential planting area, says Jim Barborinas, an International Society of Arboriculture certified arborist who runs Urban Forestry Services in Mount Vernon, Washington. “Dig at least two feet down, or use a soil probe, looking for clay and backfill.” Yards in urban spaces, he warns, are often filled with gravel that will need to be replaced. You can also alleviate clay soil, says Hennessy, by backfilling around the root ball with a mix of one part compost to two parts existing soil.
Step 2: Research, Shop, and Call 811
Your ideal tree species depends on soil, climate, sun exposure, and space. To narrow your choices, visit the Arbor Day Foundation’s Tree Wizard tool for a list of matches. When considering size and growth, your tree should still fit comfortably in the available space 25 years from now, says Barborinas. “And when you’re browsing trees, look for a good single leader, well-spaced lateral limbs, fat healthy buds, and no physical damage.”
When digging in front or side yards or near the street, dial 811 at least three days before planting. This allows utility marking crews sufficient time to visit the site and mark utility locations.
Step 3: Prep and Plant
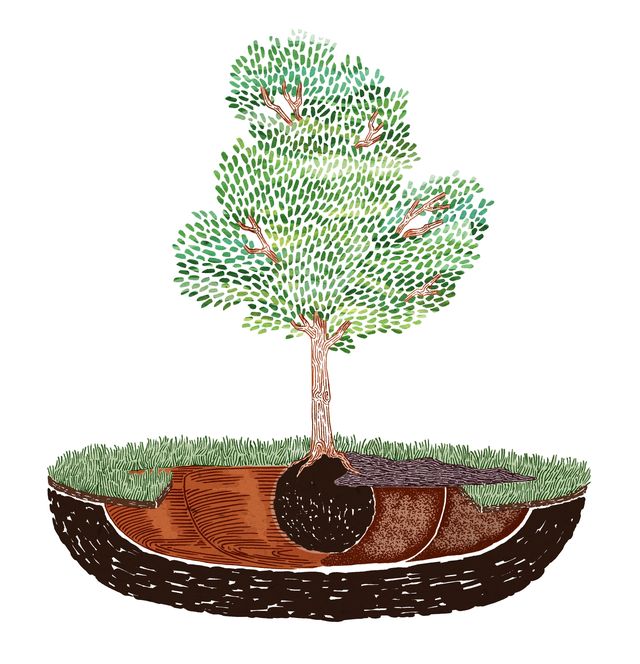
Measure the diameter of the root ball, then rototill a circle that measures five times the diameter across (see opposite). That will give your roots more space to grow. With a round-point shovel, dig a dish-shaped hole that’s twice the diameter of the root ball and deep enough that only the tree’s root flare will be aboveground. If the root ball is covered with burlap, that can be left in the hole after it’s unwrapped.
Step 1: Rototill a circular area five times the diameter of the root ball.
Step 2: Dig a saucer-shaped hole in this rototilled area slightly less or equal to the root ball’s height and twice its diameter.
Step 3: Place the sapling gently in the planting hole after removing any plastic or wire from the root ball.
Step 4: Check that the tree is plumb, and gently backfill, compact the soil, and water the tree.
Step 5: Spread two to three inches of mulch over the planting hole. Leave the root flare, where roots meet the stem, exposed.
Step 6: The soil should feel moist but not muddy. Add water as needed.
One thing you probably won't need: tree stakes. Staking trees is common but can actually inhibit wide root growth that's essential for stability. Most balled-and-burlaped trees don't need stakes. Bare-root trees often do, and container trees sometimes do. If your tree or planting site requires staking, stakes should be removed after 2-3 months, and no later than after the first growing season.
Step 4: Water Your New Tree
One of the most common mistakes we see is that people overwater, says Barton. “It’s not unusual to dig out a dead plant and find a puddle of water in the bottom of the planting hole.”
To avoid drowning a new tree, Barborinas prescribes watering it based on its size. Set your garden hose to a trickle and place it over the root ball. Let it run ten minutes for every inch of the trunk’s diameter. (Two inches across means 20 minutes.) Or for conifers, he says, give the tree two minutes for every foot of height.
Begin watering weekly, and then adjust for the soil. Clay soil traps water, requiring less work on your part, while loose and sandy soils drain fast. A simple test to tell if your tree is getting enough water, says Barton, is to stick your finger in the planting hole and wiggle it around. It should be moist, not wet or dry.

Roy Berendsohn has worked for more than 25 years at Popular Mechanics, where he has written on carpentry, masonry, painting, plumbing, electrical, woodworking, blacksmithing, welding, lawn care, chainsaw use, and outdoor power equipment. When he’s not working on his own house, he volunteers with Sovereign Grace Church doing home repair for families in rural, suburban and urban locations throughout central and southern New Jersey.

