We here at DIY Mother welcome another guest post! This time Tyler from HomeSpotHQ.com has given us a great article on toilet maintenance. Enjoy!
Over last hundred years relatively little has changed on how toilets function. The process is simple and works great. But, this does not mean toilets are without maintenance. On top of regular cleaning a full inspection and maintenance routine should be carried out every couple months.
Water Supply Inspection
Most water damage problems around the toilet stem from the supply hose. The life span of a plastic hose is 3-5 years before the material can become brittle and crack. The braided stainless steel versions last about twice as long. Plus, if a leak does occur, the metal is good at preventing a complete burst.
Visually inspect the hose for any small cracks. Close and open the shut-off valve to make sure it isn’t ceased up. Replace the hose or valve if there are any problems. The parts are cheap so it worth replacing to avoid major problems.
Water Tank Leaks
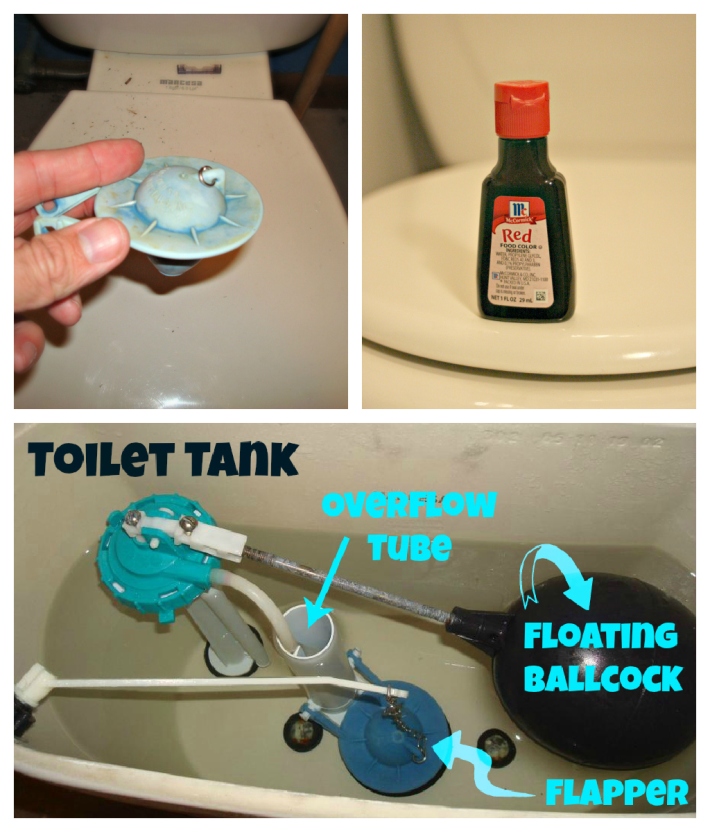
A running toilet is a very common problem that usually stems from one of three places: the water tank mounts, the downspout tube, or the flapp er valve. Start by visually inspecting the two bolts between the tank and base. Sometimes the seal around the bolt will develop a slow leak or a crack develops from over tightening the bolts. Replace any suspect parts.
The next spot to check is the downspout tube. If the floating ballcock is set too high, water will continually run through this tube to the bowl. Simple adjust the float down until the water level is below the tube.
A flapper valve leak is very tough to detect until it becomes worse. Luckily there is a simple test to check for a leak here. Put several drops of food coloring in the water before going to bed. In the morning look in the bowl for the coloring. If any coloring is present, then there is a leak and the flapper valve should be replaced.
Siphon Jet Cleaning
Have a toilet that seems to get dirty very quickly after a cleaning? It is most likely because the area between the water tank and the siphon jets is dirty. It is tough to clean because direct access is not possible. Instead, household vinegar is needed to do the cleaning.
Start by locating the siphon jets on the underside of the rim. It helps to have a small hand mirror. Clean off these smalls holes with a nylon brush. Use a clothes hanger to push through gunk that may be lodged in the orifice. To clean the inside of the rim you will need to use vinegar and duct tape.
Close the shut-off valve for the water supply. Flush the toilet to drain all water from the tank. Close off the siphon jets under the bowl’s rim with duct tape. Dump about a gallon of vinegar into the tank and pull the flush handle. The vinegar will run down into the rim and become trapped by the tape. It is best to do this at the end of the day and let it set overnight when nobody will need to use the toilet. In the morning remove the tape and brush away any debris in the siphon jets with a nylon brush.
Tyler is a writer for www.HomeSpotHQ.com, an easy to use online tool for managing maintenance, projects, paint colors, resources, and other information from around the home.
 Hi, I'm Diane. I love sharing personal stories about the DIY projects that my brave husband and I have successfully, and not so successfully, executed on our later 19th Century church turned quirky family crib in rural Springfield, Illinois. I have a passion for diving into new territory when it comes to home improvement, and happily impart my wisdom, tips, and tricks on several home improvement blogs, so much so that I've been dubbed the "DIY Mother” by my friends and family. My sister-in-law Katie and I decided it was finally time to start sharing these on our own blog; so whatever you do, don't sit back and relax. Pick up a hammer and get to work!
  Hey, I'm Katie. I'm passionate about self-reliance and green home improvements, and I've worked for five years to turn our fixer-upper into a model of clean, green living. I believe that there are dozens of simple fixes that could make every home more efficient, affordable, and sustainable, so I spend my free time spreading the word and sharing tips. We love getting our hands dirty as a family--I've spent many a Saturday bonding with my husband and two boys over fixing up the furnace or installing new insulation.
 My name is Lucy Clark, I'm a mother of two, and an avid DIY-er. My hobbies include watching my daughters' soccer games, hiking, and painting my living room a different color at least twice a year. I'm better at routing a table than cooking a roast, although I make a pretty mean cheesecake. When I'm not out in the garage working the band saw, I can be found raising money for Breast Cancer Research.
  Hi, I’m Rachael. I’m a mother of one, and I love all things DIY. Since I moved into our home with my 9-year old daughter, I have been on a mission to improve our house into a beautiful home that we could be proud of. I recently became interested in the green movement, and am constantly seeking ways to make earth-conscious decisions for our household that don’t break the bank. When I’m not working on our home, you can find me taking my daughter to ballet classes, researching new DIY ideas, and best of all, cooking a mean jambalaya. Hey, I'm Emmalee! I graduated from The University of Texas with a degree in interior designs. After working as an interior designer for a while, I decided to start helping others with their projects. I like to teach simple DIY projects and tips for decorating. Also, I enjoy photography and learning about the latest trends in home renovations and design.
  Hi, I’m Rachael. I’m a mother of one, and I love all things DIY. Since I moved into our home with my 9-year old daughter, I have been on a mission to improve our house into a beautiful home that we could be proud of. I recently became interested in the green movement, and am constantly seeking ways to make earth-conscious decisions for our household that don’t break the bank. When I’m not working on our home, you can find me taking my daughter to ballet classes, researching new DIY ideas, and best of all, cooking a mean jambalaya.
Leave a comment