Heading out the door? Read this article on the new Outside+ app available now on iOS devices for members! Download the app.
At its core, hiking is just walking. That’s what makes it so appealing: As long as you know how to put one foot in front of the other, you can do it. But that doesn’t mean it’s simple. Over time, little inefficiencies and quirks can add up, causing injury and chronic aches. The solution? Go back to basics and improve how you walk. To help, we’re resharing this classic feature from 2011 by Annette McGivney. —The Editors
The Earth is full of crawlers, creepers, flyers, and swimmers. But only humans walk.
Compared to all of the modes of land transportation nature has invented—galloping, slithering, hopping—walking on two legs is one of the most efficient at covering long distances. And easiest: A 2010 study by the University of Utah found that it takes 83 percent more energy to land first on the toes, as most mammals do, than to step first on the heel and rock forward, like humans. Clearly, when we left the jungle to roam the plains, bipedal locomotion gave us an advantage. We could cover vast distances while carrying tools, supplies, and carcasses—backpacking, in its most primitive form—and even wear down faster prey with our superior endurance (as famously argued in Christopher McDougall’s recent bestseller, Born to Run).
“Backpacking used to be a necessary part of survival,” notes author and back-pain specialist Esther Gokhale, who has studied healthy sitting, standing, and walking postures in native cultures in India, Africa, and South America. People have been doing it for millennia. It’s in our DNA. But if you think you learned everything you need to know about putting one foot in front of the other as a toddler, think again. In a modern world dominated by sedentary office jobs, cardio-focused gym workouts, and overbuilt footwear, the fundamental biomechanics of healthy walking often get, well, trampled. Even small problems in your gait—a sagging arch, cramped toes, a pronating ankle—can reverberate up your body and cause knee, hip, and back pain. And hiking on an uneven trail with a 35-pound pack on your back only increases the potential for problems. The waiting rooms of podiatrists, orthopedic surgeons, and chiropractors are full of people, including otherwise healthy backpackers, who are suffering from walking-related ailments. And as a result, a new science of smarter striding is evolving.
My own reeducation in walking started with what I thought was a pebble in my shoe. After emptying out my boot several times and finding nothing, it dawned on me that the sharp pain at the ball of my foot could actually be coming from my foot itself. A trip to the podiatrist and new hiking shoes with a stiffer, more-padded midsole provided some relief, but the pain nagged at me with every run and hike. As the snow melted off the trails come spring, I trudged on and unknowingly changed my gait in an attempt to relieve the foot ache, which subsequently expanded to include calf pain as well. Then one day, the pain in my right calf became so intense that it stopped me in my tracks. I could barely limp the mile back to my car.
The torn calf muscle landed me in a Flagstaff, Arizona, clinic where I hobbled on a treadmill as physical therapist and sports medicine expert Brian Schmitz analyzed my gait. I felt oddly self-conscious, since I had always prided myself on a sturdy stride. But I had obviously been doing something wrong. “You’re forefoot striking, probably due to proximal hip weakness,” announced Schmitz. Translation: After a long, snowy winter that kept me from my daily running and hiking routine, my hips and glutes had weakened and I had hit the trails that spring with a sloppy stride. And I had hit them hard—excited by the prospect of getting out—without allowing my body to rebuild strength. But I hadn’t been fully utilizing leg and hip muscles to ease myself forward, so I pounded my forefoot as I ramped up the miles. That caused the “pebble pain,” and I only got relief after a long break and treatment last summer.
After three months of physical therapy and focused training—literally, learning how to walk again—I returned to the trails stronger, pain-free, and with a mission to investigate the latest advice from sports medicine specialists, gait mechanics experts, and footwear designers. I wouldn’t make the same mistake again. Read their tips on stride, posture, strength, balance, stretching, gear, and injury prevention, and you won’t wind up with a rock in your shoe—or an ache in your calves or hips. What’s more, your more efficient, more fluid stride will help you log bigger miles with more speed and less fatigue.
Take the Test
Rate your biomechanical fitness for moderate backpacking.
1. Glutes and hips

Balance standing on one leg (each side) for one minute without assistance.
2. Flexibility
Lie on your back, and while keeping one leg straight and flush against the floor, raise the other leg straight to at least a 45-degree angle.
3. Alignment and stability
Do a one-legged squat down to 90 degrees and hold it for 10 seconds without your knee drifting inward. Do it successfully with each leg.
4. Calves
Do 10 full calf raises on each leg.
5. Knees and feet
To check for overpronation and other instabilities, stand on one leg, hands on hips, in front of a mirror. Slowly bend your weighted knee. Does it rotate inward or outward? Do your hips or shoulders drop forward or to either side? Is your head tipped forward, backward, or to one side? If you see any of these problems in the mirror—your body should be symmetrical, as in the illustration at right—your stance is off-balance.
Number of failed tests
0: Hit the trail;
1: Enjoy your hike, but fix the problem;
2-3: Head to the gym;
4-5: …with a personal trainer
Note: For alignment issues, consult your doctor or physical therapist.
Ups and Downs
When the slope changes, so should your gait. Here’s how to adjust your stride on hills.
Choose the Right Footwear
Too-heavy boots and too-light insoles cause some of the most common foot problems.
Boots
The best backpacking shoes are as light as possible while still providing adequate arch and ankle support and protection against the elements. Heavy boots, besides weighing you down, can restrict the motion of the foot and actually alter your foot strike as the added swing weight (picture three-pound bar bells strapped to each ankle) could cause your feet to drag and/or land unnaturally. What you want: a shoe with a partially rigid midsole that flexes at the ball of the foot and is roomy in the toebox. That allows a natural gait, so your arch (not the boot’s) absorbs shock and the metatarsals and toes provide stability and evenly distribute body and pack weight. When you shop, you’ll know a shoe is too rigid if, when you’re walking around the store, you literally hear a ker-thunk sound because the boot isn’t flexing at the ball. (Very stiff boots often have a rockered, or curved, sole to give the feel of a more “natural” stride, but that’s not the same as flex.) How do you know if it’s too light? Hold the heel of the shoe in your hand and push the toe down against the floor or table. “If the sole collapses anywhere but at the ball, it’s probably not supportive enough for backpacking,” says Brandan Hill, a designer at Chaco. In the store, exaggerate a strong toe-off to make sure the natural flex point of the ball of your foot matches the boot’s flex point. Try going up and down in half-size increments to get a feel for how the flex point shifts.
Insoles
Shoemakers use the words “insert,” “insole,” and “footbed” interchangeably to refer to the same thing: a contoured platform that’s supposed to provide additional cushion and stability, and keep your foot in a neutral position (level, with arch raised). The problem: Most shoes come with thin foam insoles that do squat. The solution: Get an after-market insert made specifically for hiking or running; most feature a molded, hard-plastic base for arch support, and resilient foam for all-day cushion. Most BACKPACKER editors swap out thin, noncontoured footbeds for a supportive insert.
Should You Go Barefoot?
Yes, no, maybe. The experts debate the controversial new craze. Proponents of barefoot running and hiking—booming in popularity since the 2009 publication of Born to Run—claim that training shoeless builds foot strength and reduces injuries. One outfit, Barefoot Hikers (barefooters.org/hikers), organizes boot-free jaunts all over the country. And barefoot-running clubs, websites, and even races have taken off. But naysayers warn that forsaking foot protection only invites new injuries. Who’s right? We think the jury is still out. You?
Yes
“I have been hiking barefoot for 50 years,” says Richard Frazine, 63, author of The Barefoot Hiker. “Going shoeless requires finding the right foot fall with every step. No step is the same. You literally feel your way down the trail with your feet.” A 2009 study by researchers from the University of Belgium and University of Liverpool found that South Indians who spent their lives barefoot had significantly wider forefeet—allowing a more effective redistribution of downward pressure across the entire surface area of the sole—compared to people who grew up wearing shoes.
No
“For people who have grown up wearing shoes, hiking without them is a bad idea,” says Arizona-based physical therapist Brian Schmitz, echoing the consensus of sports medicine professionals interviewed for this story. “You need structure around your foot for support when hiking. And you also need the protection that hiking footwear offers against cuts and injuries.” That doesn’t mean you don’t need the strengthening touted by barefoot advocates, but it’s better to achieve it through training, advises University of Calgary kinesiology professor Reed Ferber.
Maybe
“The ability to hike barefoot depends on the condition of your feet and how much ‘movement wisdom’ you have,” says Esther Gokhale, who studied indigenous populations in India, Asia, and Africa for her book 8 Steps to a Pain-Free Back. She found people who grew up wearing minimal footwear had stronger feet with healthier arches—not to mention a healthy posture and back for carrying loads—compared to well-shod Westerners. Unless you have muscular feet with well-developed arches, Gokhale suggests a “happy medium.” Wear a supportive shoe that has a thin sole, she says, “so you feel contours on the Earth.”
Training
Alone, a healthy foot strike and proper stride do not guarantee pain-free hiking. Weakness, instability, and tightness in the legs and hips can lead to problems as well. “Everybody is built differently, and gait will vary,” says Reed Ferber, PhD, a professor of kinesiology at the University of Calgary and director of the university’s Running Injury Clinic. Fitness, however, is universal. All hikers should strive to improve strength, balance, and flexibility to enjoy more comfortable miles.
What follows is a backpacking-specific training program designed to give hikers the physical tools they need to put good walking technique into practice. The program was compiled in consultation with physical therapists specializing in sports medicine, including Ferber and Brian Schmitz, a doctor of physical therapy and certified strength and conditioning specialist at DeRosa Physical Therapy in Flagstaff, Arizona.
Stretching
Think of your body like an engine. Muscles provide the power, but you need oil (flexibility) to keep everything running smoothly when you’re walking long miles. Maintain essential limberness year-round with these key moves.
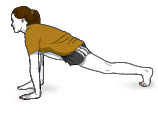
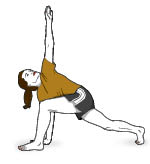
Hips/Groin
Lunge on one leg, with front foot flat on the ground and with back leg straight and toes tucked under. Place your hands on the ground, on either side of foot, and press down with your arms (A). Hold for 10 seconds. Staying in lunge position, balance upper body on straightened arm opposite bent leg; twist torso toward bent leg and raise other arm toward the sky. Look up at hand (B). Hold for 10 seconds. Switch legs. Repeat three times.
Lower Back
Lie on the floor with legs extended straight and arms out to the sides, making a T shape. Bring knees toward chest. Keeping legs bent and together, lower them to one side, and let them rest on the floor while you turn your head in the opposite direction. Shoulders should remain flush against the floor at all times. Hold 10 seconds. Switch sides. Repeat three times.
Calves
Stand six inches away from a wall. Step one leg back three feet. Place hands flat against the wall and push in with your torso straight, front leg bent and back leg straight, shifting weight onto back foot and keeping heels on the ground. Hold for 10 seconds. (Bend back leg as well for a deeper stretch.) Switch legs. Repeat three times.
Quads
Standing with both feet flat on the ground, shift weight to right leg, and use left hand to pull your left leg behind you, against your butt. Stretch the right arm toward the sky and look up. Hold for 10 seconds. Switch sides and repeat three times.
IT Band

Sitting in a chair with your feet on the ground, place one foot on top of the opposite leg at the knee, making a triangle shape. Keep your back straight, lean forward from the hip, and press chest toward legs as far as possible. Hold for 20 to 30 seconds. Switch sides. Do this stretch lying on your back (pictured) to deepen it. Repeat three times on each side.
Feet/Legs
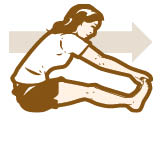
Sit on floor with your legs straight out in front and knees pointed toward the ceiling. Hinge forward from the hips with your back straight. Grab toes and pull toward your head, keeping feet flexed but legs straight, stretching foot, arches, and calves. Hold for 20 to 30 seconds. Repeat three times. (Tip: Can’t reach your toes with legs straight? Don’t bend your knees. Use a towel to pull on your feet while maintaining good form.)
Strength and Balance
Build the physical tools you need to sustain good walking form throughout a long trail day with a pack. Do these exercises—no gym required—three times per week, once your muscles and joints are warm.
Calf Raises

Why Strengthens calf and ankle muscles, which provide power during uphill hiking and improve stability on uneven terrain, preventing ankle sprains and Achilles tendonitis.
How Stand with feet pointing straight forward and shoulder width apart. Bend one leg behind so it forms a 90-degree right angle and raise up on the toes of the other foot (hold on to the back of a chair for balance if needed, but keep body weight on engaged foot). Hold in raised position for two seconds and slowly lower, bringing both feet back to the ground. Rest two seconds, then switch to the other leg. Start with two sets of 12 on each leg, and over a period of several weeks, gradually build up to two sets of 15 raises, then two sets of 20.
Advanced Work up to three sets without strain, then increase intensity by raising up on a one- or two-inch-tall platform, such as a gym stepper or a patio paving block.
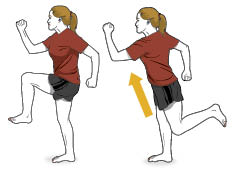
Running Man
Why Trains legs (especially quads and hamstrings) and hips for the strength and balance you need to carry a backpack. It also increases overall body stability during the single-leg phase of your gait (when your weight is on one leg and the other is swinging forward).
How Slowly raise one leg and the opposite arm in right angles, with raised foot level with the opposite knee and hand of raised arm level with forehead. Hold pose for two seconds. Without letting raised leg touch the ground, slowly swing it back, tilting torso forward and bringing opposite arm backward. Bend opposite knee slightly for stability. Leg in back should be bent at a right angle, with thigh, torso, and neck forming a straight line that is diagonal to the ground. Hold pose for two seconds, then swing leg back to place both feet flat on the ground. Repeat five times on each side.
Advanced Do it on a pillow, or uneven ground with good traction.
Single-Leg Balance
Why Strengthens feet, legs, and hips, and improves balance when you’re striding with a pack.
How Barefooted, stand on one leg with hands on hips and raised leg bent at a 90-degree angle. Spread toes to help stabilize. Hold for 30 seconds, once on each side.
Advanced Stand on uneven ground.
Lateral Step
Why Improves balance and strengthens calves and thighs so lower legs can provide maximum stabilization during mid-phase (pronation/supination) of a healthy gait.
How Stand on a stable step that is one to two inches tall. Place hands on hips, with feet flat and pointing ahead. Slowly tilt your torso forward, bending at the hips while extending one leg straight out with flexed foot. Lower heel to the ground with the other leg bent as needed. Stick your butt out with spine straight. Don’t let your weighted knee drift inward or outward. Slowly return foot to neutral position on step. Do two more, then switch to other leg. Do five sets of three reps on each side, alternating left and right.
Advanced Gradually increase height of step, up to eight inches.
Hip Flexor
Why Strengthens hip muscles to improve their ability to function under a load and to take strain off the knees and ankles.
How Hang from a chin-up bar with your legs dangling straight down. Bend your knees and lift them toward your chest while crossing your knees to your left side. Lower back down over a three count. Lift your knees again, this time crossing them toward the right. Do three sets of eight.
Advanced Hold a basketball (or even harder, a medicine ball) between your knees.
Lunges
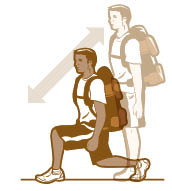
Why Improves quad strength and leg stability, which helps protect knees from strain on steep downhills with a backpack.
How Step forward (about three feet) with one leg, bending both knees to 90 degrees and toeing off the back foot. Keep feet, knees, and hips facing straight ahead. Perform 20 lunges on each side.
Advanced As you lunge, swing both arms straight up. Harder: Add a backpack.
Glutes
Why Strengthens gluteus maximus—the body’s largest muscle—to power you up hills and take strain off the quads and calves.
How Stand with feet pointing straight ahead and shoulder width apart. Resistance band* should be around both legs, above the ankles and lightly tensioned. Place hands on chair back and lean into chair, keeping spine straight, bending forward 90 degrees from the hips. With both knees straight, slowly raise one leg behind so it’s in line with your torso. Hold for two seconds, then slowly return leg. Repeat nine more times. Do three sets of 10 reps on each side.
Lunges
Why Improves quad strength and leg stability, which helps protect knees from strain on steep downhills with a backpack.
How Step forward (about three feet) with one leg, bending both knees to 90 degrees and toeing off the back foot. Keep feet, knees, and hips facing straight ahead. Perform 20 lunges on each side.
Advanced As you lunge, swing both arms straight up. Harder: Add a backpack.
Ankle
Why Improves mid-gait stability during supination and pronation, and strengthens lower leg muscles to prevent ankle sprains and overuse injuries to the foot.
How Sit on the ground, with one leg straight ahead and other leg pulled in toward the groin. Loop resistance band around the middle of foot of the straight leg. Keep the band tensioned by pulling with both hands toward torso. With foot flexed, slowly rotate forefoot inward without allowing leg to rotate (keep knee facing ceiling). Repeat 20 times, then rotate foot outward 20 times, then push foot forward 20 times. Do three sets with each foot.
Side Step
Why Works inner and outer thighs to strengthen muscles that don’t get used much during running or biking, but are critical for stability during backpacking.
How With legs spread shoulder width apart and resistance band just above the ankles and lightly tensioned, bend knees slightly and side step, engaging muscles to pull against resistance band. Keep band taut: Don’t bring feet together when stepping. Walk for 20 feet, then side step back to start (facing the same way). Repeat two times in each direction.
Hip Abductor
Why Strengthens hip muscles, improving your ability to maintain good form while carrying a pack, and taking strain off knees and ankles.
How Stand with knees bent, hips and back slightly flexed, feet pointing straight ahead and shoulder width apart. Resistance band should be around both legs, just above the ankles and lightly tensioned. Place one hand on a chair back for balance. Keeping both knees straight, slowly swing one leg back at a 45-degree angle, leading with the heel. Hold for two seconds, then slowly return the leg back to the floor. Repeat nine more times, then switch legs. Do three sets on each side. (Note: If you train at a gym, hip abductor/adductor machines are also good.)
Foot
Why You have more than 100 ligaments in each foot. This strengthens them, which helps prevent collapsing of the arch and improves shock absorption during foot strike.
How While sitting in a chair, scrunch a towel on the floor with your toes; try to use all five toes just as you would fingers. Repeat 10 times on each foot. Easy? Try picking up a marble.
Monster Walk


Why Improves balance and strength in thighs and hips, especially quads and gluteus medius (above quads), which helps with propulsion and strain of carrying pack weight.
How With legs spread shoulder width apart and resistance band just above the ankles and lightly tensioned, bend knees slightly and slowly walk forward by swinging legs out to create a semi-circle with each step. Walk for at least 20 feet, then walk backward to start. Repeat four times.
Plank Pose

Why Strengthens abdominal muscles, which helps keep torso stable and prevents hunching or leaning too far forward.
How Lie on your stomach. Keep legs, hips, and back straight and raise into a push-up position. Harder: Lower halfway, with arms flush against torso, elbows behind shoulders (pictured). Too hard? Rest weight on elbows/forearms. Hold up to 30 seconds. Repeat five times.
Side Plank
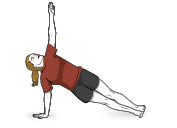
Why Improves balance and strengthens oblique (side) core muscles to increase stability under a load.
How From the plank pose, turn torso and stack feet. Keep body straight; balance on one arm and raise opposite arm toward the sky. Hold for 15 seconds. Repeat on other side.
Squats
Why Improves quad strength and leg stability, which helps protect knees by absorbing impact on descents. How Keep feet flat on the ground, shoulder width apart, and pointing straight ahead. With pelvis level and hands on hips, slowly bend knees and lower butt as if sitting in a chair. Straighten. Make sure your weight stays on your heels, and keep your knees behind your toes. Be careful not to “A-frame” knees (allowing feet and knees to flare out). Do 20 squats.
AdvancedThrough each up-down motion, swing one arm up as you lower, then down as you straighten. Repeat three arm swings: first above the side of the head, then overhead at a diagonal, then overhead to the front. Opposite hand is on hip. Avoid twisting your torso. Do 10 squats on each side.
Heads Up
It’s not fast (or easy), but this ancient method of hauling cargo builds a strong core.
Carrying a load on the skull puts weight as close to the spine as possible, says author Esther Gokhale, making the ancient technique highly efficient. She doesn’t recommend it for Westerners—it takes skill and neck strength—but says, “A small load can be very educational and even therapeutic.” It’s critical to engage the longus colli—essentially, flexing your neck. “Without this muscular support,” she says, “weight bearing leads to degeneration and arthritic changes in the spine.”
Tips from the Pros
Two veteran thru-hikers share tips for racking up pain-free miles.
Justin Lichter: Completed the PCT, AT, and CDT in one year
“I switch insoles about two-thirds of the way through the day, especially when I’m doing big miles. I think the different feel helps prevent overuse injuries.”
“A tight IT band pulls your knee out of alignment and causes pain. Massage the band with your thumb at night to keep it loose and relieve soreness. [The IT band runs along the outer thigh.]”
“Sleep with your feet elevated to prevent swelling and keep your shoes fitting right. I rest mine on my packed backpack. Jack haskel: 7,500 long-trail miles… and counting
Jack Haskel: 7,500 long-trail miles… and counting
“Toughen your feet before a trip by applying tincture of benzoin to problem areas like your heels.”
“Avoid and treat ingrown toenails by not rounding the nails when you cut them. Try to keep them cut ‘square.’ If you have an ingrown nail, treat it in the field by notching a ‘V’ into the end of the nail at its center. This will open up some space for the nail to move back toward where it should be.”
“Make sure your shoes have enough wiggle room in the toe and that there’s no chance that your toes will touch the front on downhills. Hikers typically select shoes that are too small.”
From 2023