


The media could not be loaded.
Specs: My “offline” testing using a 12V switching power supply indicates a draw of 2.5 A, so at 12 V that is 30 watts. Others indicate these are rated for about 3 amps, which may be what you get from a battery. The fuse in the wire is rated for 4 A. There is no official spec, but good to plan for about 3-4 amps draw on your bike. With the engine running and alternator charging the battery, you will be looking at something closer to 14 V, so ~36 watts. The grips got up to 160 F on the hottest setting, and lower settings use PWM (basically rapid switching power on and off) to modulate heat.
Heat: Excellent! It takes a few minutes to warm up. Other people comment that the heat is unbearable on the hottest setting. Maybe this is true with bare hands, but with gloves this was not my experience. That being said, on a 60 F degree day, the hottest setting was uncomfortable. Even on a freezing day (35 F), with thick winter riding gloves, the hottest setting was very warm, and after about 5 minutes I opted to turn it down to the 3 setting.
On moderately cool days with thin gloves, I will probably use 1-2 for a heat setting. On colder days when I wear winter gloves, I will likely start on 5 for 5-10 minutes, then turn it down to 3 once it is warmed up. Adding this to my bike will definitely have a huge positive impact on the quality of my cool-weather riding, and extend my riding season! Really happy so far! That being said, additional accessories like handguards to block wind, good quality winter gloves, and warm weather gear are still needed for a comfortable cold-weather riding experience.
Installation Difficulty: Installation is easy if you are comfortable doing basic work (read: if you change your own oil and know how to remove the fairings/covers/gas tank of a bike to get at the internals, you can do this job). I agree with other reviewers who have noted that the instructions are pretty poor. That being said, the kit is very self-explanatory and detailed instructions shouldn’t really be necessary.
TEST BEFORE YOU INSTALL. It would be really frustrating if you cut off your old grips, get these installed, and then find out they don't work. Get a 12V power supply or spare battery, hook them up, and verify they get hot. They go on snug, and once they are on it is very difficult to get them off again.
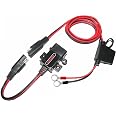
Installation – Wiring: Again, in my experience the wiring is very self-explanatory. Each grip has a cable and 2-pin plug, which goes into a wire harness that the control module is attached to. It doesn’t matter which grip goes into which plug. This harness has a 4-pin plug that attaches to a long cable, which has two wires at the end that you attach to 12V power. I would recommend switched power, if you can get to it easily, so you don't kill your battery by leaving them on accidentally. There is no auto-off or voltage monitor on these, like some of the more expensive brands have. I used the Honda 6P connector on my NC700X. I added a splice to my custom wire harness, and terminated the cable with a Sumitomo HM waterproof connector.
The end of the cable supplied in this kit has its own fuse, which you should leave in if you are connecting this directly to the battery. I opted to cut off the fuse, so I could trim the cable to the correct length, and because I'm attaching to a fused, switched circuit.
Installation - Grips: One of the grips has a larger inner diameter; this one goes over the throttle tube. The other one goes on the other bar. If your throttle tube has ridges or bumps, such as my Honda did, you *will* need to cut these down with a Dremel or file them down some other way. Some people disassemble the whole throttle tube/cable assembly to do this, but I found it was easy enough to just grind it down with the Dremel while still mounted to the bike.
The kit includes end caps for bikes that don't have bar-end weights.
I opted to just cut off the old grips - I won't ever put them back on. If you want to save them, some people lift them up and blow compressed air or lubricant (PTFE or silicone) to break up the adhesive. Clean the adhesive off of the bars before installing, then get them slippery with soap or hair spray, which will allow you to press and twist the new grip on. Some people use a block of wood and mallet to help this process, but I found that it wasn’t necessary. Once the soap or hair spray dries, the grip will be firmly stuck in place.
I used the included superglue on the right throttle tube side, but not the left side. The bottle of glue is very low quality, and leaked on my hand when I opened it up! Not good. It also leaked on the paint on my bike, because I stupidly did not put a towel down to protect everything first. Regrets. Buyer be warned. If I did it again, I'd go buy some name-brand Permatex cyanoacrylate "super" glue to use instead of what was provided.


