Track your WordPress site statistics with Google Analytics.
Google Analytics support on Jetpack is available to all users with Security and Complete plans.
Jetpack already includes site stats with reports that offer quick, at-a-glance views of the traffic on your site. New posts, likes, and comments are shown alongside visitor activity, so it’s easier to make sense of the numbers.
Google Analytics includes advanced features to complement Jetpack stats. Funnel reports help you track the path visitors take through your site, and goal conversion lets you measure how visitors complete specific tasks (such as reaching a product page or contact form). If you already use Google Analytics with other projects, you’ll be able to see all your stats in one place.
Enabling Google Analytics in Jetpack
Google Analytics is a free service offered by Google.
To get started, you’ll need to sign up at the Google Analytics site. After you click Sign up, you can begin creating your account.
If you already used Google Analytics with other sites before, you can create a new account in your existing Google account. Click Admin in your Google Analytics account and click Create Account to create a new analytics profile.

Be sure to fill in the “Account Name” for your new Google Analytics account. You will see some data sharing options under “Account Data Sharing Settings.” By default, all four Data Sharing settings are selected. You can read the description for each setting to decide if you would like to opt out. When you’re ready, click Next.
You will then be taken to the Property Setup:
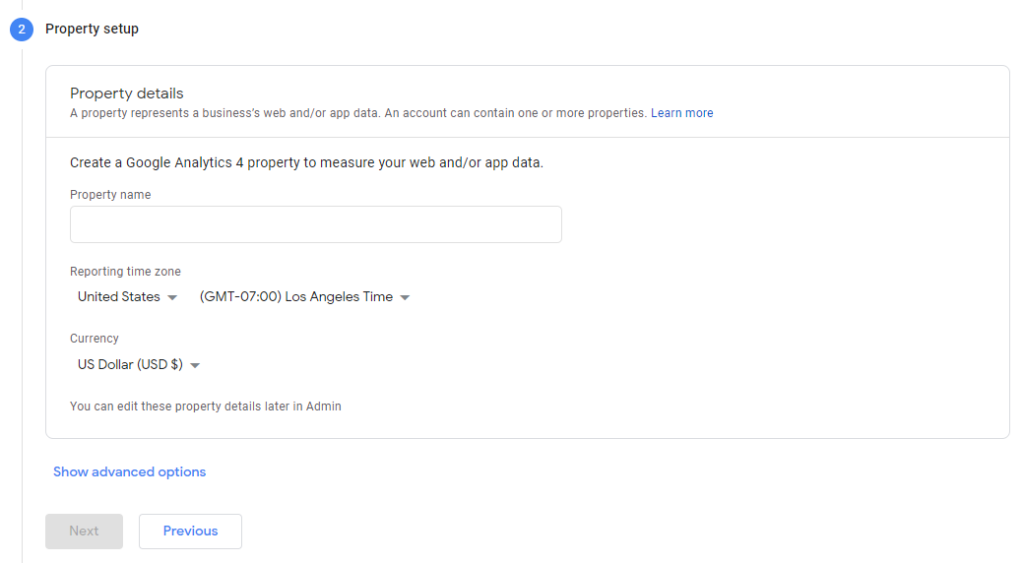
On the Property Setup screen, fill in the following details:
- Property Name: Enter a name for your property, such as your site title.
- Reporting Time Zone: Choose the timezone you want the reporting of your website to be in.
- Currency: Choose the currency of the location you normally operate in.
On the next screen, fill in your business information and click Create:

A pop-up will appear with “Google Analytics Terms of Service Agreement” and “Additional Terms Applicable to Data Shared with Google”. You will need to click the checkbox for both and accept the terms to continue.
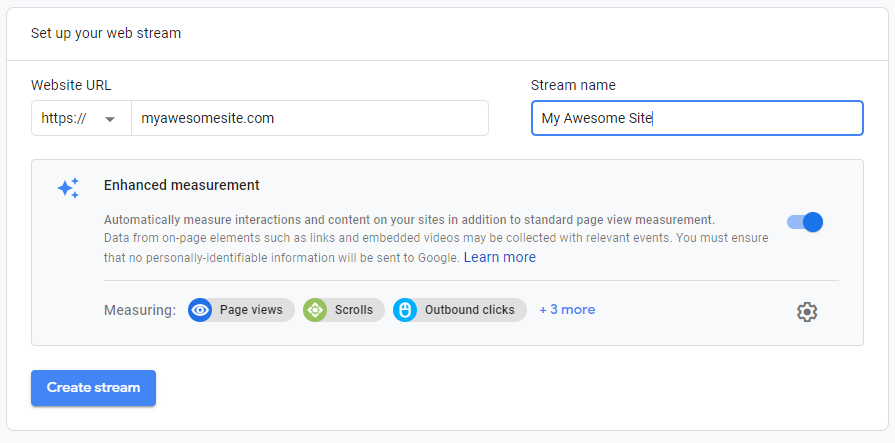
You will then be presented with this screen asking you to choose a property:

Choose Web and insert your website’s domain. Select https:// or http:// depending on your site’s URL. Type something in the Stream Name box (this can be your site’s title again) and click Create Stream:
Get Your Measurement ID
After following the steps in the previous section, you will be presented with this screen that provides you with your Measurement ID.

Click the copy icon next to your Measurement ID to copy it to your clipboard.
If you already closed this screen, or need to find your Measurement ID again at a later time, follow these steps:
- In Google Analytics, go to Admin by clicking the gear
 icon in the lower-right corner of the main Google Analytics dashboard.
 - Under Property, click on Setup Assistant.
- Go to Tag installation.
- Click on the Web tab.
- Click on your site.
- Copy the Measurement ID that looks something like
G-A1B2C3D4E5.
Add your Measurement ID to your site
Now go to Jetpack → Settings → Traffic from your WordPress dashboard and scroll down to ‘Google Analytics’. Clicking on ‘Configure your Google Analytics settings’ will take you to the Traffic page in your WordPress.com dashboard, and from here you can scroll down to the Google Analytics section, and you can toggle on ‘Track your WordPress site statistics with Google Analytics’.

Paste the entire Measurement ID you copied from the Google Analytics site into the “Google Analytics Tracking ID” box. After you click Save Settings, your site will be connected to Google Analytics and start sending data to Google.
Enhanced Ecommerce Tracking support for Complete plan customers
Jetpack Complete plan customers using WooCommerce and needing some in-depth Google Analytics reports have access to enhanced E-commerce tracking, which gives you more in-depth insights into product page activity, shopping cart additions and removals, and purchase data.
- In Google Analytics, navigate to Admin and choose the account for which you want to enable Enhanced Ecommerce.
- Click Ecommerce Settings and toggle both Ecommerce Settings and Enhanced Ecommerce Settings to On.
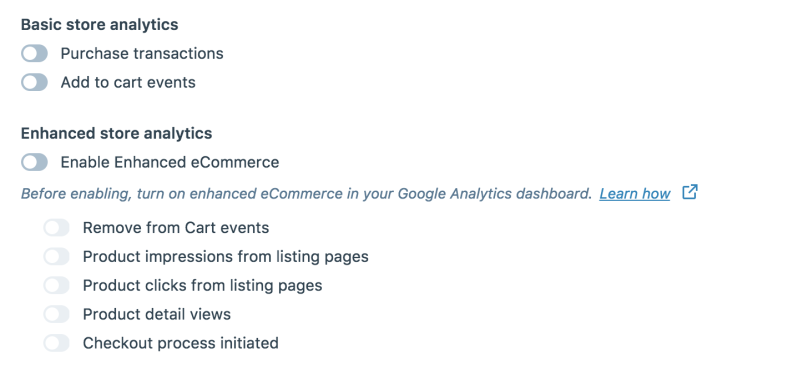
- Return to Jetpack and visit Settings → Traffic.
- Toggle the settings below the Google Analytics label on to track (or off not to track) features like add to cart events, product impressions, and the checkout process.
You can read more about enabling Enhanced Ecommerce Tracking, as well as learn about the benefits of this enhanced tracking.
Honoring DNT
Do Not Track (DNT) is a feature in web browsers and websites that asks advertisers and other web software providers to not track individuals’ browsing habits. If you’ve enabled Google Analytics using Jetpack, you can force Google Analytics to honor any visitors with DNT enabled and not track their activity (i.e. post and page views) by adding the following code snippet to your site:
add_filter( 'jetpack_honor_dnt_header_for_wga', '__return_true' );
Frequently Asked Questions
I connected to Google Analytics, but I’m not seeing visits reported. Is it working?
Most Google Analytics reports do not work in real time. Reports are normally delayed by at least a few hours. Use Real Time reports in Google Analytics to monitor activity on your site as it happens. The following Google help page will show you how to check whether your tracking code has been installed properly or not.
If you are not seeing visits reported after 24 to 48 hours, and you know you have had visitors based on your your Jetpack Stats, go back to your Google Analytics dashboard and check that your domain is spelled correctly, does not contain WWW, and matches your primary domain. If it meets all of those criteria, generate a new Tracking ID. Enter the new ID after visiting Jetpack → Settings → Traffic from your WordPress dashboard and scrolling down to ‘Google Analytics’, following the steps outlined above.
The data from Jetpack stats and Google Analytics doesn’t match. Is something broken?
Jetpack stats and Google Analytics use different methods to identify and track activity on your site. You can expect Google Analytics and Jetpack stats to always show slightly different totals for your visits, views, etc. However, you will be able to notice the same trends and patterns in both systems.
Where can I get support for using Google Analytics?
Google Analytics is a very popular website analytics service, and you can find plenty of information about it in books, workshops, blog posts, online forums and more. We suggest you start with Google’s help center for Analytics, and specifically the getting started guide. You can also check out the Analytics support forum, where you can interact with other Analytics users.
Still need help?
Please contact support directly. We’re happy to advise.
Privacy Information
Google Analytics is deactivated by default, and activating/unlocking it requires an upgrade to either the Security or Complete plan. It can be deactivated any time by clicking on the Configure your Google Analytics settings link in the Google Analytics section from Jetpack → Settings → Traffic in your dashboard. Once you’ve arrived on WordPress.com, toggle the Track your WordPress site statistics with Google Analytics setting in the Google Analytics section.
| Data Used | |
|---|---|
| Site Owners / Users
This feature uses the site owner’s Google Analytics tracking ID in order to integrate with the service.Additionally, for activity tracking (detailed below): IP address, WordPress.com user ID, WordPress.com username, WordPress.com-connected site ID and URL, Jetpack version, user agent, visiting URL, referring URL, timestamp of event, browser language, country code. |
Site Visitors
Please refer to the appropriate Google Analytics documentation for the specific type of data it collects. For sites running WooCommerce (also owned by Automattic) and this feature simultaneously and having all purchase tracking explicitly enabled, purchase events will send Google Analytics the following information: order number, product id and name, product category, total cost, and quantity of items purchased. Google Analytics does offer IP anonymization, which can be enabled by the site owner. |
| Activity Tracked | |
| Site Owners / Users
We track when, and by which user, the feature is activated and deactivated. We also track when, and which, configuration settings are modified. |
Site Visitors
This feature sends page view events over to Google Analytics for consumption. For sites running WooCommerce-powered stores, some additional events are also sent to Google Analytics: shopping cart additions and removals, product listing views and clicks, product detail views, and purchases. Tracking for each specific WooCommerce event needs to be enabled by the site owner. |
| Data Synced (Read More) | |
| Site Owners / Users
We sync options that identify whether or not the feature is activated and how its available settings are configured. We also sync the Google Analytics tracking ID that is configured with the feature. |
Site Visitors
None. |
