How to Anchor Furniture to Help Prevent Tip-Overs
Securing dressers and other large pieces takes only a few minutes—and might save a life
Tragic injuries and deaths from furniture tip-overs are a safety epidemic across the nation, but families can significantly reduce the risk by properly anchoring dressers, televisions, and other items to walls.
On average, more than 5,000 people are injured each year in the U.S. when dressers or other clothing storage units tip and fall on them, according to the Consumer Product Safety Commission. Nearly three-quarters of those injured are children. Include TV tip-overs and other furniture, and that number is even higher.
The CPSC reports that since 2000, 199 children have died from clothing storage furniture accidents. The good news is that the recently passed STURDY Act, long championed by CR, will likely save many young lives when it goes into effect this year. Among other things, the act calls for the CPSC to establish a mandatory rule for manufacturers to produce sturdier furniture, as well as for improved safety testing and stronger warning labels on furniture.
How Furniture Anchors Work
Furniture restraints, also called anchoring kits, are typically two brackets tethered by a strap or cable. One bracket screws directly into the piece of furniture; the other fastens into a stud in the wall. The connecting strap or cable is typically affixed to each bracket, then tightened.
Selecting an Anchor
Peter Kerin, founder and owner of Minneapolis-based Foresight Childproofing, recommends kits with straps made from nylon webbing or braided steel cable. Some manufacturers of children’s furniture include kits with their merchandise. But if the included tethers are not made of nylon webbing or steel cable, Kerin recommends purchasing your own kit with straps made of these materials.
But you should never delay installing an anchor. If you can buy an aftermarket anchor the same day you buy your new furniture, that’s ideal. If you can’t, you should install the furniture with the included anchor, then consider upgrading at a later date.
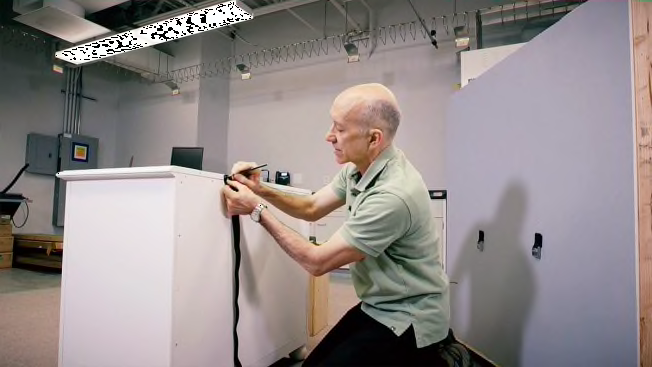
How to safely anchor furniture
CR's experts demonstrate how to properly install furniture anchors
Anchoring to Drywall
Most homes built after the 1960s have interior walls made of drywall over wood studs. If this describes your home, start by placing the furniture against the wall where you’d like it installed.
Use a stud finder to locate studs in the wall. In modern construction, they’re usually spaced 16 inches apart, and you should find one to the left or right of an electrical outlet or light switch. Once you’ve located a stud that aligns with the back of your furniture, mark the wall along the stud with a pencil and place an intersecting mark on the wall that indicates the height of the furniture. From this point measure vertically, according to the installation instructions, to determine the correct location for the wall bracket.
Next, install the wall-mounted portion of the anchor. We recommend using a wood screw that’s at least 2 inches long to ensure a strong connection. (Buy these screws yourself if your kit comes with shorter screws.) If you live in a newer commercial building like an apartment or condo with metal studs, the process is the same; simply use 1⅝-inch (fine thread) drywall screws instead of wood screws.
Align your furniture with the bracket on the wall. Refer to the instructions to determine the proper location for the furniture-mounted portion of your anchor. (See “Attaching Brackets to Furniture,” below, for full instructions.)
Never use a drywall anchor or toggle to anchor furniture. “It’s not like hanging a picture or mirror, where the force pulls straight down,” Kerin explains. “A furniture anchor needs to withstand any effort to pull the fixture straight out from the wall, and the best practice is to always attach to a stud in the wall.”
Anchoring to Plaster Walls
Studs are harder to find behind plaster walls; a traditional stud finder won’t always work. But a magnetic stud finder can detect the metal nails used to secure wood lath to studs. When you think you’ve located a stud, test the spot just above the baseboard by drilling into the wall with a small wood bit. If you feel resistance the entire time, you’ve hit a stud. If not, move to the left or right, 1 inch at a time, until you find one.
Don’t worry about the small holes you’ll leave behind; they can be easily patched with spackling—see “Patching Holes,” below, for full instructions—and concealed by the furniture once it’s in place.
Measure up along the stud where you’ll anchor your furniture, and use a properly sized wood bit to drill a pilot hole for securing the anchor. Proceed with installing the wall- and furniture-mounted portion of the anchor, as you would in a wall made of drywall.
Anchoring to Masonry Walls
Brick or concrete block walls are far less common than drywall or plaster walls, and they pose a unique challenge. Unless you’re extremely skilled and tool-savvy, Kerin advises hiring a professional who specializes in childproofing a home or a handyman to secure furniture to masonry.
If you want to attempt the job yourself, you’ll need a hammer drill with a suitable masonry bit and self-anchoring masonry screws. Always follow the included instructions.
We recommend masonry screws with hexagonal heads, which are driven into place with an impact driver or ratchet wrench, because those with Phillips heads are easily stripped. Typically, these hexagonal screws come with a properly sized masonry bit for drilling the pilot holes. When drilling into masonry, select a spot that sits squarely in the center of a brick or cinder block—not on the mortar between stones. If the bit slips or bores out the hole, start again. The self-anchoring screws won’t sufficiently grip a hole that’s too large. The screw should be tight as it turns. Proceed with installing the furniture-mounted portion of the anchor, as described below.
Attaching Brackets to Furniture
You want to go into solid wood whenever possible, and install the bracket as high as you can on the piece of furniture. It’s not essential that the bracket be centered on the furniture; securing it to a thick piece of wood, high up, is more important. Don’t attach the anchor to the thin back panel of the piece of furniture.
Simply align your piece with the wall-mounted bracket, mark the furniture at the spot where you’ll install the bracket, and pre-drill into the wood. Secure the bracket to your furniture with wood screws, and connect the wall-mounted bracket and furniture-mounted bracket with the included cable or strap. “Upon attaching a furniture restraint, confirm each screw is tight and secure by testing by hand using a screwdriver,” Kerin says. “Sometimes a cordless drill can give you a false positive, and the screw is not safely connected to either the furniture or wall.”
Patching Holes
Nobody wants to leave a lasting hole in the wall. And if you’re a renter, wall damage may mean forfeiting a portion of your security deposit when you leave. But patching holes and touching them up with paint is easy and straightforward.
For plaster or drywall, use a 1- to 2-inch putty knife to scrape away loose debris around the hole. Fill the hole with spackling paste or joint compound, and scrape it smooth to the wall with your putty knife. For larger holes, you might need a couple of coats. Let it dry, sand the spackled spot smooth with 180-grit sandpaper, and touch it up with matching paint.
For brick or masonry, vacuum loose or crumbling debris from the hole, then fill the spot with color-matched masonry hole filler. It’s the consistency of caulk but dries hard and comes blended in colors to correspond to common shades of brick and concrete.
The prospect of a hole in a wall should never prevent you from anchoring furniture.
Podcast: Hear Moms Tell Their Stories
Keeping Kids Safe From Furniture Tip-Overs
Danger might be lurking right in your home. On the "Consumer 101" TV show, host Jack Rico learns what consumers need to know about furniture tip-overs.