. -
The quote above by Winston Churchill about "the end of the beginning" was said in November 1942, and not about Operation Mercury. As all students of World War II know, the
- occurred much earlier, in May 1941. I am intentionally wrenching Churchill's well-remembered words completely out of context because, in many ways, Operation Mercury marked the true end of the "beginning" of World War II.
By that, I mean that the German invasion of British-held Crete was the last true victory of the Wehrmacht, the final link in the unbroken chain of conquests that had begun in the mid-1930s. In Crete, the Wehrmacht captured the final piece of significant ground that it retained to the very end of the conflict. Operation Barbarossa, the invasion of the Soviet Union, took place a month after Operation Mercury and marked the onset of the middle phase of the war. So, Operation Mercury, as sort of the final chapter of Volume 1 of World War II, is worthy of study, capping a remarkable period of German military conquest.
Let's take a step back for a moment and take in the broad strategic overview in May 1941. After conquering Poland in 1939 and France in 1940, the Wehrmacht for a variety of somewhat unwelcome reasons found it necessary to subdue Yugoslavia and Greece. These reasons included pro-British sentiment in those countries and, to be blunt, Italian military failures. The Luftwaffe's failure over England in the summer of 1940 had led to a "Mediterranean strategy," and, all else aside, Hitler felt it necessary to evict the British from the Continent.
As he confessed to Finland's Marshal Mannerheim a year later, Hitler was petrified of RAF attacks on his sources of oil in Romania, suffering nightmares in which the oil fields were "burning end to end." Thus, everything coalesced around an invasion of the Balkans, which Field Marshal Wilhelm List's 12th Army had completed in April 1941. However, Crete, which held major Royal Navy bases, remained unsubdued. It was this afterthought of Operation Marita, the invasion of Greece, to which the Wehrmacht turned in May 1941.
On 20 April 1941 - Hitler's birthday - the Wehrmacht's eviction of the British from mainland Greece was beginning to look like a certain. Lieutenant General Kurt Student, commander of the XI. Fliegerkorps (German Airborne troops), took the opportunity of the birthday festivities (Hitler's birthday always was a major event in the Third Reich) to approach Reichsmarschall Hermann Goering with a proposition: invade Crete using Student's airborne troops.
To date, Student's Fallschirmjäger (paratroopers) had had a mixed record. They had successfully completed the capture of the Belgian fortress of Eben Emael in May 1940, which some consider one of the top operations of the entire war, but had had great difficulties near Rotterdam (where Student had been shot in the head) and in Norway. Kurt Student thus was eager to prove the worth of his airborne troops (
, which include both parachutists and glider forces), so he pointed to the map of the Mediterranean at an objective not yet completely contemplated by the Oberkommando der Wehrmacht (OKW): the island of Crete.
Goering was interested in Student's proposal in part because he wanted to restore his own prestige. Goering's reputation had slipped somewhat following the lost Battle of Britain the previous autumn, and making Crete an exclusively Luftwaffe affair promised to restore him to favor. Goering quickly brought Student in to meet Hitler, who essentially rubberstamped the concept on the spot. The OKW and army high command (OKH) hadn't put much thought into what to do in Greece following the capture of Athens - they were preoccupied with planning for Operation Barbarossa - so Student was filling a sort of planning vacuum.
Hitler perhaps felt that an invasion of Crete would be a straightforward affair, and would be achieved cheaply because it would use experimental airborne troops he had no real use for in the Soviet Union campaign anyway. It also would keep the British busy and give General Erwin Rommel's Afrika Korps in Libya some flank support. Thus approved, Student's idea blossomed into Unternehmen Merkur - Operation Mercury.
Goering, following a pattern often displayed by Hitler, basically refused to decide the matter. Instead, he approved a compromise plan in which there would be a couple of morning drops around Canea and the airfield at Máleme, and two afternoon drops at the airfields at Heraklion and Rethymnon. Thus, the overall plan of Operation Mercury was for a dispersed invasion at multiple points as proposed by Student, but not quite as dispersed as Student would have liked. The early focus on Máleme airfield somewhat satisfied Lohr's concern that there be a definite focal point (
Schwerpunkt, a key component of so-called Blitzkrieg) for the invasion. Even if the invasion widened out later in the day, presumably the vital airfield would be secured by then as a source of supplies and reinforcements.
 |
| General Eugen Meindl, who played a key role in Operation Mercury. |
Goering's compromise was far from ideal, but it did at least give Operation Mercury multiple chances for success. Staff work assigned Generalleutnant W. Süssmann's 7th Flieger Division and Generalmajor Eugen Meindl's Luftlande Sturmregiment (Airborne Assault Regiment) the key morning drops. Meindl's troops would both parachute in and land in gliders near Máleme airfield, with Süssmann and his men landing in nearby Prison Valley in gliders. Later, the 1st Fallschirmjäger Regiment would arrive near Heráklion, while the 2nd Fallschirmjäger Regiment would land near Rethymnon. Experience at Rotterdam and elsewhere had shown that landing too far from an objective could be inefficient, so the drops were planned closer to the objectives than in previous operations. Later reinforcements by Generalmajor Julius Ringel's 5th Gebirgs Division and other units would follow by air and sea, but it was critical that the initial landings secure territory for their arrival.
Allied Dispositions on Crete
The Allies were in disarray on Crete following the shellacking they had taken on the mainland, but they had a number of tactical advantages. For one, they had a huge number of troops on the island: an estimated 32,000 Commonwealth (primarily Australian and New Zealand) and 10,000 Greek men. The Royal Navy also had a huge presence at Crete's ports, which they had built up for support of operations on the mainland.
 |
| Major General Bernard Freyberg (right) led a massive jumble of refugees from the mainland and hastily assembled supernumeraries from General Archibald Wavell's Middle East Command on Crete. |
In overall command was New Zealand Major General Bernard C. Freyberg, in place as much for political reasons and favoritism by Churchill as for his military prowess. Freyberg - an extremely competent general, to be sure, who later commanded with distinction in Italy - assumed command in Crete on 30 April and found a disorganized mess on the island.
 |
| Even the top-secret Enigma decrypts from Bletchley Park were not enough to win the Battle of Crete for the British. |
The Allies' second tactical advantage was more subtle, but also more significant. The British, with Polish assistance, had been reading some German military codes for some time under code name Enigma. The scientists at Bletchley Park had found in particular that the Luftwaffe, the Wehrmacht's newest service, had the worst security practices in terms of codes. While the German naval codes (Kriegsmarine) were kept very secure, the Luftwaffe operators would blithely send the same messages day after day, making occasional changes in the codes they used relatively easy to decipher. So, while very few people were allowed to know where the information was coming from for security purposes (which did not include Freyberg), the British knew German dispositions almost as fast as their local commanders did. Since the entire advantage of Fallschirmjäger was surprise and placement, an enemy who knew when and where they would arrive was sure to create a disaster for somebody - most likely the arriving Fallschirmjäger.
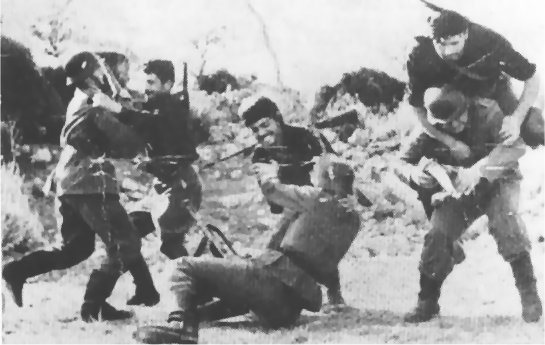 |
| This photograph reportedly shows local Cretans (partisans) attacking Fallschirmjägern during Operation Mercury. To this day, Cretans harbor ill will toward Germans for events during the long occupation. |
The Allies did not have to rely just on Enigma. The Wehrmacht committed also committed some security breaches aside from their insecure wireless communications. One such incident involved a Bf 110 twin-engine fighter which crashed in Suda Bay, Crete and was found to contain plans for Operation Mercury. This obviously resulted from a breach of standing security regulation but was just one of many such breaches by the Wehrmacht during the war on both the Eastern and Western Fronts. Freyberg, apparently confused as to the reliability of all this intelligence both from the Bf 110 crash and Enigma (the source of which was described to him as a spy in Athens), took it with a grain of salt. He concluded that it was all a massive trick and the main German landing would come by sea, as he had always expected. So, instead of concentrating his men in potential German drop zones, Freyberg strung many units out along the coast defending empty beaches. Still, despite these mistakes, there is no question that the Allied intelligence services greatly aided the defense despite the fact that it was not fully capitalized on.
The Battle for Crete
The Germans initiated Operation Mercury in the early morning hours of 20 May 1941. The timing turned out to be exceptionally fortunate in one often overlooked regard: the Kriegsmarine battleship Bismarck was occupying much of the Royal Navy at the time. While many disregard the effect of this coincidental timing, it most likely prevented the British from reinforcing their naval forces around Crete with Force H from Gibraltar.
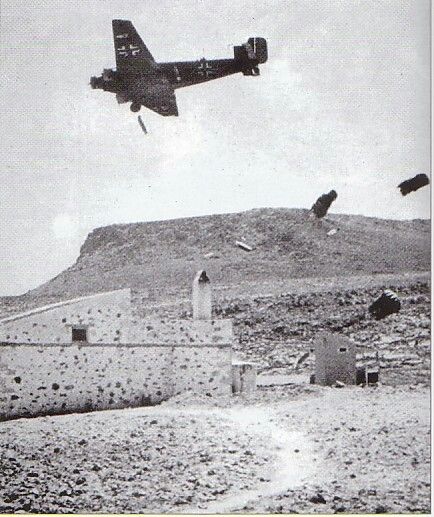
Junkers Ju 52 transport planes based at Corinth, Megara and Tanagra took off before dawn on the 20th, carrying the troops for bound for Canea and the airfield at Máleme. Fliegerkorps VII pitched in with attacks on Crete. However, as usually happens in operations, things began to go wrong. For one, the dusty airfields in Greece slowed down the transports bound for Crete. For another, General Süssmann's glider crashed at Aegina on the way to Crete, killing him. Also, some of the Fallschirmjäger landed in the middle of Allied formations (the New Zealand 21st and 23rd Battalions) and took massive casualties. Still, all in all, the initial landings around Máleme went fairly well, and the initial Fallschirmjäger landings secured a perimeter near the airfield and captured a key bridge over the Tavronitis river. General Meindl, who survived his trip and parachute jump near the Platanias Bridge, ordered his men to take a nearby hill, known as Hill 107, which overlooked the field and was considered the key to its possession.
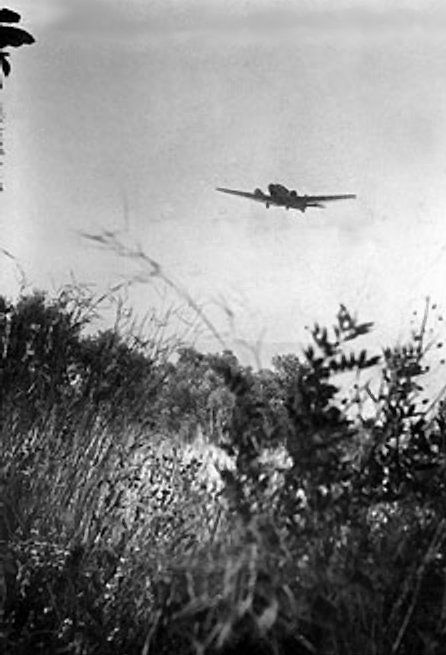 |
| A Junkers Ju 52 transport comes in low and slow over Crete, 20 May 1941. |
At Canea, the other morning drop location, things did not go quite as well for the Fallschirmjäger troops. The Greek (8th Regiment) and New Zealand (4th and 10th Brigades) in the area were quick on the mark and wreaked havoc on the arriving Germans. The Fallschirmjägern did capture the village of Agia and set up a command post there. However, after these initial local successes, neither the landing force at Canea nor the one at Máleme made any further progress on the 20th.
 |
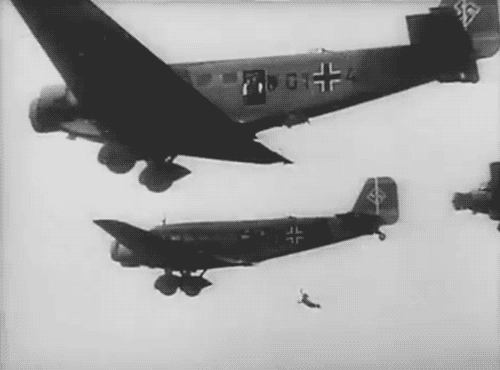
| The chaotic scene over Crete during Operation Mercury. |
General Student, in control of the operation, was sitting safely in the King George Hotel back in Athens. He assumed - wrongly - from a lack of contrary information that everything was going according to plan on Crete. He, therefore, ordered the second wave of planes to take off to secure the secondary objectives in other locations on Crete. Once again, dust on the mainland Greek airfields slowed departures, which further dispersed the effort. The 2nd Fallschirmjäger Regiment dropped near Australian (19th Brigade) and Greek (5th Regiment) formations, but managed to head toward their objective of Rethymnon anyway - where they were stopped cold by the local inhabitants of the town firing with muskets and police weapons. Some German units approached the Rethymnon airfield but were unable to take it in the face of determined Australian (2/1 Battalion) resistance. At Heráklion, the Fallschirmjäger (2nd Regiment) dropped right in the middle of the British and Australian troops and took horrendous casualties. Some troops managed to make it to the harbor there, but Brigadier Chappell, in local command there, managed to drive them out.
 |
| A Junkers Ju 52 dropping supplies on Crete. Until an airfield was secured, this was the only means of sustaining the German invasion. |
As the sun went down on the 20th, the Fallschirmjägern were bunched up in essentially four different pockets which were not mutually supporting and which had few means of resupply or reinforcement. General Freyberg had a massive superiority in men and especially armored vehicles and had plenty of opportunities to crush each pocket in turn or even at the same time. Here, however, one of the key advantages of using paratroopers came into play: sheer confusion. With no single point of attacks such as a beach or a harbor, the Germans were appearing seemingly everywhere at random, popping up like weeds hither and yon. Freyberg did not know where the next paratrooper drop would occur. In addition, the Germans had silenced many of Freyberg's antiaircraft batteries. So, Freyberg basically took no decisive action and allowed the Germans to retain the initiative - such that it was.
 |
| Many brave airmen gave their lives over Crete during Operation Mercury. |
At first light on the morning of the 21st, General Student decided to gamble. He heard that the Fallschirmjäger at Máleme had secured a small portion of the airfield, so he sent a Junkers Ju 52 there. It landed successfully - much to the relief of Student's staff officer, a Hauptmann Kleye, onboard - and this encouraged Student to send more aircraft. By 08:00, half a dozen Junkers managed to land, bringing the Fallschirmjägern supplies. More planes followed, and Oberst Bernhard Ramcke replaced Meindl (who had been badly wounded and was evacuated). Kurt Student dropped more Fallschirmjägern to the west and east of the airfield, some of whom managed to make it to the airfield and reinforce the badly strained men who had arrived the day before.
 |
| Máleme Airfield after the battle for Crete. If you think planes shouldn't be parked like that in such a jumble... you are absolutely correct. The planes got down under fire any which way they could, often spinning around in the dirt and on fire. The men got off them as quickly as they could and never looked back. |
At this point, Freyberg still could have eliminated the German pockets. He had plenty of men and equipment, and the Fallschirmjägern could hardly squeeze enough supplies onto a few Junkers transports to keep all the men on the ground supplied. However, Freyberg decided to withdraw from Hill 107 and regroup. Ramcke's men attacked Hill 107 around midday and found it abandoned. Freyberg eventually counterattacked with two Australian battalions - hardly a massive response. The Australians made progress and got to the edge of the Máleme airfield again, but the Germans were literally fighting for their lives and stopped them there. Some local counterattacks by New Zealand troops under the command of Lt. Colonel L.W. Andrew also failed. Andrew, in command of local forces, then withdrew as well. The Germans quickly moved in and secured the absolutely critical airfield which, in hindsight, decided the entire campaign.
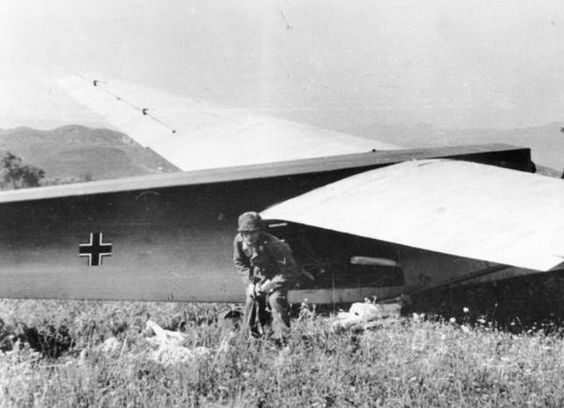 |
| Many Fallschirmjägern in the first wave came in on DFS 230 gliders. |
The original plan for Operation Mercury called for a massive (relatively speaking) seaborne follow-up by the 5th Gebirgs Division. The German convoy duly put to sea, but the Royal Navy, which did not have Freyberg's qualms about the validity of the intelligence intercepts, was waiting. The British sank virtually the entire first German convoy, with only about 100 men reaching Crete and 250 plucked out of the water by the British. A second convoy beat a hasty retreat, aided by the Luftwaffe, which essentially had control of local airspace from its airfields on the mainland and Italian-held islands in the Aegean. The Luftwaffe kept up its pressure throughout the day of the 21st and sank two cruisers and four destroyers while causing damage to three other ships. Despite the Royal Navy's success at beating off the German convoys, it was a terrible battle for the British at sea.
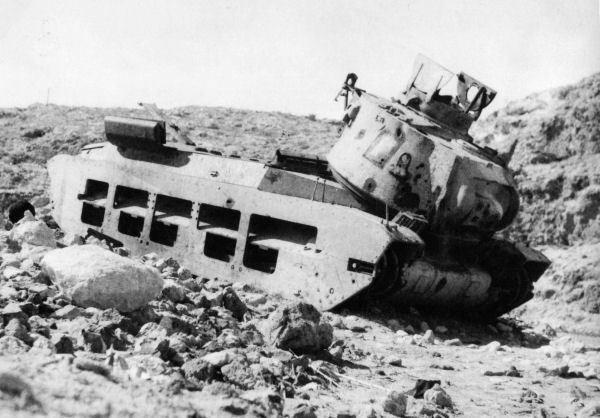 |
| A destroyed British Matilda tank on Crete after Operation Mercury. The British did not have many tanks... but the invading Germans had none. |
General Freyberg now realized his mistake at pulling back his troops to regroup. After dark on the 21st, he mounted a night attack under the command of Brigadier Edward Puttick. The counteroffensive, however, was confused and disorganized, with the Australian forces arriving late and much of the action taking place after daylight when the Luftwaffe could intervene. The German holdouts in various pockets around the drop zones also interfered with the Commonwealth operations. Meanwhile, General Student sent everything he had to Máleme airfield despite horrendous losses from anti-aircraft and RAF defenses. Freyberg was forced to pull his forces at Máleme back even further. German reinforcements of the 5th Gebirgs Division under Generalmajor Julius Ringel took over from the Fallschirmjägern, and they began to gain ground along the coast.
 |
| Ultimately, victory in Operation Mercury relied upon hundreds of sorties by Junkers Ju 52 transport aircraft which got the job done - at a heavy cost to themselves. |
After this, the Germans steadily increased their hold on Máleme, a position that essentially went unchallenged after the 21st. However, General Freyberg still had tens of thousands of soldiers at his disposal and the only tanks on the island. The Germans sluiced in some heavy equipment, including heavy artillery, and the battle began to take a more typical course. Aided by the Luftwaffe, the Germans under General Ringel reached Galatas, which changed hands a couple of times but ultimately fell to the Germans. This opened the way to Canea. This attack occupied the Germans for the next couple of days, but Freyberg now realized that his position on Crete was hopeless. On 27 May, Freyberg and his superiors decided to evacuate Crete by sea from points on the south coast.
 |
| As the days went on during Operation Mercury, the Germans were able to bring in some light artillery by air. |
Operations continued after this, but they were mainly blocking operations by the Commonwealth troops to secure their withdrawal to the south. Still, it was tough fighting for ten days. The Germans battled the New Zealanders at the village of Stilos and captured a key bridge near Kalami. This enabled further German operations to the east of Crete, and the New Zealanders ultimately broke contact and headed south with the general retreat. Scattered actions then continued along the north coast, with the Germans relieving the forces near Heráklion and occupying the port on the 29th. After that, the Germans focused on Rethymnon and forced the 700 defending Allied troops - who had never been ordered to withdraw south with the others - to surrender.
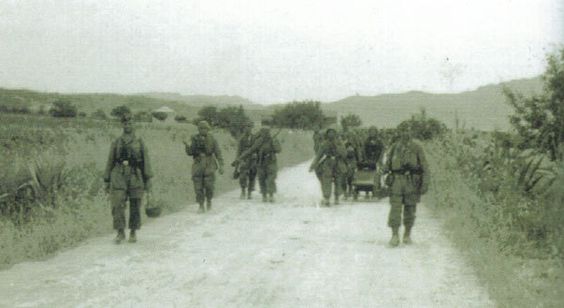 |
| After the initial fighting, Crete involved a lot of walking down dusty roads. These are Fallschirmjager of 13./FjSR 3. |
The Allies who were retreating converged on Sphakia on the south coast of Crete. The Germans, basically in control of the entire north coast now, headed south on the 29th. The Commonwealth troops put up a fierce rearguard battle, however, slowing the Germans down. The Allies managed to extract about 14,500 men by sea and air, with General Freyberg leaving by flying boat on the 30th. All other Allied troops on Crete were ordered to surrender as of 09:00 on 1 June 1941.
Conclusion
There is absolutely no question that the Germans won the battle for Crete despite sustained Allied propaganda that has implied down to the present day that it was a "Pyrrhic victory" of some sort. Look, a victory such as Operation Mercury is a victory. However, the victory in Crete did come at the high cost of 3600 dead and missing Wehrmacht men and about another 1900 wounded out of a total of 22,000 troops ultimately committed to Crete. In addition, the Luftwaffe lost about a third of the Junkers transports it committed to the battle, either by being badly damaged or destroyed. The airfields on Crete were littered with shot-up planes from Operation Mercury for years. However, by retaining possession of the battlefield, the Germans could retrieve and repair some equipment and scavenge the rest, so the losses were not quite as bad as might first appear.
 |
| Oberst Bernhard-Hermann Ramcke awarding the Iron Cross 1st Class at Maleme, Crete soon after Operation Mercury (Baier, Federal Archive). |
The Allies, for their part, lost 1700 killed, 1800 wounded, and almost 12,000 men taken prisoner. The Royal Navy suffered damage to an aircraft carrier, two battleships, six cruisers and seven destroyers in addition to their losses of three cruisers and seven destroyers sunk. In total, the Royal Navy lost over 2,000 sailors in the waters around Crete. The RAF, for its part, lost 47 aircraft, a not inconsiderable number. It must be said that, overall, the Commonwealth troops came out much the worse during Operation Mercury despite the common view that the Germans did.
 |
| Oberst Bernhard-Hermann Ramcke decorating some of his men (identified as Oblt. Gerhard Schacht next to Oberst Walter Bräuer) in Crete (Franz Peter Weisler, Federal Archive). |
Adolf Hitler never had much faith in his Fallschirmjägern, and Crete reinforced his view that they were rather expensive toys that broke easily. He forbade further use of Fallschirmjägern in the role of conquering enemy positions by airdrop. However, the Fallschirmjägern remained in existence and continued to recruit and be used after this in a variety of important roles (including in Russia and on Sicily). In fact, in the view of some, the Fallschirmjägern became the cream of the Wehrmacht's military after Crete. Without Operation Mercury, the Fallschirmjägern could have been put to good use in some later prospective operations such as the seizure of Malta, and some (such as Field Marshal Albert Kesselring) would have preferred that they were used on Malta and not Crete.
 |
| Hitler in 1941. In a sense, Operation Mercury was the apex of Hitler's military success. |
However, while it is easy now to fault everything that he did, Hitler apparently made the right decision to forbid further use of Fallschirmjägern on offensive operations, even though he did so for debatable reasons. This is because the British code-reading Enigma Operation almost assured that the German paratroopers would receive a hot reception from defenders from this point forward - the element of surprise, the chief advantage of Fallschirmjägern, was gone. The Allies, for their part, retained their faith in paratroopers, but this was shaken by tremendous losses in their own later paratrooper operations such as at the Arnhem bridgehead in September 1944.
 |
| Wolfgang Graf von Blücher (31 January 1917 – 21 May 1941), who perished during Operation Mercury. Wolfgang was one of three brothers killed during the fighting to secure Crete. |
To sum up, Crete was an expensive victory for the Germans, but a victory it was, and it stood them in good stead for the remainder of the war. While a very close-run affair, Crete capped Hitler's string of victories that had begun in the mid-1930s. While the Axis was unable to make good offensive use of the Cretan ports due to Italian naval timidity, their ultimate value to the Germans lay in denying them to the Royal Navy. The occupation of Crete arguably delayed the British counteroffensive until late 1944, protected the Romanian oilfields and facilitated some minor German successes in the Aegean through late 1943. Basically, the occupation of Crete protected the flank of southeastern Europe from Allied incursion. There are many who argue that Crete was a worthless objective and not worth the cost of occupation - and the Germans did maintain an excessive garrison on the island throughout the war - but Crete remained a strong German outpost until the final surrender in May 1945.


