


Powersliding is one of the coolest and most important moves you’ll learn on your longboard. To me, learning how to powerslide has been a major goal from the start, even though I must admit it looked quite scary for a beginner.
Why is knowing how to powerslide so important ? Besides looking cool, it’s a fundamental technique for slowing down and stopping on your longboard. Powersliding is at the heart of the freeride and downhill longboarding disciplines. But it’s also extremely useful if you’re just cruising or commuting through traffic.
Powersliding means pushing your board 90 degrees across the road so your wheels are no longer spinning and start skidding. The friction makes you lose speed very quickly, an effective way to slow down or stop.
The basic steps involved when learning how to do a heelside standup powerslide are the following:
- Start by getting a little speed on flat ground or on a small slope
- Make a slight toeside pre-turn by pressing on your front rail
- Then initiate a sharp heelside turn with your weight down low
- As you’re turning, push your board out with your back foot to take it 90º across
- At the same time, straighten your legs out, swing your shoulders, lean backward, and skid
- To end the slide, release the pressure on your back foot and sink your weight in the front
At first, powersliding looks intimidating, particularly if you’re not a fearless teenager / twenty something, or a long time snowboarder. However, it’s a highly technical move that you can practice and learn in a progressive and safe way.
Let’s dig deeper into learning the powerslide technique.
Types of powerslides


There are actually a lot of different types of powerslide, including :
- Heelside slides (facing downhill)
- Toeside slides (facing uphill)
- Stand up slides (remain standing while sliding)
- 180 slides (end the slide in switch stance)
- Coleman / glove down slides (put one or two hands down on the ground)
- Pendulum slides (hands on ground, swing board around hands while sliding)
- Sitdown slides (crouching low on your board)
- Speed checks (partial slide for slowing down)
And many more.
These are not clearcut, distinct techniques, most powerslides are a combination of these. For example, doing a toeside Coleman slide means sliding while facing uphill and putting your (gloved) hand on the ground.
Some powerslides are harder to master than other. For example, heelside slides are generally easier than toeside since you’re facing forward (downhill) and pushing on your heels (vs your toes).
Some riders find sitdown slides easier to start with since you’re crouching low on your longboard, making thee move a bit less scary. I personally think stand up slides are easier to begin with, particularly for older riders.
Some people also find 180 slides easier to learn than basic slides as they involve complete shoulder and hip rotation, ending up in switch (reverse) stance – as opposed to getting back to your initial position after the slide.
Again that’s debatable, but I personally find it easier for a beginner to start with a simple non-180 slide. In the rest of this post, we focus on the basic heelside stand up powerslide. As we’ll see though, the technique for some other types of slides are similar.
Sliding terrain
A good place to start is on a flat area that has a pathway with a bit of a hill coming into it. You can start off about 15 feet uphill and push into the hill, preparing to slide as you get into the flat area.
Wet ground also makes it easier to get into a powerslide, because your wheels break traction faster as you push your board across. Experienced longboarders often suggest to learn on wet pavement since you’ll be able to slide with less speed – just be aware your bearings can get damaged from being wet.
Powerslide : first get some speed
Let’s look at how to prepare before sliding. First, you’re going to need some decent speed – sliding is much easier the more speed you have, because your wheels will break out and lose traction more easily (wheel choice is important too, keep reading).
So starting on a steep enough hill is a good idea. As mentioned, if you’re on wet ground you’ll need less speed to slide.
Powerslide : toeside pre-carve
As you’re starting off and getting speed, press with your toes and lean your body forward to initiate a quick toeside turn. A good pre-carve is crucial to breaking traction during the next turn.


If you’re a regular footer, a toeside turn means you’re moving toward the right side of the road – left side if you’re goofy.
While you do the pre-carve turn, begin setting up for your upcoming slide : place your feet at roughly equal distance from the trucks, positioned symmetrically at a slight angle. Keeping your feet closer to each other can make your slide more stable.
Make sure you’re relaxed, with your knees bent to keep your center of gravity low.
Powerslide : heelside carve
Once you’re close to the side of the road, you’re ready to turn again and start carving into the slide. Press with the heel of your front foot to initiate a quick 45º backside turn – 45º works best before trying to slide.

Place your heels slightly over the edge of your board for leverage, and bend your knees to get low on your board. It is important to lower your center of gravity because sliding requires a compression – decompression move : you crouch (compress) right before the slide, then pop up (decompress) into the slide.
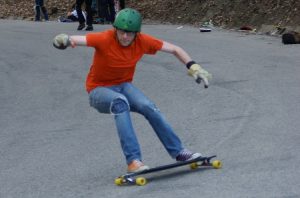
The actual slide
So now you’re into the heelside carve and ready to push your board across. After you’ve turned 15 to 30º heelside, you need to do several things at the same time :
- Bend your front knee and put most of your weight over it
- Dig your back heel into the rail to kick out the back truck forward, extend your back leg out
- At the same time, swing your back hips to help pushing and turning
- Lift your arms up and lean back to deweight the board, helping it lose traction
- Continue to push your board away from you with both legs into the hill


You should still have your front knee slightly bent for control, and your back leg extended out. Both legs, however, are pointing into the hill and pushing away from you.
Hold that slide stance for as long as you can while your board skids. You’re facing the hill with your board sliding perpendicular to it. Your arms are up, your heels are slightly off the rail, pressing hard into it to keep the wheels from catching.


You’re leaning back to keep your weight as much off the board as possible, balancing with your torso. Don’t lean forward because you will stop pushing out and your wheels will catch. Just use your torso to adjust your balance back and forth.
Ending the slide
After a few seconds of sliding facing down the hill in a balanced, backward leaning position, you need to get back into normal stance and resume riding.
Remember, at this point you’re still drifting across the road, pushing out evenly on both legs, with your weight uphill.
Now, you bend your knees again and shift your weight back into your front foot, releasing the pressure on your back foot, leaning slightly forward.


As you sink your weight back into your board, you pull your back foot in to bring the board back under you, swinging your torso back into its initial position as your board starts rolling again. You bring your elbows back to your sides.
The following 33 seconds of video provide a great a great recap of how to do the powerslide – although the rider is actually performing a 180 slide, except for the end switch the technique is similar to a normal stand up slide :
Tips and common mistakes
Having trouble learning how to do a powerslide on your longboard ? Check out these common mistakes :
- Are you merely pivoting on your front truck with your back wheels coming off the ground, instead of really sliding out the board ? Don’t put so much weight in the front so as to tip your board.
- Are you doing a good heelside carve before kicking out ? Or are you just kicking out your board with your back foot while riding straight ?
- Are you putting your weight on your front foot before sliding ? If your weight is on your back foot, you won’t be able to kick out and slide.
- Once you kick out and start sliding, are you leaning back enough ? Or are you leaning forward too much, causing your wheels to catch ? Leaning back is hard because it requires trust and commitment – do remember to lean forward at the end of the slide to avoid falling backward.
- More advanced : do you have flatspots ? i.e. flat areas in your wheels from repeated sliding at 90º. To avoid these and make your wheels last longer, after mastering basic sliding, try to slide at an angle (not fully perpendicular) to get a more even wear pattern.
Equipment
Although you can learn to powerslide on pretty much any kind of longboard, some boards, trucks and wheels make it easier to slide.
Smaller, sideset wheels with a small compact patch make it much easier to learn how to initiate a slide. Note : “sideset” means the core (hard part) of the wheel is placed on the edge of the wheel closest to the board.


While harder wheels are easier to slide, you can learn on wheels with durometer anywhere from 78A (for a smooth surface) up. It’s also harder to learn sliding on wheels that are not broken in, so you’ll need to wear them out a bit before sliding on them gets easier.
Examples of wheels commonly used for learning to slide include Orangatang Kilmer 86a and Sector 9 ButterBalls.
You can use any kind of trucks, but learning to powerslide will be easier with very turny trucks such as the Gullwing Sidewinder.
A flexy deck will also help you learn sliding at low speed, even though you may need a stiffer board if you later start sliding at higher speeds.
Longboards with higher center of gravity, such as symmetrical topmounts and pintails, are easier to slide because they give you more torque over the wheels, so you need to carve less to get into a slide.
Pintails, however, are not ideal if you’re a beginner learning to slide, because they typically have no concave, so your back foot may fly off the tail when you push out (unless you add some very strong grip tape). You’ll be better off starting with a board with more concave for secure foot placement.
See also: Do You Need Risers On Your Longboard?
Other powerslides
So we’ve looked at the technical steps involved in performing a basic stand up heelside powerslide. As mentioned earlier there are many types of powerslides, some of which require significant additional steps and technical moves.
However, two other common beginner slides are very similar to the one we’ve learned : the speed check and the 180 powerslide.
Speed check
The speed check is a more tamed version of our stand up slide, but with your shoulders remaining aimed downhill.
So instead of fully swinging your torso and shoulders into facing downhill, you keep your shoulders back, and your front shoulder facing the hill just like when normal riding.
When you push your board out for sliding, only your hips rotate for a brief moment, they swing back into riding position. Your shoulders don’t rotate much.
The purpose of a speed check is to perform a brief slide to control speed, then resume riding.
180 stand up slide
This one is a “fuller” version of our basic stand up slide, in the sense that you complete a full 180º body rotation to end up in switch (reverse) stance after the slide.
The steps are the same as described above, but the swinging motion is broader and the exit step different. You rotate through the slide in one fluid shoulder rotation motion. After finishing sliding, you follow through with your shoulders and hips instead of bringing them back to their initial position.
As a result, you end up riding switch, with your opposite foot in front after the slide.
Wrapping up
Learning to powerslide, while intimidating at first, is a game of patience and skill building. While you may initially feel it’s about “sheer guts”, it’s actually a highly technical skill that requires mastering sequences of balanced positions and transitions in a fluid way.
Once you master basic powersliding, the sky will be the limit as you’ll start getting better in terms of slide complexity, speed, and longboard specs. As a beginner, this will open new frontiers in your longboarding, including the awesome disciplines of freeriding and downhill.
“Spider Hands” (CC BY 2.0) by PeterYSKim (featured photo)
“Spring Rolling Slide” (CC BY 2.0) by PeterYSKim
“beaheaded” (CC BY-ND 2.0) by jdrephotography
“DSC05290” (CC BY 2.0) by Rob Cruickshank
“longboard 114” (CC BY 2.0) by S Pallavicini
“_DSC4827” (CC BY 2.0) by Sandra Punct
“_DSC4824” (CC BY 2.0) by Sandra Punct
“Longboard wheels” (CC BY 2.0) by 99 Factory
Video by Anton Zvyagintsev / CC BY-NC-ND 4.0

