Heading out the door? Read this article on the new Outside+ app available now on iOS devices for members! Download the app.
Grouped among the so-called baby backbends, which includes Dhanurasana (Bow Pose) and Sea Monster Pose (described in the Variations section below), Salabhasana (Locust Pose) is an unassuming posture that is more interesting and challenging than it appears at first glance.
Salabhasana takes some back and abdominal strength, plus mental fortitude to hold the pose. Focus on lengthening your spine and distributing the backbend evenly through your upper, middle, and lower back. No crunching that lumbar area! Engaging all of your back muscles instead of just those in your lower back will help open your chest and shoulders. Building up strength and stretching your chest not only feel good to those of us that spend most of our days hunched over our computers, but will also result in better posture.
Section dividerSanskrit
Salabhasana (sha-la-BAHS-anna)
salabha = locust
Section dividerLocust Pose Basics
Pose type: Backbend
Target area: Upper Body
Benefits: Locust Pose improves posture and counteracts the effects of prolonged sitting. It may help relieve lower back pain and can counteract slouching and kyphosis (abnormal curvature of the spine).
Other Locust Pose perks:
- Strengthens your back muscles, especially the muscles supporting your spine and also strengthens your buttocks (glutes) and backs of thighs (hamstrings)
- Slightly strengthens around your shoulders and upper back
How to
- Begin on your belly with your feet together and your hands reaching back, palms down.
- Extend your big toes straight back and press down with all ten toenails to activate your quadriceps.
- Rotate your inner thighs to the ceiling to broaden your lower back.
- Keeping your hands lightly on the mat, raise your head and chest and your legs, leading with your inner thighs.
- Roll your shoulders back and up away from the floor. Keep the back of your neck long and emphasize lifting your sternum instead of lifting your chin. Don’t grip your glutes.
- To come out of the pose, slowly release.
Beginner tip
- Beginners sometimes have difficulty sustaining the lift of the torso and legs in this pose. Begin the pose with your hands resting on the floor, a little bit back from the shoulders, closer to your waist. Inhale and gently push your hands against the floor to help lift the upper torso. Then, keep the hands in place as you do the pose, or after a few breaths, once you’ve established the lift of the chest, swing them back into the position described above in step 3.
Explore the pose
You can do this pose with the legs lifted alternately off the floor. For example, if you want to hold the pose for a total of 1 minute, first lift the right leg off the floor for 30 seconds, then the left leg for 30 seconds.
Be mindful!
Avoid or modify this pose if you have a headache or back injury. If you have a neck injury, keep your head in a neutral position by looking down at the floor or by supporting your forehead on a thickly folded blanket.
Deepen the pose
- Advanced students can challenge themselves with a variation of Salabhasana. Instead of stretching the legs straight back from the pelvis, bend the knees and position the shins perpendicular to the floor. As you lift the upper torso, head and arms, lift the knees as far away from the floor as possible.
Teacher tips
These tips will help protect your students from injury and help them have the best experience of the pose:
- If you focus your attention on how high you go, you may feel strain in your lower back. Instead, you want to distribute the backbend throughout your upper, middle, and lower back, which requires you to open the chest.
- Don’t bend your knees. This will compromise the action of your legs and add pressure to your lower back by distributing too much weight to your lower vertebrae.
Variations
Half Locust Pose, upper body
Try just lifting your upper body to prepare and focus on your upper back muscles. You can bring your hands behind you and optionally interlace them. Alternatively, you can simply reach your hands back without interlacing.
Half Locust Pose, both legs
Lift only your lower body to prepare and isolate your lower back, buttocks, and thigh muscles.
Tuck your arms and hands close to and slightly under your body. You can put your chin or forehead on the floor or stack your hands under your forehead. Lift both legs. Hold for several breaths; lower slowly.
Half Locust Pose, one leg lifted
Lifting one leg at a time isolates your lower back, buttocks, and thigh muscles.
Tuck your arms and hands close to and slightly under your body. Put your chin or forehead on the floor or stack your hands under your forehead. Lift one leg at a time. Hold for several breaths on each side; lower slowly. Repeat approximately 10 times or as many as you can do comfortably.
Section dividerWhy we love this pose
“l treasure my rotator cuffs, and this pose always presented a challenge for me until I used Chaturanga Dandasana as a base,” says Sarah LaVigne, Yoga Journal‘s contributing photo editor. “Locust always comes closer to the end my practice, so setting up in a familiar pose helps. I no longer look like a pretzel while getting into the pose, and my shoulders thank me!”
Section dividerPreparatory and counter poses
Locust Pose isn’t as intense a backbend as some other poses, but it can still be quite challenging given the demand it places on the body. Prepare yourself with stretches for the low back, hip flexors, and quadriceps.
Preparatory poses
Urdhva Mukha Svanasana (Upward-Facing Dog Pose)
Virabhadrasana I (Warrior I Pose)
Setu Bandha Sarvangasana (Bridge Pose)
Supta Virasana (Reclining Hero Pose)
Counter poses
Section dividerAnatomy
At first glance, Salabhasana appears to be an easy pose. But it’s not. It requires significant flexibility and muscular effort to perform, explains Ray Long, MD, a board-certified orthopedic surgeon and yoga instructor.
Salabhasana strengthens the muscles that arch the back, including the erector spinae along the length of the spine, the quadratus lumborum in the lower back, the lower trapezius spanning the upper back, the gluteus maximus, and the hamstrings.
In the drawings below, pink muscles are stretching and blue muscles are contracting. The shade of the color represents the force of the stretch and the force of contraction. Darker = stronger.
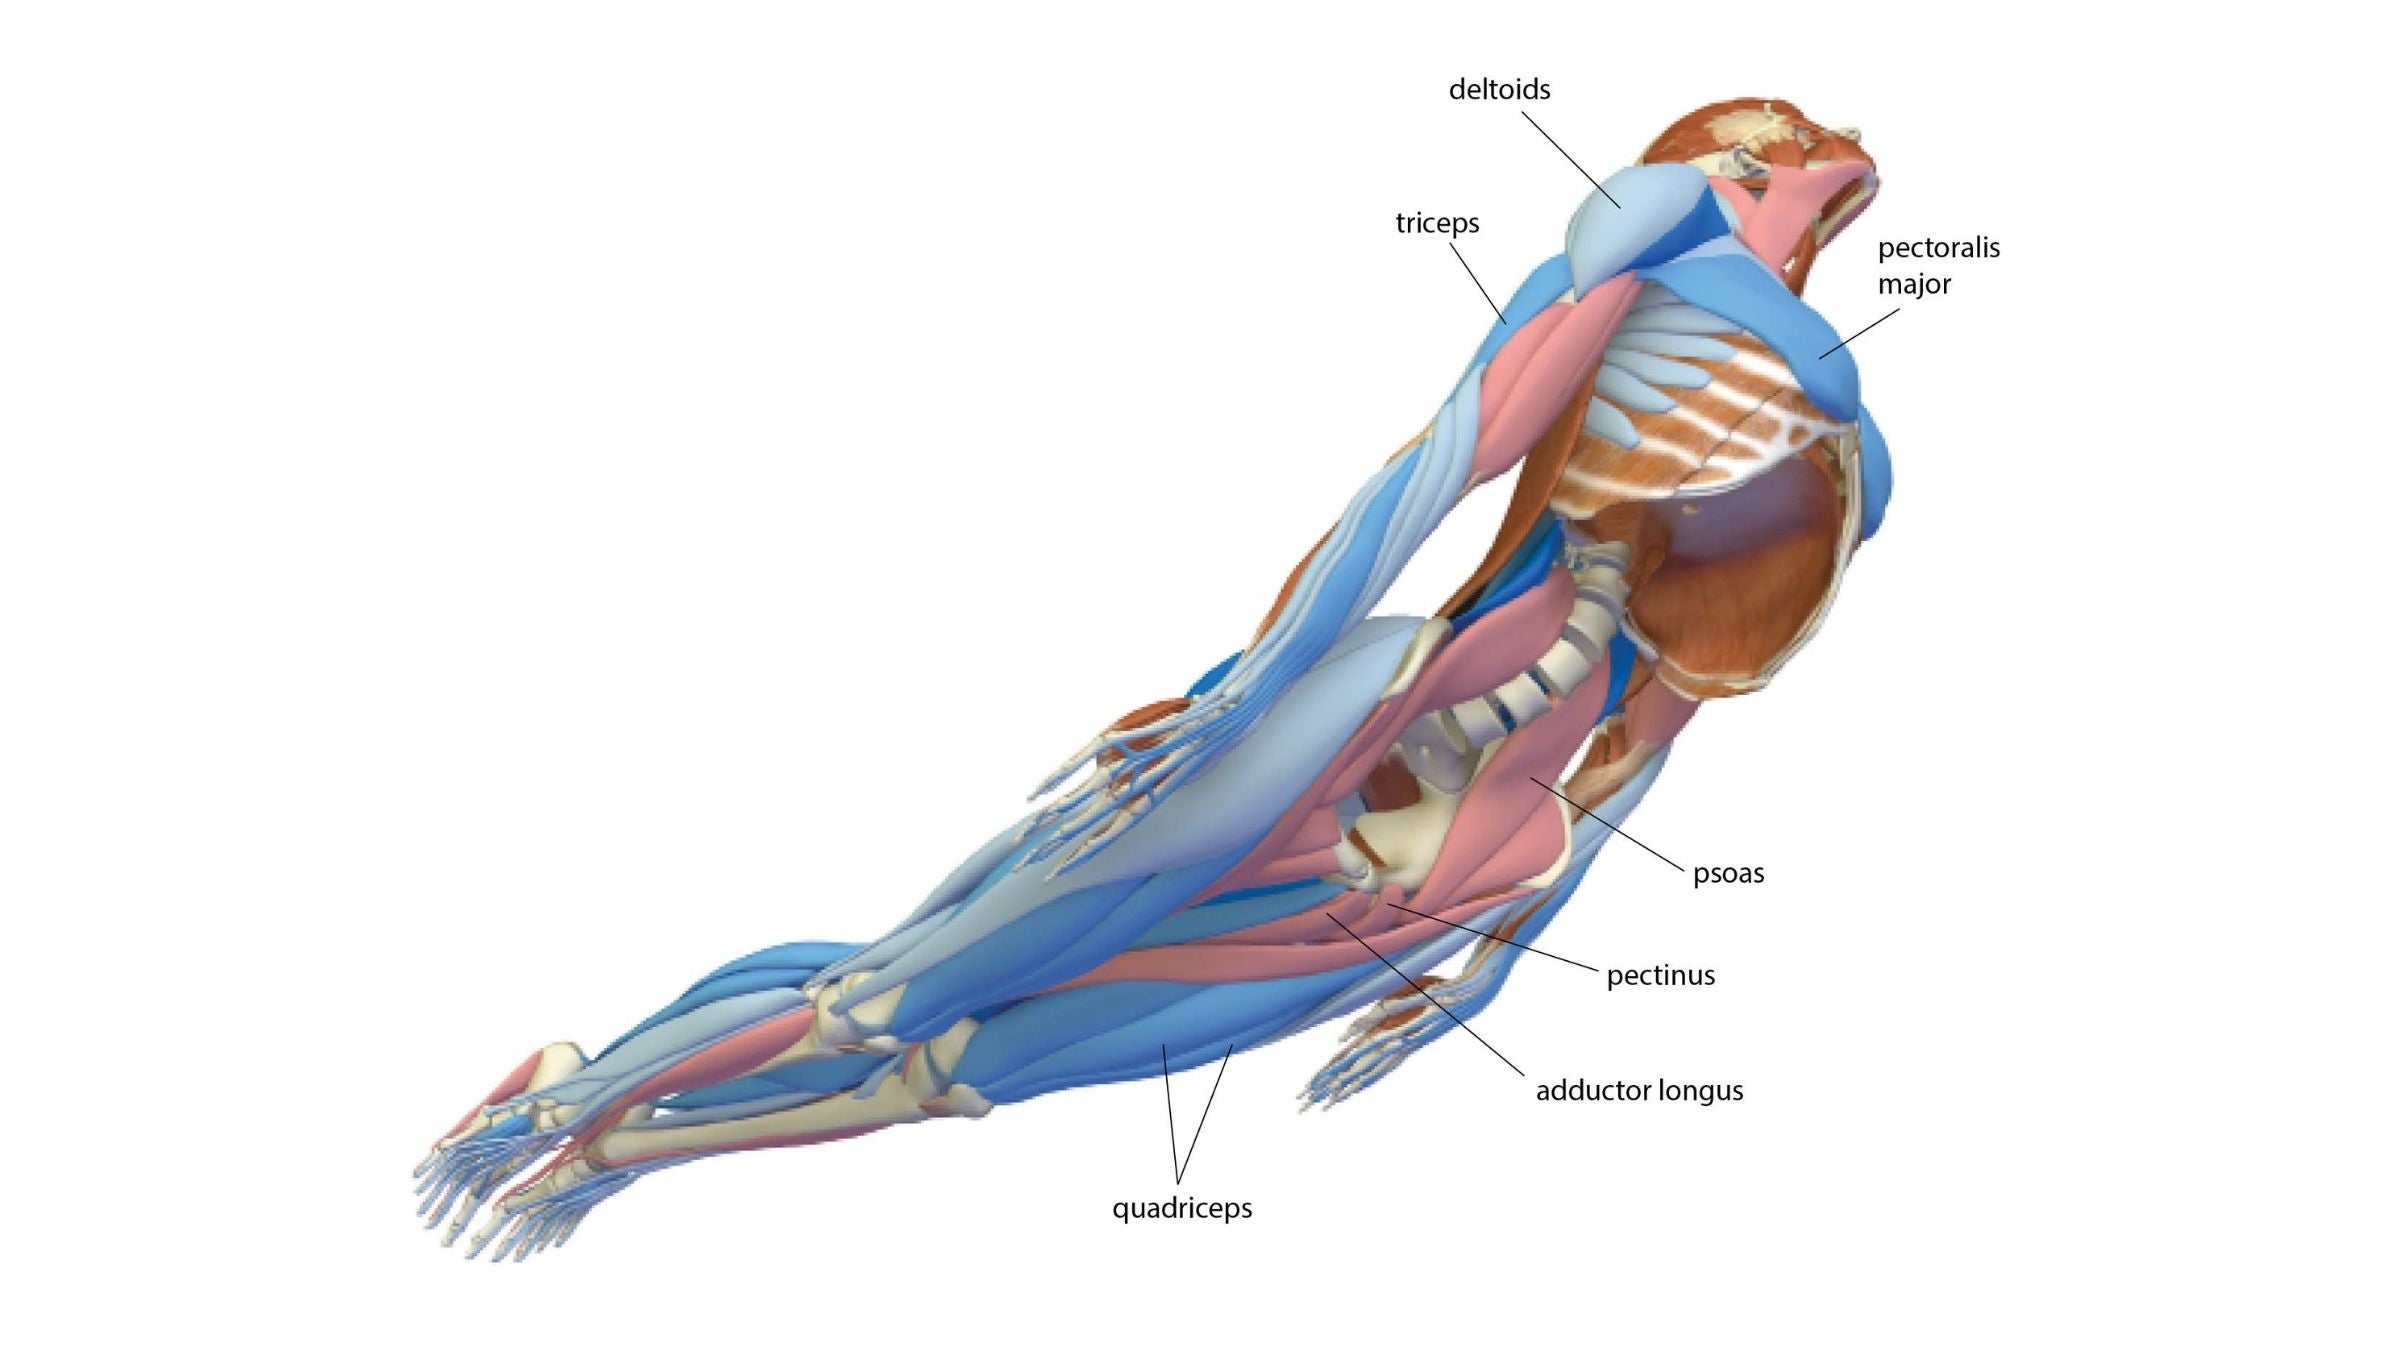
Contract the gluteus maximus to extend the hips, lifting the femurs. At the same time, engage the hamstrings; a cue for this is to bend your knees about 10 degrees while lifting your thighs off the floor. Maintain the lift of your thighs and activate your quadriceps to straighten your knees. Tilt the pelvis back and down.
Extend your back and open your chest by contracting the erector spinae and quadratus lumborum muscles.
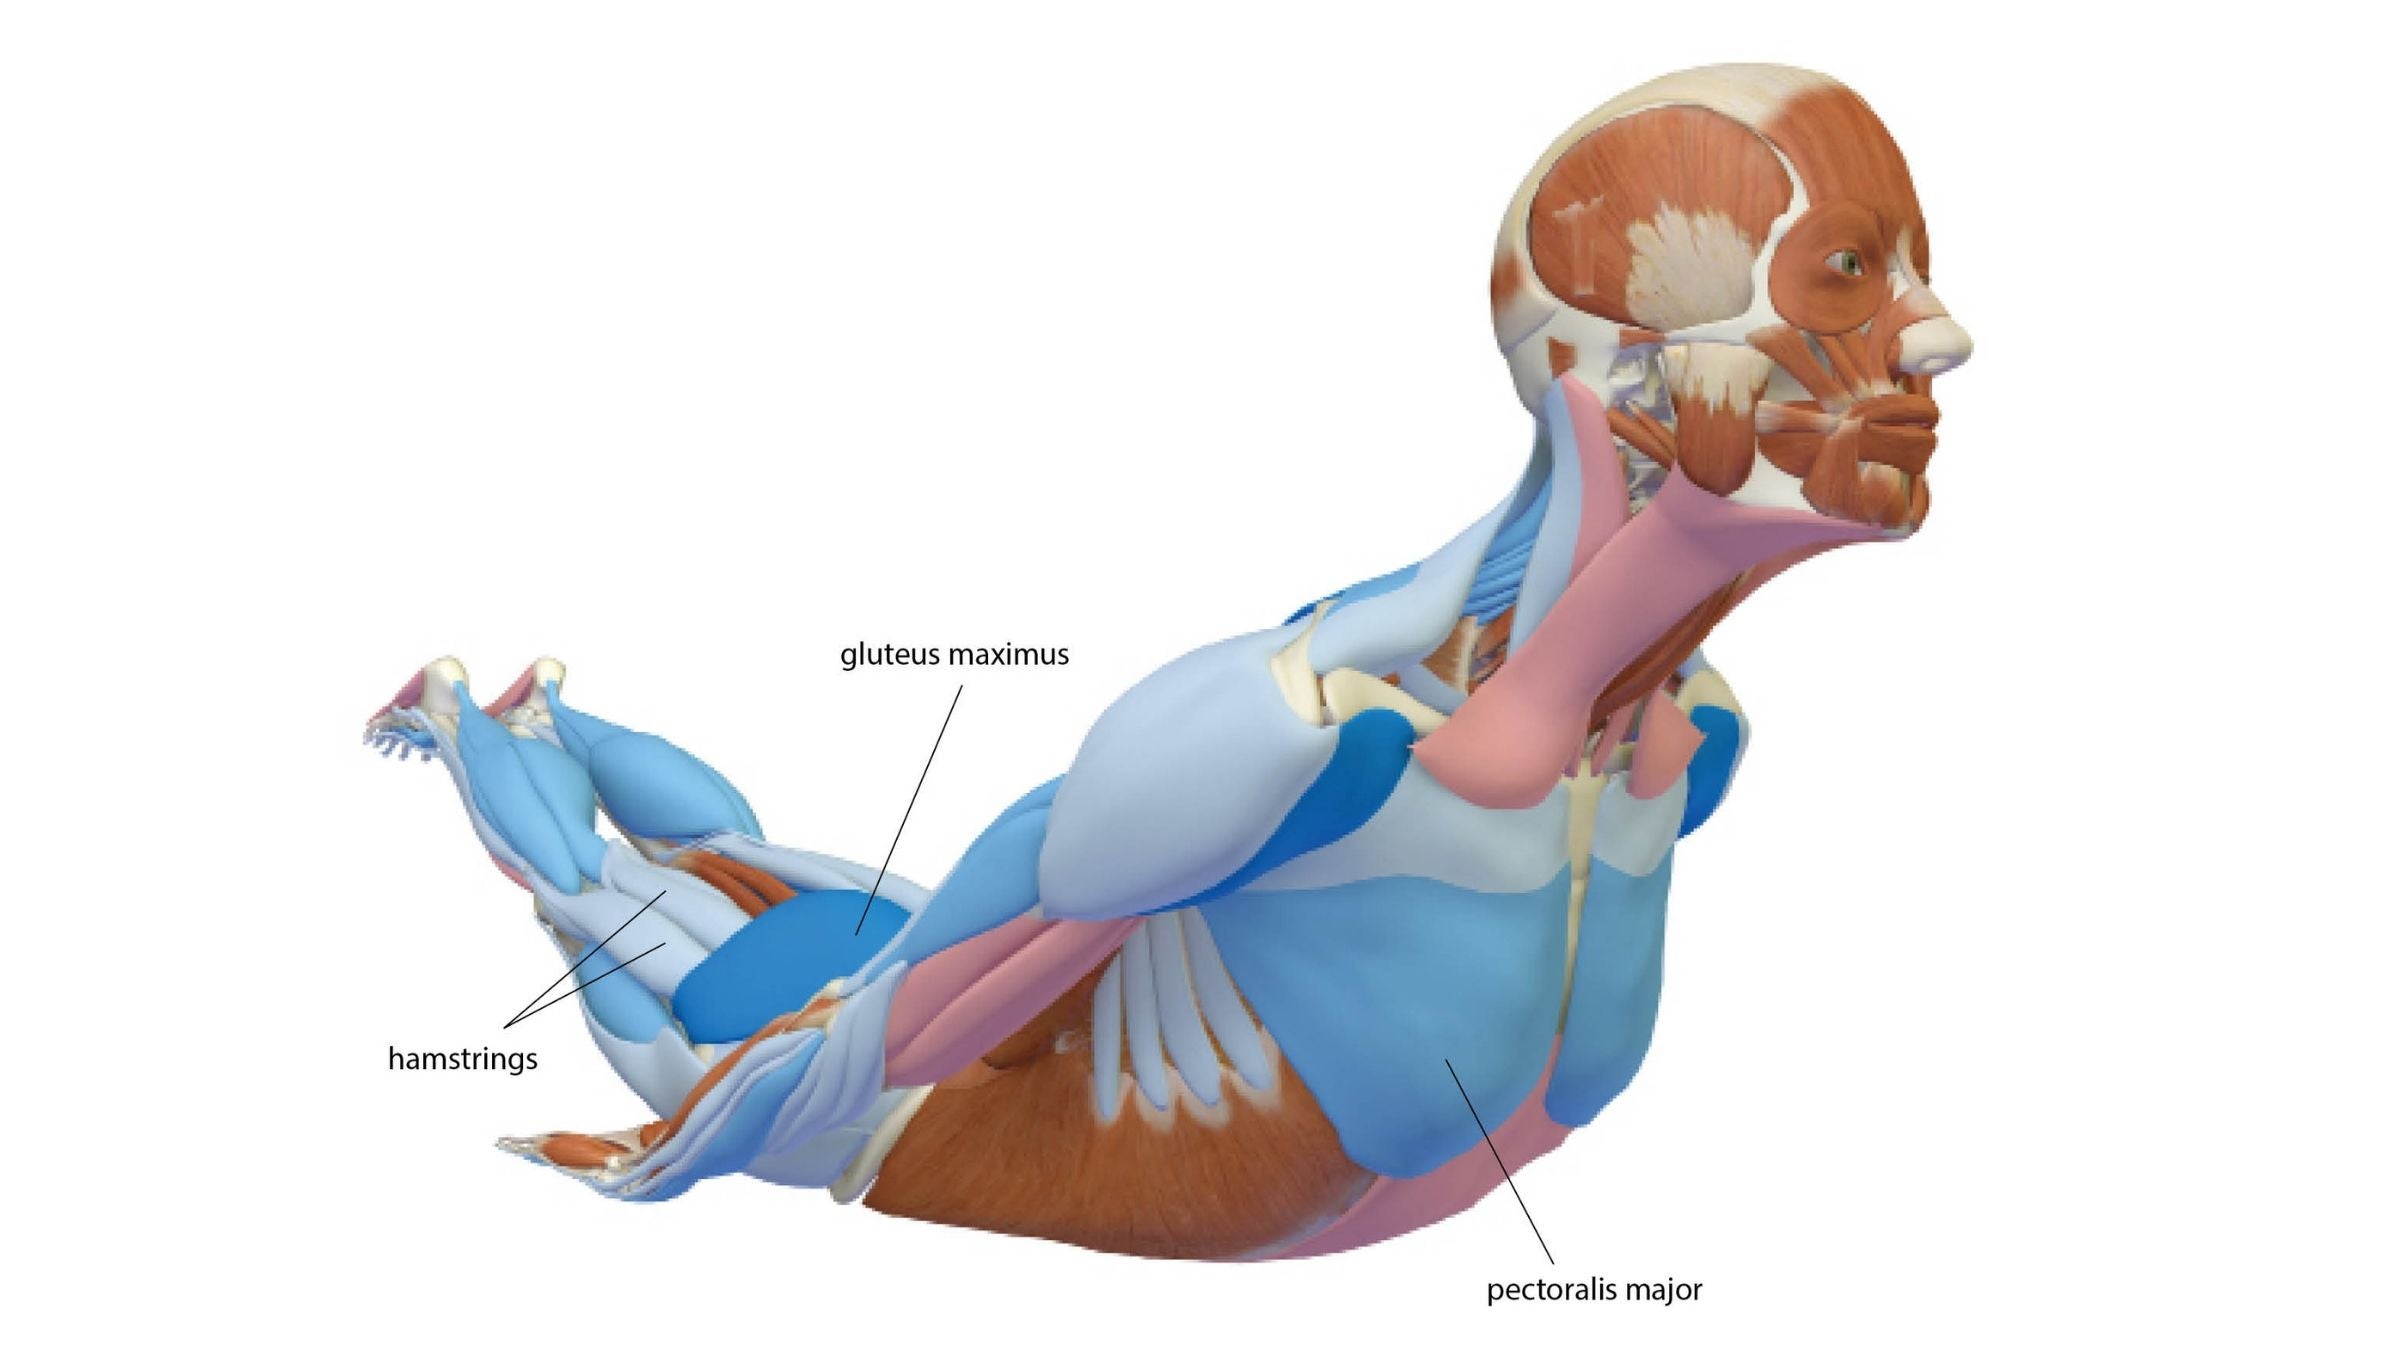
Flex your ankles to point your feet so that the soles face upward.
Excerpted with permission from The Key Poses of Yoga and Anatomy for Backbends and Twists by Ray Long.
Put Locust Pose into practice
15 Yoga Poses to Help You Sleep Better
Stiff Shoulder? It Might Be Frozen. These 8 Poses Can Start the Thaw
10 Yoga Poses to Help Prevent Dead Butt Syndrome
12 Poses to Transform Your Backbends
Section divider
About our contributors
Teacher and model Natasha Rizopoulos is a senior teacher at Down Under Yoga in Boston, where she offers classes and leads 200- and 300-hour teacher trainings. A dedicated Ashtanga practitioner for many years, she became equally as captivated by the precision of the Iyengar system. These two traditions inform her teaching and her dynamic, anatomy-based vinyasa system Align Your Flow. For more information, visit natasharizopoulos.com.
Ray Long is an orthopedic surgeon and the founder of Bandha Yoga, a popular series of yoga anatomy books, and the Daily Bandha, which provides tips and techniques for teaching and practicing safe alignment. Ray graduated from the University of Michigan Medical School and pursued post-graduate training at Cornell University, McGill University, the University of Montreal, and the Florida Orthopedic Institute. He has studied hatha yoga for over 20 years, training extensively with B.K.S. Iyengar and other leading yoga masters, and teaches anatomy workshops at yoga studios around the country.