Heading out the door? Read this article on the new Outside+ app available now on iOS devices for members! Download the app.
As someone who’s relatively new to yoga, you know that it can take some practice to understand the basic shapes of poses. And as you go to rehearse and refine the postures outside of class, you probably have no idea how to string the poses together into yoga sequences for beginners.
Yoga sequences come in all different shapes and sizes, but most progressions of poses consist of one posture following another in a step-by-step fashion, moving from less challenging to more challenging and back to less challenging. A practice or sequence usually begins with stretches, then progresses to more challenging standing postures, and then settles down with more stretches.
Typically each posture is done once. As a beginner, though, it can help you to practice each posture two to three times, focusing on a different aspect of the pose each time. For example, when you practice Triangle Pose (Trikonasana), first focus on your feet and legs. Then you can repeat it while focusing on your spine and arms. Finally, pay attention to if you’re holding your breath and, if so, work on slowing your breath to a steady rhythm.
How to Create a Yoga Sequence for Beginners
The poses in most yoga sequences for beginners can be grouped into four basic sections. Understanding these can help you put together your own class at home.
- Centering
Begin seated or lying down and simply focusing on your breath. Bring your full attention to each inhalation and exhalation and allow them to become slightly slower and longer. If you like, you can incorporate a simple meditation to collect and concentrate your awareness.
- Warm-Up
These are stretches and less intense poses that prepare your body for more challenging poses to come.
- Standing and Balancing
This is the middle portion of a sequence and includes standing poses. These challenge you to find the shape of a pose by engaging your body in various ways while not forgetting to breathe. The pose itself is not yoga. Being aware of how you hold yourself in the pose is yoga.
This part of class can also include balancing poses. When you steady your gaze on a single point straight ahead of you, slow your breath, and quiet your thoughts, you can become surprisingly grounded in yourself. It just takes a little practice.
- Cool Down
The last portion of class includes simpler seated and reclined stretches and culminates in Savasana. It can be tempting to skip the last resting pose, but it’s an essential component of your practice as it allows your body to integrate everything that came before it.
Practice This Yoga Sequence for Beginners
The following sequence is something you can practice as-is or adjust to your needs. This is, after all, your practice.
Centering
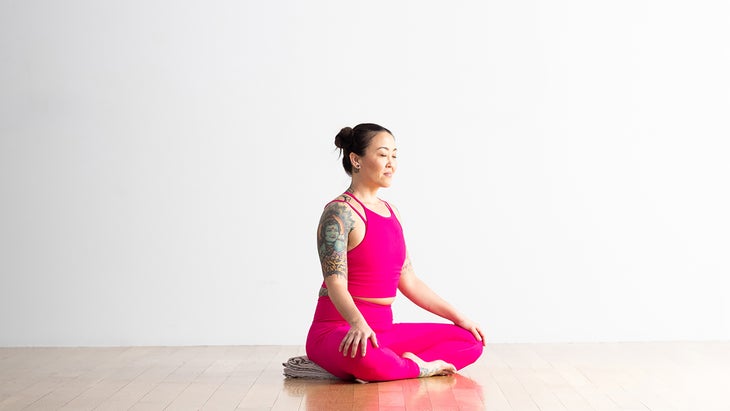
1. Easy Pose (Sukhasana)
Often used as a meditative posture, Easy Pose is useful as a transition pose from the chaos of your day to a place where your mind can disconnect from distractions.
How to:
- Sit on the mat with your legs extended in front of you. Tuck a folded blanket beneath you to make the position easier on your hips and low back.
- Bend your knees and pull your feet in toward your body. Cross one shin on top of the other.
- Sit up tall. Notice if you’re arching your back. Feel your sit bones grounding down into the mat. Rest your hands on your calves or thighs, palms facing up or down. Breathe here. Close your eyes if you like.
Warm Up
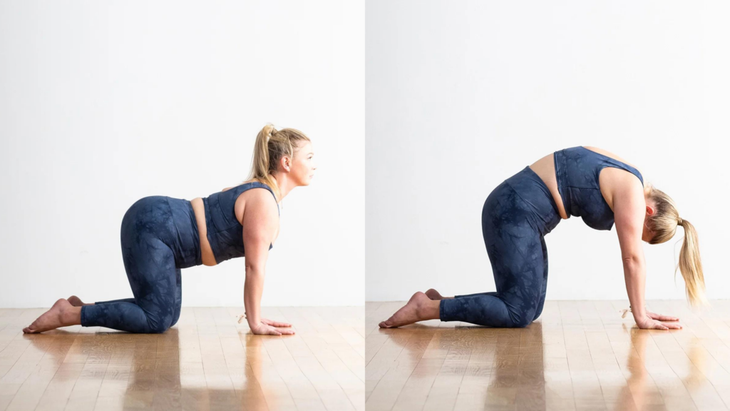
2. Cat and Cow (Marjaryasana and Bitilasana)
Cat and Cow deliver a stretch for your lower and upper back and shoulders. It’s a must in any yoga sequence for beginners.
How to:
- Come onto hands and knees, with your hands shoulder-width apart and knees hip-width apart.
- Exhale and round your spine toward the ceiling, pointing the crown of your head and your tailbone down toward the mat. Gently draw in your lower belly in Cat Pose.
- On an inhalation, press down through your knuckles, drop your lower belly, and lift your chin and sternum so your back is arched in Cow Pose.
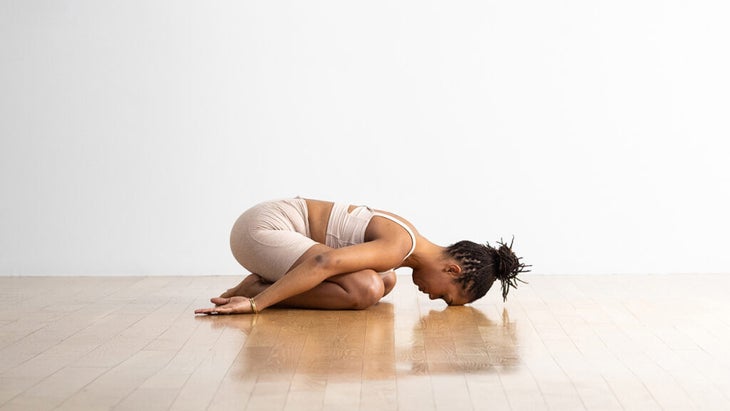
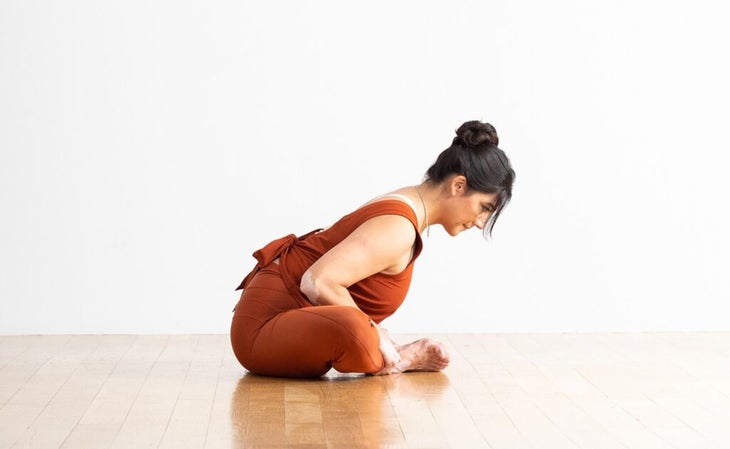
3. Child’s Pose (Balasana)
In Child’s Pose, your back body experiences a stretch as your awareness turns inward.
How to:
- Come to hands and knees.
- Separate your knees about hip-width apart and shift your hips toward your heels. (You can also keep your knees closer together.)
- Lower your chest toward the mat and walk your hands forward until your arms are extended in front of you. Rest your forehead on the mat, a block, or a pillow or folded blanket. Breathe here.

4. Downward-Facing Dog Pose (Adho Mukha Svanasana)
This is probably one of the most recognized yoga poses, but that doesn’t mean it’s easy. Downward Dog engages your entire body for a stretch and strengthening exercise all in one.
How to:
- Come onto your hands and knees. Place your hands slightly in front of your shoulders and spreadyour fingers wide.
- Tuck your toes, press down through your knuckles, and lift your knees off the mat. Reach your hips up and back to create an inverted V shape with your body. Take a slight bend in your legs.
- Press your heels toward the mat but it’s fine if they don’t touch it. Imagine the backs of your thighs are reaching toward the back wall.
- Relax your head and neck. Breathe here.
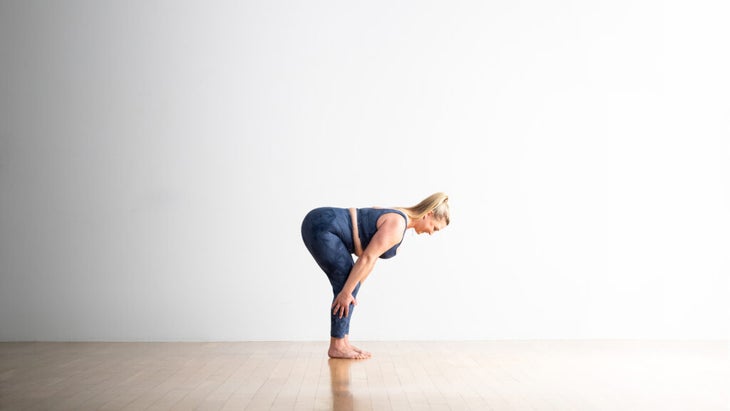
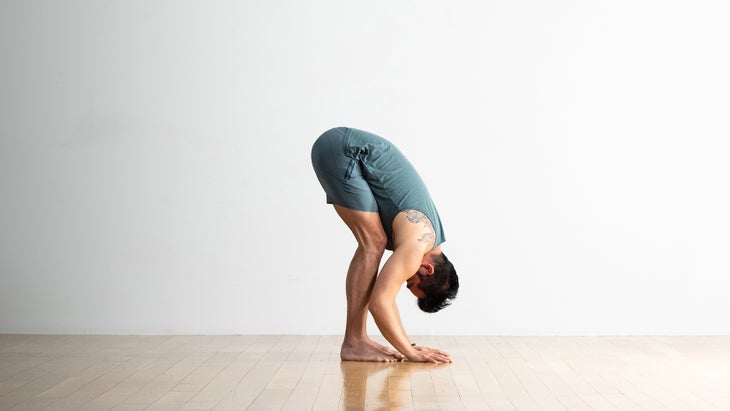
5. Standing Forward Bend (Uttanasana)
Contrary to popular belief, this pose isn’t about reaching your hands to the floor. It’s about your entire back body getting a big stretch, especially if you spend a lot of time sitting. The instructions below offer adjustments you can make in Standing Forward Bend to suit your comfort level.
How to:
- Stand with your feet hip-width apart and your hands on your hips.
- Bend your knees, hinge forward from your hips, and bring your chest toward your thighs.
- Rest your hands to the floor or to blocks. Lengthen your back as you inhale and then release as you exhale. You can gently nod your head up and down or side to side to relieve your neck muscles. Some people like to sway their upper body slowly side to side before settling into stillness. Breathe here.
6. Standing Half Forward Bend (Ardha Uttanasana)
This pose typically follows after Standing Forward Bend. In Standing Half Forward Bend, your upper body and lower body lengthen in a full-body stretch.
How to:
- From Standing Forward Bend, inhale as you lift your chest halfway and press your palms into your shins or blocks.
- Straighten your arms and back. Breathe here.
- To release, exhale as you slowly lower your upper body back into Standing Forward Bend.
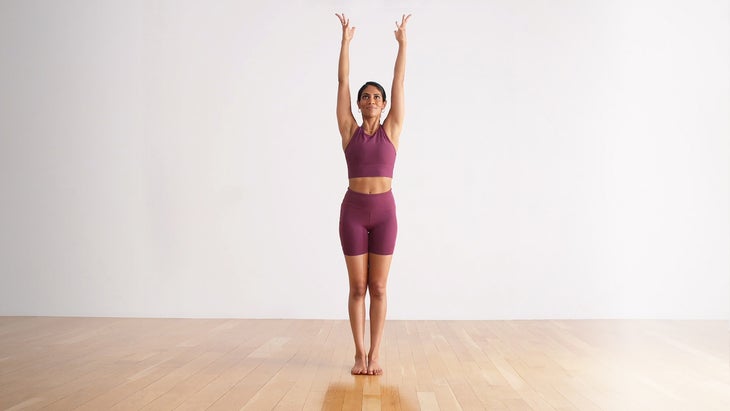
7. Upward Salute (Urdhva Hastasana)
Don’t let the simple appearance of this pose fool you into believing it isn’t a strengthening posture. Upward Salute is a powerful stance in which everything engages and your shoulders and arms experience a stretch. It’s essentially the right-side up version of Handstand, so when you can find your alignment here, you’re one step closer to taking it upside-down.
How to:
- Stand with your feet together. Press down through your feet. Draw your shoulders back and stack the crown of your head above your pelvis. Lift your chin so it is parallel to the floor. Reach your tailbone toward the mat.
- Raise your arms overhead with your hands shoulder distance apart and palms facing each other. Allow your shoulder blades to move back and down. Notice if you start to arch your back and, if you do, draw your navel toward your spine. Breathe here.
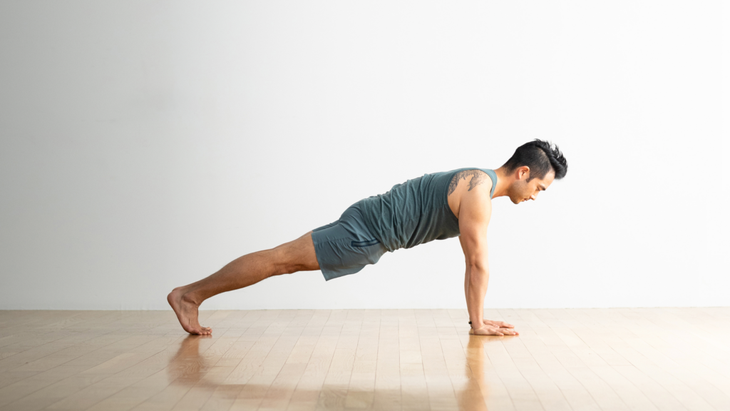
8. Plank
This pose engages your arms and legs, activates core strength, and improves your endurance. (Phew!) Plank can be challenging, so listen to your body.
Variations: Lower your knees to the mat in Knee-Down Plank. You can also do Forearm Plank by pressing your forearms into the mat instead of your palms.
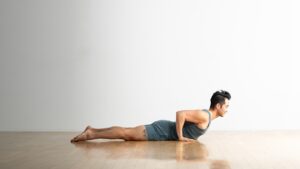
9. Cobra Pose (Bhujangasana)
A gentle backbend, Cobra Pose strengthens your back muscles and stretches your shoulders and chest. When practiced regularly, it can help improve your posture. It’s typically included early in a sequence to prepare the body for more intense backbends.
How to:
- From Plank, lower your knees and chest to the mat. Make sure your feet are hip-distance apart and your hands are beside your ribs.
- Press down with all ten toenails to activate your quadriceps. Pressing down lightly with your hands, lift your head and chest and roll your shoulders back and down. Keep a bend in your arms as you gently press your elbows in toward your body.
10. Downward Dog (Adho Mukha Svanasana)
This is a pose you’ll return to again and again during most beginner yoga sequences.
Standing and Balancing
11. Extended Side Angle Pose (Utthita Parsvakonasana)
In most standing poses, your lower body is anchoring itself into the mat as your upper body lifts and lengthens away from your hips. This is exactly what happens in Extended Side Angle Pose.
How to:
- Stand facing the long side of the mat with your legs a wide distance apart. Extend your arms straight out from your shoulders in a T position with your palms facing down.
- Turn your left toes toward the short side of the mat and angle your right foot slightly inward. Lengthen through your spine.
- Bend your left knee as much as is comfortable for you.
- Hinge sideways at your hips and lean your left side body toward your thigh. Place your left forearm on your thigh and reach your right arm alongside your right ear, palm facing behind you.
- Press down into your left forearm so you’re not collapsing in your left shoulder. Lengthen through your sides. Turn your chest toward your raised arm and sink your right hip toward the mat. Press through the outer edge of your right foot. Breathe here. Repeat on the other side.
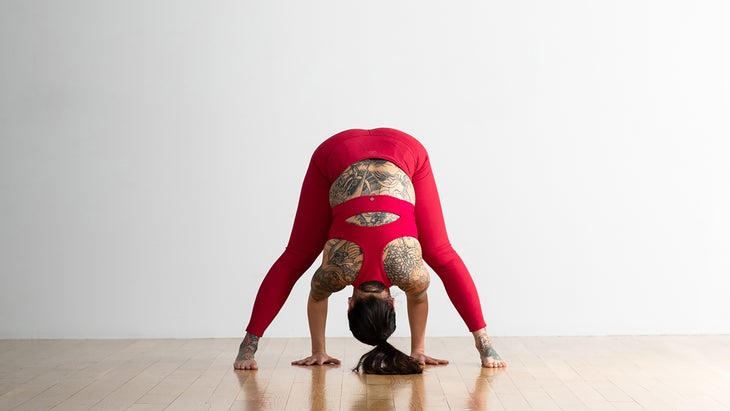
12. Wide-Legged Standing Forward Bend (Prasarita Padottanasana)
Gravity plays a part in stretching your neck in Wide-Legged Standing Forward Bend as it gently lowers your head toward the mat. You’ll feel a more pronounced stretch along your hamstrings.
How to:
- Stand facing the long side of the mat with your feet as wide apart as is comfortable with your hands on your hips.
- Slowly hinge at your hips and fold forward. Try to keep your spine lengthened rather than round your lower back.
- Place your hands shoulder-width apart on the floor or on blocks. Relax your neck and let your head release toward the mat. Press into the outer edges of your feet and lift your arches. Breathe here.
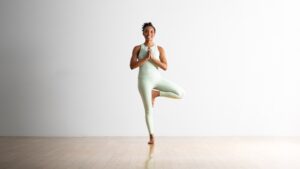
13. Tree Pose (Vrkasana)
Swaying a little side to side as you work on your balance in Tree Pose is part of the process. Think of how a tree sways in the wind. The standing poses and hip stretches you’ve already practiced in this sequence have worked the same muscles as Tree Pose.
How to:
-
- Stand at the top of your mat. Press your feet into the mat. Draw your shoulder blades down your back. Look straight ahead and keep your gaze steady at a spot on the wall.
- Place your hands on your hips and shift all your weight into your left foot. Begin to lift your right foot off the mat. Place it against your left ankle, shin, or thigh. Press your right foot and left leg into each other.
- Place your hands in prayer position at your chest (anjali mudra) or slowly reach your arms above your head, palms facing each other. Keep your gaze steady and straight ahead. Breathe here. Slowly come out of the pose the way you came into it. Repeat on the other side.
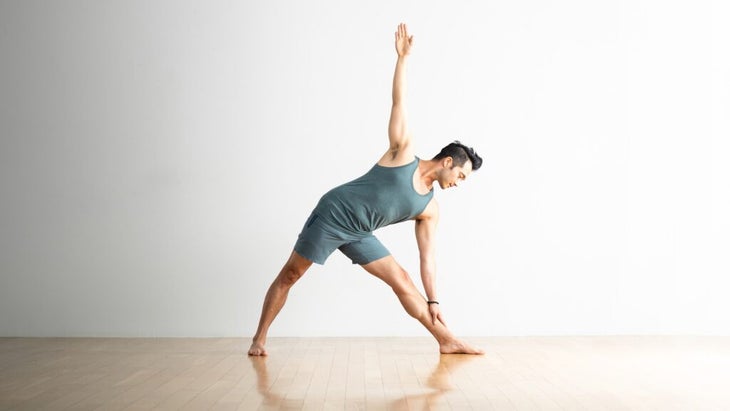
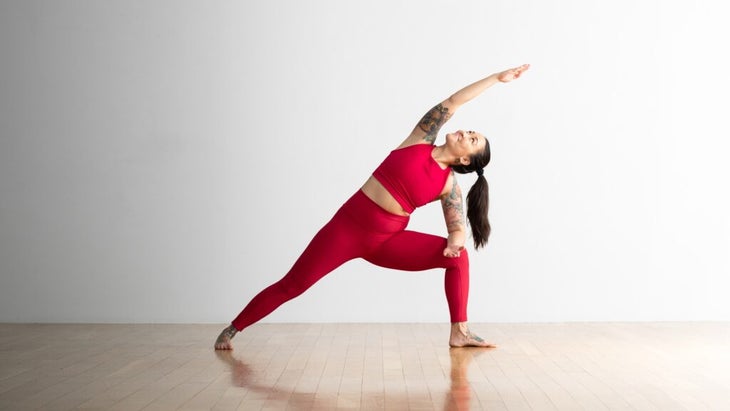
14. Extended Triangle Pose (Utthita Trikonasana)
By this point in this sequence you’ve stretched your hamstrings and side body, which is a necessary precursor to finding alignment in Triangle Pose.
How to:
- Stand facing the long side of the mat with your feet parallel and a wide but comfortable distance apart. Raise your arms straight out from your shoulders in a T position, palms facing down.
- Turn your right toes to face the short side of the mat. Angle your left foot slightly in toward your body. Press the outer edges of feet into the mat and lift your arches. Hinge sideways at your hips to lean your side body over your right leg.
- When you have reached as far as you are able, reach your right hand to the mat, your shin, or a block. Bring your left hand to your left hip. Lengthen through your spine and keep your left side parallel to the floor even if that means you need to slide your hand up.
- Turn your face to look straight ahead or down to the mat. Stay here or reach your right arm toward the ceiling. If it’s comfortable, turn your gaze toward your right hand. Breathe here. Repeat on the other side.
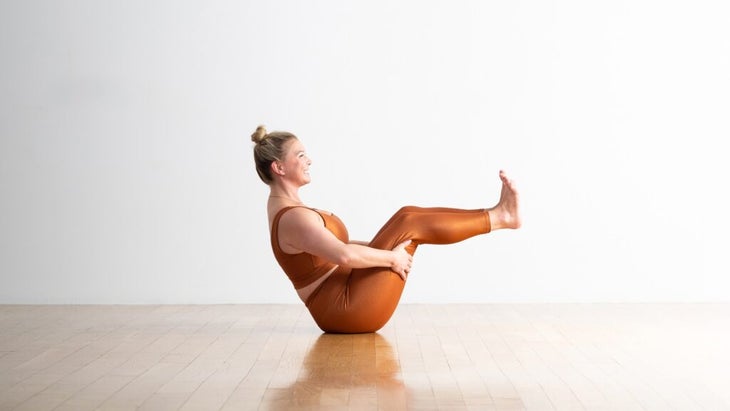
15. Boat Pose (Navasana)
This pose engages your core, arms, legs, and hip flexors. Boat Pose is often placed toward the end of a sequence so these muscles have already been primed to take this posture.
How to:
- Sit on the floor with your knees bent and your feet flat on the floor. Place your hands on your outer thighs.
- Lift your chest and lean back slightly, balancing your weight on your sit bones.
- Lift your feet off the mat and try to bring your calves parallel to the mat. Point or flex your toes. Breathe here.
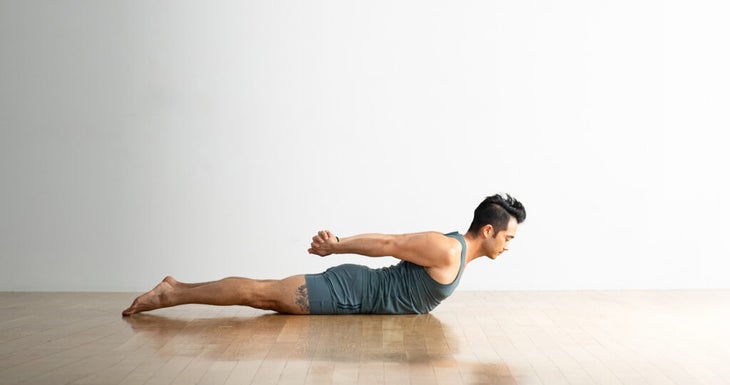
16. Locust Pose (Salabhasana)
A gentle backbend, Locust Pose strengthens your entire back body as it lengthens your chest and abdominal muscles.
How to:
- Lie down on your stomach with your feet together and your arms alongside your body, palms facing down.
- Press down through the tops of your feet to engage your quads. Lift your head and chest off the mat. Keep the back of your neck long by focusing your gaze down and slightly forward. Breathe here. For a more intense stretch, you can interlace your fingers behind your back and straighten your arms.
Cool Down
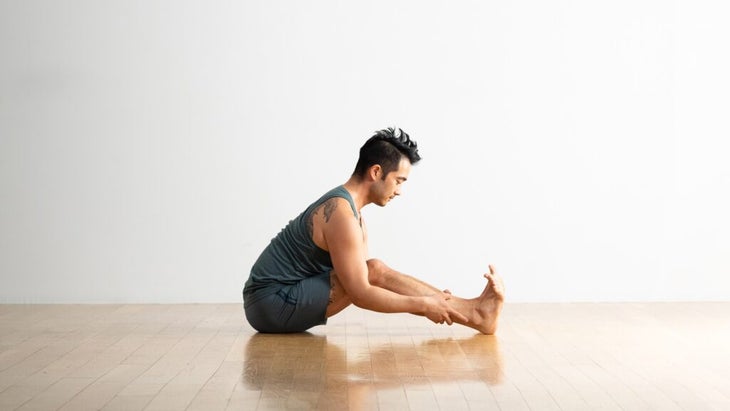
17. Seated Forward Bend (Paschimottanasana), with Bent Legs
This pose allows you to experience an intense stretch in your lower back and hamstrings and is best practiced after you’ve warmed up in other poses. Bending your legs in Seated Forward Bend creates less strain in your back body.
How to:
- Sit down with your legs extended straight in front of you hip-distance apart. Press through your heels. Hinge at your hips and lean forward as if you’re reaching your chest toward your thighs. Lengthen your spine instead of rounding your lower back. It’s okay if you only move an inch or two forward. If you feel tightness along the backs of your legs or your lower back, bend your knees.
- Place your hands on your thighs, calves, or ankles or you can wrap a strap around the balls of your feet and hold onto either end of it. Breathe here.
18. Bound Angle Pose (Baddha Konasana)
Bound Angle Pose is a deep stretch that opens your hips. All the previous poses you practiced prepare you for it, although it’s also a posture you can quickly take between meetings if you don’t have time for a longer practice.
How to:
- Sit with your legs extended in front of you. Bend your legs and bring your feet together. Allow your knees to fall open to the side. If you feel a lot of strain in your inner thighs, place a block, pillow, or folded blanket beneath each thigh to help support them.
- Grasp your outer ankles and draw the soles of your feet together.
- Lift through your sternum and draw your shoulder blades away from your back. Hinge forward, keeping your spine lengthened. Breathe here.
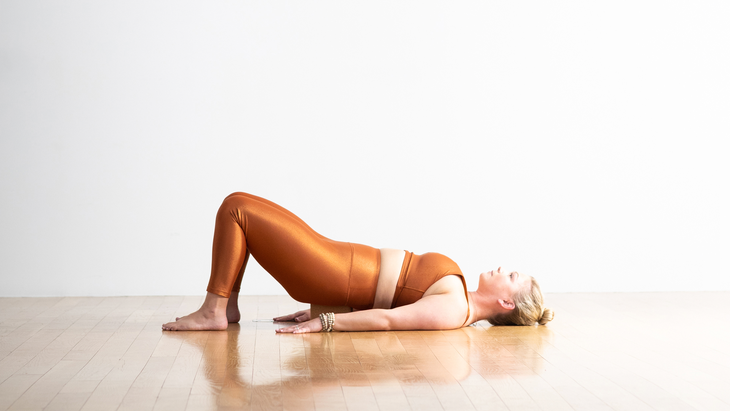
19. Supported Bridge Pose (Setu Bandha Sarvangasana), Variation
This is a more restful version of Bridge Pose. It’s typically practiced near the end of a sequence.
How to:
- Lie on your back with your knees bent and your feet on the mat, hip-distance apart. Keep your arms alongside your body with your palms facing down.
- Press your feet and arms into the mat as you lift your hips. Slide a block on the lowest level underneath your sacrum, which is the flat triangle-shaped bone at the bottom of your spine. Rest your weight on the block. If it feels uncomfortable, the block is beneath your lower back rather than your sacrum, so adjust its placement.
- Shimmy your shoulders underneath you to help you broaden across your chest. Continue to press your feet into the mat. Draw your thighs toward each other so they are hip-width apart rather than splaying out to the sides. Breathe here.
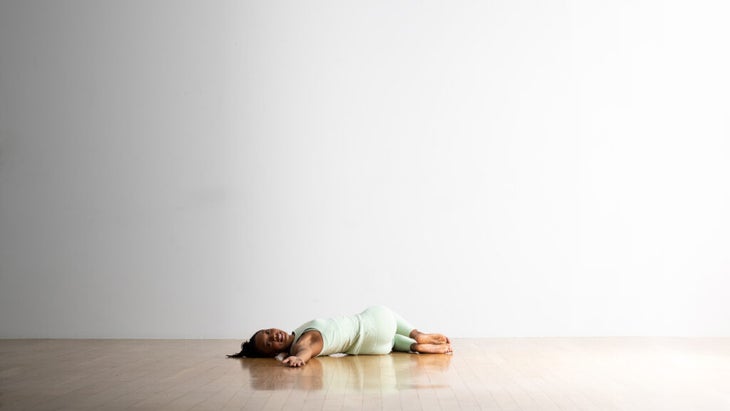
20. Reclining Twist
Twists are known as transformative postures for their ability to stretch hard-to-reach muscles.
How to:
- Lie on your back with your knees bent and feet flat on the mat.
- Draw your knees toward your chest. Gently lower your legs toward the left until your left leg meets the mat. If it doesn’t lower all the way, slide a pillow, block, or folded blanket beneath you. Relax your shoulder blades toward the mat. Extend your arms straight out from your shoulders in a T position. For a more intense stretch, take your gaze over your right shoulder. Breathe here. Repeat on the other side.
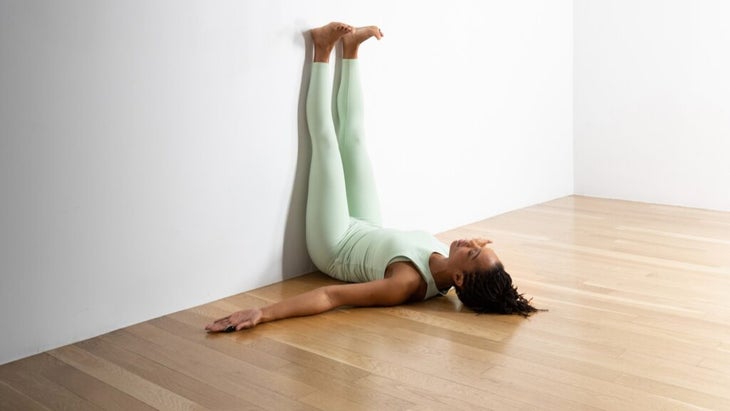
21. Legs-Up-the-Wall Pose (Viparita Karani)
After some of the more engaged poses in this sequence, you get to enjoy Legs-Up-the-Wall. It’s a soothing break from physical and mental effort.
How to:
- Sit down facing a wall. Lie down so your back, shoulders and head are on the mat. Place one foot and then the other on the wall. Inch your hips in toward the wall (they don’t have to be touching).
- Extend your arms straight out from the shoulders in a T position or rest them alongside your body, palms facing up. Settle into the pose and breathe.
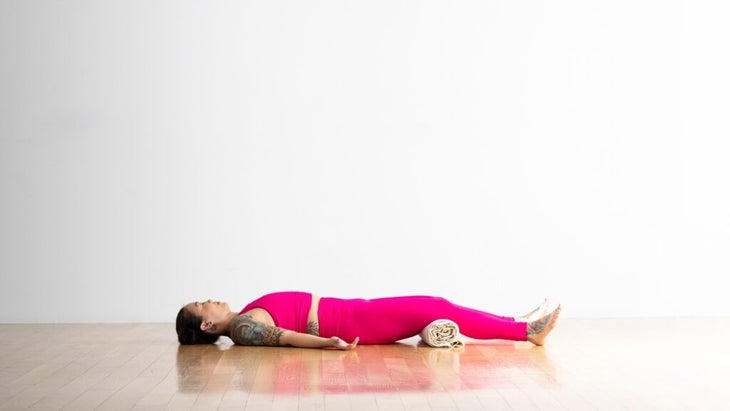
22. Corpse Pose (Savasana)
This is the final resting pose which ends your practice. Stay here for as long as you can so your body and mind can integrate your beginner yoga sequence.
How to:
- Lie on the mat with your arms and legs extended.
- Turn your palms up. You can place a bolster, towel, or blanket underneath your knees for lower back support. Allow your toes to turn out. Lower your chin slightly to lengthen the back of your neck.
- Allow yourself to feel supported. Breathe here.
Learn more about how yoga can transform your everyday life and enhance your connection to your body, mind, and soul by subscribing to our newsletter!
This article has been updated. Originally published November 7, 2012.