NOTE: This article and the images are protected by copyright. PLEASE DO NOT copy and paste to your own website, blog, or newsletter.
If you’ve ever tried to capture a family photo with everyone smiling at the same time, you know the exquisite torture of group photography. Some wise-guy pulls the rabbit-ears trick at the last minute, or crosses his eyes, or yanks someone’s hair. That’s why I love those long tightly-rolled panorama photos often found cast aside in family collections. You can usually spot a goofy grin, a secret wink or a wayward hand. It’s a second of social history captured by lens and film.
It’s obvious that people don’t quite know what to do with these old rolled photos. They resist exploration. When forced flat, the paper often cracks every few inches damaging the photograph. If you try to look at the photo a few inches at a time, carefully handling the paper as though you were reading an ancient scroll, it’s hard to get the “big picture” of what’s going on.
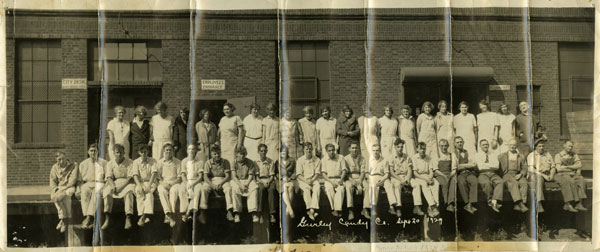
This 1929 black-and-white panorama photo is a classic example of what can happen when a brittle rolled photograph is forcibly flattened without first reconditioning the paper; the print is cracked at regular intervals across the entire image.
I inherited nearly a dozen long group photos from the 1920s through 1960s, most still rolled tight and in good condition. I really wanted to flatten the photos and examine them more closely for genealogical clues to my family history. If nothing else, I thought they would look great framed and hanging on the wall.
Fortunately, it’s not difficult or expensive to relax, or re-humidify, a rolled photo or document. When I asked Sally Jacobs, The Practical Archivist, if there was a safe method to flatten those old photos, she directed me to the instructions and reassured m:
“Yes, It’s Safe to Try This At Home”
So I did.
And it worked!
The cracked photo shown above was curled in a series of small waves looked like a photographic washboard. Because it was already damaged, I thought it would be a good item to use in my first experiment with the rehumidification process.
Since then, I have successfully rehumidified and flattened many panorama photos, and some curled and brittle snapshots. Sally says that the process is also safe with documents, not just photos. Museums and archives create a similar humidification chamber when working with old documents. You don’t need any fancy equipment, just a few household items and a bit of common sense about working with your family keepsakes. Here’s the recommended method I used with success:
Step-by-Step Instructions for Relaxing a Rolled Photograph
You Will Need:
- rolled or curled photograph
- plastic tub or container — deep enough to hold your rack and leave space between the rack and tub lid
- rubber coated wire rack — I used an expandable plate rack (you need a rack that is large enough to accommodate your item
- water — room temperature
- archival blotting paper
- wax paper or parchment paper from your kitchen (optional)
 Step 1. Select Your Photograph
For your first project, select a photo or document that is NOT a priceless heirloom. If you just want to practice this technique, you may be able to find an old rolled photo selling cheap at a thrift store. Most people throw them away (ouch) because they think they’re past saving.
Tap the print with your fingernail. Does it sound hard, like dry pasta? It should feel and sound different when the paper is dehumidified.

Step 2. The Humidification Chamber
Place the tub on a towel or rug on your floor in an out-of-the-way spot where you can leave it for a few days. Make sure the rack will fit inside the container and extend long enough to support your photograph. The rolled photo will start needing only a few inches of space, but as it relaxes you may want to gently help it unroll.
Add about 2 inches of room temperature water. Do NOT use warm or hot water. You don’t want condensation on the underside of the lid that might drip down on to your photo. Use room temperature water.
Place the rack inside the tub and place your photo on the rack. It will look lonely.

Step 3. Close the Chamber
Place the lid on the box and let it sit.

Step 4. Wait.
Let everything sit there for a few hours. Get on with your life. Read a new blog.

Step 5. Check for Condensation
After about an hour, open the container and check your photo. Make sure there is no moisture dripping on the photo. Feel the paper. Does it feel softer? It will probably need more time to absorb the moisture in the chamber.
What we are doing here is making moisture available to the paper, so that it can become limber and flexible once again. You don’t want too much moisture, because that can damage the print. It could also encourage the growth of mold or mildew. If you notice beads of water on the inside of the cover that could drip down on your print, wipe them off and check your print. Notice the moisture aroung the side walls of the chamber in the next photo. That’s okay.

Step 6. Check Again
After 4 or 5 hours, or overnight, check the paper again. Can you unroll it at all? You may need to do this a few times. Keep checking every few hours until the paper feels relaxed. Look at the difference between this photo and the tightly curled batons in the first step. You can feel the difference in the paper. Tap the print again with your fingernail. It should sound different; softer, more like. . . well, like paper.

Step 7. Remove Your Photo from the Chamber
When you think the photo feels softer and flexible remove it from the box supporting it with both hands and place it on the blotting paper. Gently ease open the rolled image. If it resists or starts to crack, it needs more moisture. Return it to the humidification chamber.
At some point the photo will have absorbed enough moisture to relax and allow you to unroll it. If the paper is still extremely brittle and hard you should probably stop and seek professional assistance. I have not experienced this situation.

At this point, your photo is relaxed. Now you need to allow it to dry as a flat print. If you have a sheet of kitchen wax paper or kitchen paper, you can place this over the surface of the photo before folding the blotting paper over the top. It’s not absolutely necessary.

Step 8. Add Weight and Dry.
Finally, weight down the entire photo in the blotting paper so that it dries flat. I used a heavy wooden cutting board topped with both volumes of the Compact Oxford English Dictionary (the heaviest books on my shelves).

Step 9. Allow the Print to Completely Dry
It may take a few days for your photograph to dry out completely. Check it occasionally. Remove the parchment paper and let the blotting paper absorb more moisture. Give it enough time to become very very flat.
The result will be an heirloom group photograph you can scan, restore, share, frame, or use for further family history research.
In a forthcoming post I’ll show you how I scan panorama group photos with the Flip-Pal Mobile Scanner and with the Epson Perfection V500 and use stitching software to recreate the original long image.
Disclaimer:
This DIY project worked for me; but I can’t guarantee you will have the same results. Please use caution and good judgement, and try it at your own risk.


Denise, you say to use archival blotting paper, and link to gaylord.com and other sites, but blotting paper sold at these sites are pretty expensive. Just wondering whether you use archival blotting paper or the watercolor paper alternative and then which brand you use?
Thanks!
Yes, archival blotting paper isn’t inexpensive. I used kitchen baking parchment paper in drying old panorama prints with good results, but archivists do recommend “official” blotting paper.
I have a query about `kitchen paper“ Looking through our kitchen I find two rolls of it. One is made by Reynolds and is described as parchment paper. The other is branded as `Master wrap` and is apparently wax paper. Are both safe to use. Photo shops sell stuff (expensive) that goes into albums and I wonder whether it`s the same product as parchment paper.
Jim – I have used Reynolds Parchment Paper (typically used to line cake pans and cookie sheets) as a barrier when drying out flattened photos. I have not tried wax paper. I absorbs water quickly, unlike parchment paper. The paper sold by photo shops for albums may be acid-free interleaving paper. It’s useful to place between the pages of old albums that use non acid-free paper to protect album contents contaminating other items.
Silicone release paper or sheets are more expensive, but the best choice when drying flattened photos. Whatever you use, remember this is only temporary. Remove when the print is dry.
Please contact an art conservator for proper treatment and care for your ‘curled’/’rolled’ documents and photographs. Too much moisture and/or contact with moisture and too much weight or stress placed on top of these fragile works can be very damaging to your archival materials. You can easily find a conservator near you by following the link: http://www.conservation-us.org/membership/find-a-conservator#.V080_pErKM8
I agree, G. Dunn, it’s always good to consult a professional conservator for rare or extremely fragile items. I have used this process successfully with both photos and documents, working carefully and monitoring the progress closely. Users should use good judgement and consult a professional when in doubt. The American Institute for Conservation of Historic and Artistic Works is an excellent resource for locating a conservator in your area and area of need: http://www.conservation-us.org.
I can’t thank you enough for this great advice! I had a very old marriage license from my grandparents that was cracked, split and rolled into a flat log. Using your advice and directions above I was able to relax the document to a flat sheet. I used paper towels as blotters during the last steps and it it looks GREAT! I do have a question, the document is torn where it was folded and was wondering if I could use acid free low tack tape to reinforce the pieces together before framing?
Hi Sue – Thank you for sharing your success with this conservation technique. Regarding how to repair the torn document: I would advise you to use acid-free backing paper with archival hinges to mount the document so it hangs from the top. You’ll also want to use an acid-free mat to give some “breathing space” between the paper and the glass. You can find mounting hinges at an archival supplier like hollingermetaledge.com or gaylord.com.
This method worked amazingly well for a very, very old photograph that had not only been rolled, but was also very wrinkled. I had hoped to scan it, but of course the scanner picked up the “waves” or “wrinkles” and reproduced them as ugly shadows and highlights. In only an hour in the chamber the fiber based photo had absorbed enough humidity to work with. Thank you very much for the advice and instruction.
Hi there,
Thanks for posting the humidification article. What would you suggest for someone who needs to do a big bunch of these and can’t really afford to go one at a time?? I have a couple hundred 5X7 photos with moderate curling on the edges. They are not rolled. Any suggestions will be helpful. Thanks
Hello kobi, You can work in batches with smaller prints. Just be careful to keep the photos out of the water and avoid condensation on the inside of the humidification chamber (the plastic tubs).
I hope this helps, Denise
I, too, have gobs of old rolled up pictures. I’m so glad to find your instructions. In Step 5, you say “Notice the moisture around the side walls of the chamber. That’s OK” But in the last reply to kobi you say, “avoid condensation on the inside of the humidification chamber.” (the plastic tub) Did I miss something?
Thanks so much,
Bonnie Smith
Hi Bonnie, You didn’t miss anything. Yes, do note the moisture inside the container. If it is accumulating too much, it may drip onto your photos. You can wipe it off with a paper towel, or just monitor it and remove your items before there is so much moisture that it is dripping on to your paper.
I hope this helps. Thank you for writing.
Denise
Hi Patrick – Thanks for your questions. The purpose of using wax paper, kitchen paper, or parchment paper is to keep the surface of the photo from sticking to the blotting paper. The emulsion side of the photos can become sticky if damp. Silicone paper (available at art supply and archival supply stores) is the best to use, but wax paper or parchment paper are acceptable substitutes. The papers are probably not archival, but you aren't using them for storage, so short time use should not be a problem.
I hope this answers your questions. ~ Denise
Hello Denise,
I just discovered this tutorial and wanted to thank you for the helpful and clear instructions.
If you get a moment, I have a few questions regarding the use of certain materials:
1. In Step 7, you mention kitchen wax paper or kitchen paper that can be placed over the surface of the photograph before folding the blotting paper over the top. This seems to be described as optional. Could you clarify what specific advantages there may be (if any) in using kitchen wax paper or kitchen paper, as opposed to not doing so?
2. In Step 9, there is a (new) reference to the removal of parchment paper. Is "parchment paper" being used here as just alternative wording for "kitchen wax paper" or "kitchen paper"? I suspect that is the case, but I wanted to check because I understand the three types of paper are distinct.
3. If kitchen wax paper, kitchen paper, or parchment paper are used in the process, would you know if there may be any conservation or archival risks, especially with delicate photographs or documents? I wasn't sure, for example, whether the pH levels in these papers were considered safe, or if some of the papers could result in possibly archivally-harmful residue (like wax or silicone) being unintentionally deposited onto the surface of photographs or documents while drying.
Many thanks for your help.
Patrick
Thanks so much for this information. I have an old rolled up marriage certificate of my parents and I tried to open it and it looked like it was going to crack if I went any further so I just rolled it back up. The document is very thick – I'm not sure if it's parchment or sheepskin, but I think it may uncurl if I try your method. Again, thank you!
Linda – Do NOT use regular construction paper. The contents are unknown and may damage your document or photo. Instead, use archival blotting paper available from archival suppliers like Gaylord.com or hollingermetal.edge. OR, use acid-free watercolor paper from a local art supply store.
Good luck, Denise
you say to use archival blotting paper..what is that? Can't i just use plain light weight construction paper as that is what it looks like you have used there in your pictures? Please respond as quickly as you can, as i don't want this person to get rid of these photos because they don't seem to have much on the patience end of the spectrum…
thankyou..
HHHmmmm I am going to try this. I have acquired a bunch of curled up photos from ww2 of Hitler and his henchmen and want to restore them.
Annie, I am delighted to hear that you had good results with this process. We really owe Sally Jacobs for the inspiration and encouragement. She's not only a Practical Archivist, she does this in her work as a professional career archivist.
Thanks for sharing your good results with us, Annie.
~ Denise
Denise, I cannot thank you enough for this post. I am organizing my Grandfather's WWII photos and wanted to put them in a photo album. I tried for months to get them flattened enough to get them in the photo sleeves and nothing worked until I found your website. You saved me so much frustration and time! A million thanks!!
~Annie
Hi Mary – I'm so glad you found this article helpful. I think it's like magic to see the brittle rolled photos relax and unwind to reveal the images inside.
To answer your question about Step 7: The photo is placed inside the chamber without any other papers. After you remove it from the box, place it on top of a sheet of blotting paper with a sheet of wax paper on top of the photo and then another piece of blotting paper. The blotting paper helps absorb the moisture.
I hope this helps. Good luck with your project.
Denise
I have a question. In step 7 when you took the image from the chamber, is the blotting paper under the photograph and the waxed paper on top of it. Also, is the parchment paper used on top of the photo or under it? I just want to make sure I have that order correct.
This is an amazingly helpful post. I just inherited a box of about 30 panoramic images that have been rolled up for nearly 100 years.
I agree with you that I would use both my Flip-Pal mobile scanner and my EpsonV600 to scan and stick images together to recreate new digital copies. In my case I have a large extended family who all want these images. Some just want the digital editions.
Thank you for the great tutorial.
"PLEASE, NO HEAT!" Heat is definitely a no-no. Do NOT use an iron on old documents, and never ever on a photograph of any kind. The humidification process described by Denise in her article is what conservators do. It's slow and gentle and you only leave the item in that environment until it relaxes enough to unroll or unfold. This is the most advanced conservation technique that's still safe to do as a DIY. Remember: Never force anything to unfold or unroll, that can cause cracking and/or tearing.
Many thanks to Denise for posting photographs of this process. I've tried to describe it many, many times but it just doesn't make sense until you see it. I send people to this article all the time (as recently as last Friday).
Jane — The National Archives Preservation website cautions against using heat to flatten rolled documents or photos. Heat can cause colors to fade. The temperature of an iron is difficult to control and may cause scorching. In addition, steam may overwet the paper. A better solution is to use a rehumidification chamber and carefully monitor the progress or your item's recovery. For priceless heirlooms, consult a professional conservator for treatment.
~ Denise
Arthur – I'm glad to hear this worked well with your postcards. Isn't it an easy fix!
Much easier way to flatten a rolled picture. Simply spread a piece of wax paper on your ironing board. Set your iron to HOT/STEAM. Pin the edges down with straight pins. Hold the iron as close as you can, then hit the steam button. Spray the back of the picture. It should flatten easily. I also actually iron the back of the picture with heavy steam. Let it dry out, and you are ready to go. Some pictures should be sprayed twice. Have fun !
Bought 1,000 old postcard sized fotos and most of them had gone curly and I know that even if I put them in my book press, it will not cure it. Lo and behold I found your article – popped down to homebase and bought a plastic tub and a brick vent (!!) and stood it on two old cups and then put in 3 photos and shut the lid. Came back 90 minutes later and they had softened and straightened. An amazing tip that works like magic and yet it is so simple and I only have 997 to go too….thanks very much
Hi John! Ask for archival blotting paper at an art store. Watercolor paper will work too. Good luck.
Great post Denise and thanks so much. I can't wait to try this. Where can I obtain the blotting paper? Are these available at a place like Michael's or Hobby Lobby? Thank you.
Thank you so much–this is a super helpful and timely post. I'm going to try the technique today. I have several panoramic photos I want to unfurl, plus the marriage certificate of my great-grandparents. Love your blog–keep it coming!
This is brilliant! I am excited to try it. My grandmother passed on several items that are essentially useless because they are rolled so tight. Thank you
Michael – The rack needs to be high enough to keep the paper above the water line. Typical dish racks are about 6 to 8 inches high. This is fine. The container needs to be large enough to hold your document as it begins to relax and spread out. A panorama photo may be quite long but it won't completely unroll in the chamber, so 25-30 inches long should be adequate.
Hope this helps. Denise
Hi Denise,
I really enjoyed reading your article on unrolling old pictures. I plan on trying this in the near future. I have but one question. You say to place 2 inches of room temperature water in the bottle of the container but don't say how high to place the rack over the water. Could you please comment on what the height should be. And also what size container I need for pictures that measure 8 x 10 and 10 x 18. Thanks in advance for your help in this matter.
John,
those WW1 panoramas sound very valuable actually. Have you considered speaking to the Imperial War Museum about them?
JohnW
Those photos sound like real treasures. I hope you will scan them and then frame (behind UV glass with archival materials :<) ) I have found that panoramas were often ignored because they became so tightly rolled. Yours sound like especially interesting prints. Good luck.
I have several rolled up panoramics of the 'front' in WW1.
The longest is about 6 feet – depth about 8 inches, they are obviously for artillery purposes .
You simply would not believe the carnage – for miles on end, barely a tree, just the odd stumps here and there… no buildings, obviously mud and churned up earth.
My father brought them home in 1918 but I don't suppose he looked at them for hundreds of years.
Anyway, they need re-humidifying so I'm going to have a gp
John
Glad to help Luana! Those vintage photos are great for this technique!
Very timely as I work on all of my dad's old panoramic photos from the early 1930s. Thanks so much for posting this. I look forward to taking them from their currently rolled state to flat and being able to scan them (yes, with my Flip Pal as well).
You're welcome, Kathy!
I have a couple of rolled up photos I've been wondering what to do with. Thanks for the great instructions!
Denise,
Thank you for this tutorial! I want to let you know that your blog post is listed in today's Fab Finds post at http://janasgenealogyandfamilyhistory.blogspot.com/2013/07/follow-friday-fab-finds-for-july-12-2013.html
Have a wonderful weekend!
Mariann- I love the way you are already grooming your niece to be your Family Curator. It sounds like she is a wonderful candidate for the role. Be sure to tell her to drop me a note if she has questions!
Erica- I am happy to hear another testimonial for this technique. Thanks so much. Isn't it cool to see these old documents just come to life under your hands?
I have used this on ~150 year old letters as well, which were on very thin paper folded in tight squares and then left to sit in a shoebox for almost a century. Unfolding them almost always resulted in cracks, until I started humidifying them (briefly) to relax the paper long enough for me to get it stretched out. An excellent technique and tip!
Denise, this is great! This method looks so do-able and even (dare I say) fairly easy. Such a clear explanation, too. I'm going to send this post to my niece.
Recently I mailed to her a box of Stuff that belonged to my grandfather (her great-grandfather), because she feels a deep connection to that side of the family and she's much younger than I am. (In answer to the question I've learned to ask, "Who will take care of the Stuff when I'm gone?") One of the items is an award my great-grandfather got when he was chief clerk for the Commandant at the Navy Yard in Charleston during WWII. It is quite large, and seems permanently rolled — I didn't even try to unroll it. My niece is a resourceful person and will probably handle these directions with dispatch!
Thanks Carol. It sounds like you want advice on how to repair a broken photo. Good question. I have a few damaged photographs too. I will add the topic to my To Do list! Thank you for the suggestion.
This is great information. I have some very tightly rolled marriage certificates that I've been afraid to touch. Also, if you ever have the inclination, could you post something about repairing a photo with a broken corner. Not scan it (which I did before I broke the corner!) but the best way to put the two pieces together again. It's a photo about 1870-1880 on stiff thick paper?
Thank you for a great set of instructions! I have several school photo panoramas of my mother's grade school classes (early 1930s), and one long group shot of my grandfather and his fellow employees (probably early 1940s) that are so tightly rolled, I had despaired of ever being able to view and scan them. I can't wait to try this.
Denise! I am SO happy you posted this amazing step-by-step guide. After we had talked about this at Jamboree, I did a little bit of research on the subject, but it was still a little complicated for me. This breaks it down to my level; much easier than the other articles I had read. Now I'm ready to go and do this same process.
Oh, and thanks for mentioning the photo stitching software. I've been using a program that works great for my legal sized documents. I don't think many genealogists consider this option when scanning their documents and photos, so I'm happy you're bringing this to the public's attention.
Good point kdosset about the nearby heat! Avoid heat registers or nearby heaters when situating your humidification chamber.
Regarding ink on these old documents — use good judgement about the water temp. It's humidity, not hot vapor that you want. It may take time with very brittle documents, but mine have always relaxed enough to be unrolled.
Thanks for the great post. I did want to mention that if you have in-floor heat do not put the box on the floor as it will get warm and can cause condensation. (I learn this the hard way doing a different project.)
This is so helpful – I have several old photos still tightly rolled, plus a large old paper document hand-written with details of the family. My concern would be about the ink used in the document… it's impossible to scan in the tight roll, and I'm supposing that if I use barely room temp water it wouldn't affect the ink -?
I really appreciate the time and effort that went into explaining the procedure. I have both of my grandmothers' high school diplomas, both with very ornate artwork, and of course have been stored rolled for 70+ years. Thanks for sharing.
Thank you for the great post. I just acquired some documents, not photos, that were rolled tightly. So this post is timely.