:format(webp)/cdn.vox-cdn.com/uploads/chorus_image/image/55274029/happy_cutt_offs_coachella_driely.0.jpg)
Racked is no longer publishing. Thank you to everyone who read our work over the years. The archives will remain available here; for new stories, head over to Vox.com, where our staff is covering consumer culture for The Goods by Vox. You can also see what we’re up to by signing up here.
Polling friends and co-workers about the summer clothing items they most needed help buying, I was pretty surprised at the number of times I heard “jean shorts!” I’ve got a growing collection of jean shorts at home, but it’s not because I keep buying them — it’s because I make them.
Making them yourself saves you money and gives you a lot of control over how they look in the end. I guess I thought everyone made their own jean shorts, but after talking it out with several people, apparently not. (Which makes the number of cut-off shorts I see for sale for upwards of $70 make much more sense.)
If you’ve never done it (successfully) before or if it’s been awhile, making cut-offs is both exactly as easy and much harder than you’d think. Essentially, all you have to do is choose a length, cut them, and then throw them in the wash to get the fray going. But there are a few things to keep in mind throughout the process to make sure you don’t end up with no pants and 10 pairs of crooked, too-short jorts.
:format(webp):no_upscale()/cdn.vox-cdn.com/uploads/chorus_asset/file/8690955/high_waisted_cutt_off_driely.jpg)
First, pick out a style you want before you snip. There are four things to consider here: rise, fit (how tight or baggy they are), inseam length, and whether you want a frayed or cuffed edge.
The first two factors are totally dependent on the jeans that you start with. I’ve got a few shorts archetypes I like to shoot for when I’m making mine, all of which translate pretty easily into jeans styles. These include (but aren’t limited to) low-slung and slouchy (start with boyfriend jeans or anything oversized); high-waisted and relaxed (start with mom jeans); high-waisted and fitted (retro, good-butt jeans); and mid-rise, just-right shorts (your everyday jeans; I look for Levi’s 501s and 550s that hit a little below my belly button).
The cardinal rule of picking out pants to jort-ify: Don’t start with jeans that are skin-tight in the leg (nothing is worse than muffin top on the bottom). The pants I like to wear are usually way too tight in the legs for making into cut-offs, so I typically buy jeans or even longer shorts at a thrift or consignment store (or eBay) for $5 to $25 instead of cutting up pants I already own. You can use any old pair as long as they fit the profile you’re going for.
The legs rule actually makes finding the starting pants way easier, because you can look stupid from the thighs down and just worry about how the pants look on your butt and waist. Crazy taper on those mom jeans? Whatever, you’re going to cut them off anyways. I also find that starting with denim with zero stretch helps in the sausage leg department; they loosen up a lot after the first wear.
Got your jeans? Cool. First step: Try them on before you decide where to cut. This is important. Use chalk or a fabric marker (or anything that will wash out) to make a mark on the outer seam where you think you want the shorts to hit.
If you’ve got a pair of shorts you really like that has the same rise/fit as the pants you’re cutting off, you can use them as a template instead. Lay them flat across your soon-to-be new shorts and use chalk or a fabric marker to mark where you want the jeans to hit. (If you’re confident in your perfect shorts template, mark all the way across, skip the rest of the steps, and just go for it.)
When you’re ready, cut in a straight line across the leg about two inches below where you made your mark. Be conservative — you can’t take this step back.
Third step: Try them on again!! This is even more important than last time. Cuff your jorts up a bit, or fold them under to see how they’ll look when you make your final cut. (Look good? Do you want cuffed jorts? Skip ahead to the ironing.)
Verify the mark you made earlier, and make a new mark if you want your shorts shorter or longer than you thought initially. Resist the urge to cut them on your body (yes, people do this). Take your shorts off and fold them in half, with the waist and inseam exactly lined up. Do your marks line up? Good, because they’re supposed to. If they don’t, correct it.
Step four: Time to cut! Cutting at an angle looks the most flattering on your body — if you cut straight across the leg when it’s laying flat, it’ll actually look kind of crooked (and if you’re going Daisy Dukes-short, it leaves you with some serious ass cleavage and/or shorts that ride up in the crotch area).
-
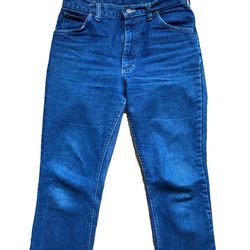 Start with pants!
 -
 Try them on and mark where you think you want to cut them.
 -
 Cut across 2-3 inches below the mark.
 -
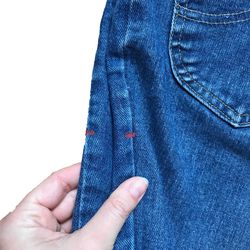 Make sure your marks line up.
 -
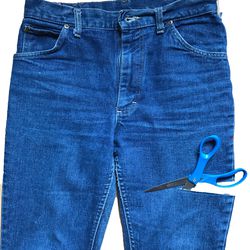
 On each leg, measure a straight line from your outer leg mark to the inseam and make a dot here.
 -
 Measure 1.5-inches below the inseam dot.
 -
 Make a mark there. You should now have three marks on each leg.
 -
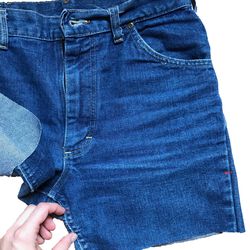
 Draw a straight line from the lower inseam dot to the mark on the outer leg. This is your cut line.
 -
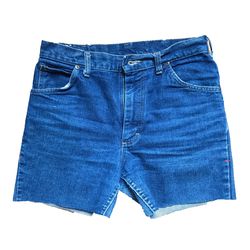
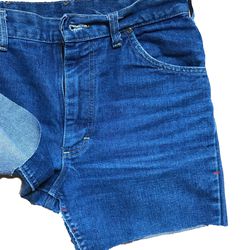
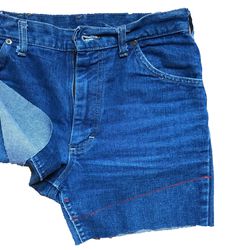
 Ta-da! After a wash, the hem will look frayed. (These shorts are freshly cut.)


According to Janet Sung at Denim Refinery, you want the inseam of your shorts to be 1.5 inches lower than the outer seam. Take a ruler or any straight surface (a big book works) and eyeball a straight line from the mark on the outer leg to the inner seam, and make a tiny dot there. Then, measure (or eyeball) 1.5 inches below that dot, and make a mark there. Finally, use the straight surface to actually draw a final cut line from the original mark on the outer leg to the new, lower mark on the inner leg.
After you go ahead and cut along that line, try them on and see how they look! If you ignored my anti-sausage leg tip and started with too-tight jeans, you can snip a teeny tiny bit up the outer seam to create a little more room in the legs.
:format(webp):no_upscale()/cdn.vox-cdn.com/uploads/chorus_asset/file/8690533/cuffed_levie_driely.jpg)
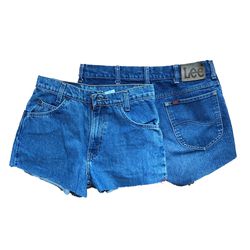
If you are cuffing your hem, fold them up once or twice, depending on your desired look, and iron the cuff down so the edges are nice and creased. You can sew a single stitch or an X on both the outside and inside seam to keep the cuff perfect even after washing. (If you choose not to, you’ll have to re-cuff and iron every once in awhile.)
And how do you get that fray? Just throw them in the wash and voilá. Depending on the denim you started with, you might have to wash them a few times for this effect. Be patient, it will come. If you are, like, really impatient, you can use tweezers or the pointy edge of your scissors to pull out some of the white threads that run across the denim, which will make the blue frayed threads seem longer.
For advanced jorts-makers: I received a tip from Racked’s editor-in-chief that ripping the shorts instead of cutting them gives you a better fray right off the bat. I tried this out and can verify that indeed it does — but it’s a little tricky to rip in a straight line, so go this route at your own risk.
Enjoy your new shorts!