FREE Standard Shipping On Orders $100 Or More! *
How to Replace an Above Ground Pool Liner

If your above ground pool liner is looking a bit... shabby - replace it! The cost to replace an above ground liner yourself can be less than half the cost of contractors, who typically double their liner cost, and then charge $500-$1000 for labor.
A simple weekend project, replacing a pool liner requires only basic tools, and a small pump to drain the pool.
Aboveground pool liner installation does require some specialized knowledge, which you'll find below - let's get started!
Q: How do I Measure for a New Pool Liner?
A: Very Carefully!
This could be the most important step in the process of replacing a pool liner - however, since most aboveground pools have a flat bottom, measuring is much simpler than for inground pools.

You'll need a measuring tape that is longer than your pool, and a helper to hold the other end. For round pools, measure the diameter (across the pool), from wall to wall. Be sure to measure from the wall, not from the edge of the horizontal top rail.
Oval pools will need wall to wall measurements for the width and the length. For the length measurement, be sure that you are measuring from the exact apex of the curve, to obtain the longest length. Likewise, when measuring the width, measure straight across the pool, be sure that your tape is at right angles to the walls, and not running askew.

Wall height (or pool depth), is the next measure to take. Use a hard measuring tape and measure from the flat floor (not any pool cove), to the top of the pool wall (overlap or Uni-Bead liners), or to the top of the bead receiver (beaded liners).
Most above ground pools have a wall height of either 48", 52" or 54". Double check your wall height measurement in several spots, to be certain.
Q: How to Order an Aboveground Pool Liner?
A: Select your Type and Size.
As mentioned above, there are a few types of above ground pool liners.
- Overlap liners fold over the top of the wall, visible from the outside.
- Uni-Bead liners hang on the top of the wall, with a thick vinyl hook.
- Beaded liners lock into a track or groove, called a bead receiver.
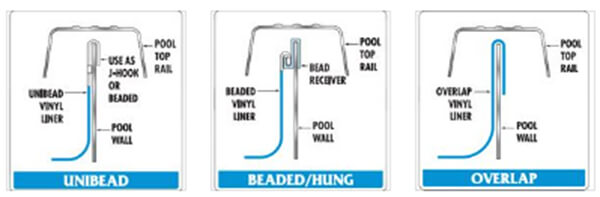
There are other types too. Doughboy pools use an expandable pool liner, and Kayak pools have rectangular pool liners.
Unibead/J-Hook, Overlap or Beaded? The most popular liner is the overlap style liner, but perhaps the beaded liners ought to have a wider appreciation - they are much easier and quicker to install, since you do not need to remove the top rails. You can use a Uni-Bead liner in place of an overlap liner, or you can convert to a beaded liner using, 'bead receiver', also known as conversion strips.
Upgrading to a beaded liner will mean that when you remove the old, overlap liner it will be the last time you'll have to remove all those top rail pieces. And if you have done this before you can understand the time and hassle you will save. Another reason for installing a beaded liner is that they can give a classier look to your swimming pool, as there are more liner patterns. Because the overlap won't vary, they can have a waterline tile pattern, that won't be wavy.
Picking a Liner Color / Pattern: Darker colors hide the dirt a bit, and have a small solar benefit. Wavy patterns on the floor also help hide underlying floor imperfections and dirt/debris, as compared with plain blue liners.
Q: How Much Do Pool Liners Cost?
A: Pool Liner Cost = Size x Type x Thickness
Above ground pool liners vary in cost, ranging from $99 for a 12' round overlap liner, to $660 for an 18x33' oval beaded liner.
Length, width and depth is the main pricing factor. Add a few dollars for a beaded or uni-bead top edge, and a few more dollars if you opt for a thicker, 25 mil liner, instead of the standard 20 mil pool liner.
Pattern is another factor in the price of a vinyl liner. Basic blue is always the cheapest pool liner. Swirl bottoms add to the cost of a pool liner and an all-over print adds a few more dollars to our pool liner prices.
Q: Do I Need Pool Liner Accessories?
A: Probably, at least Some...
Faceplates & Gaskets: It's always recommended to replace your gaskets and faceplates for the skimmer and return wall fittings. If you have rust on the wall below either, it would be advised to replace the entire skimmer or return fitting, to ensure a better seal this time around.
Wall Foam: If walls are rusty and crusty, protect your new pool liner with wall foam, held in place by spray adhesive. Also helps insulate the wall, and gives a nice, soft feel to the wall.
Pool Cove: Placed at the base of the wall, these angled foam pieces (4' long) protect the liner from rust at the base of the wall, and make a nice transition from floor to wall. If you already have pool cove, you may be able to reuse it again.
Floor Padding: To hide an uneven floor or prevent footprints, to protect the liner from rocks, weeds and insects, or to just give the floor a soft and smooth feel, Liner Shield can be installed between the liner and the floor.
Q: How To Install Aboveground Pool Liners?
A: Like this!
Drain the Pool: A small submersible pump is best for draining the pool. A pool cover pump will do, or a pump can be borrowed or rented for a day. To get out the last bit of water, cut the liner with a razor knife just above the floor on one side, and lift half of the liner off the floor, to pool the water in a smaller area.
Remove the Old Liner: With a large screwdriver or cordless drill, remove the screws on the skimmer and return faceplate. For an overlap liner, you may have to remove the top rail, to be able to remove the coping strips, but if it can be avoided, they are better off left in place. For beaded or uni-bead liners, just lift and pull to remove the liner from the top of the wall. Cut up the liner into strips and roll them up. Set them out with your recycling (vinyl is recyclable!).
Floor & Wall Prep: Walls can be wiped clean if they have any dusty, crusty deposits. If there are rusty deposits, scrape and paint and then cover with wall foam. Wall dents or crumples can usually be straightened out with a heavy hammer and two 2x4's, one on each side of the wall. Most aboveground pools have sand floors. Using flat trowels, or wood floats, smooth out the sand, shaving off high spots and filling low spots. If you have weeds, rocks or algae in the sand, it's best to replace with fresh masonry sand (without small pebbles), or install Liner Shield or Happy Bottom floor padding.
Drape the New Liner: With 1 or 2 helpers, pull the liner carefully over the pool and over the wall (overlap and uni-bead liners), or lock it into the track (beaded liners). Once you get the liner hooked in place in several locations around the pool, work around the pool, adjusting and evenly attaching the remainder. Overlap liners commonly use coping strips to hold the liner in place. Pull the liner over the wall until it's just off the floor by 1-2 inches, and snap on the strips. For beaded and uni-bead liners, just pop the liner in place, and pull out any floor wrinkles toward the wall.
Fill the Pool: We're almost done now! Drop in a garden hose (or two), and fill the pool, keeping an eye on overlap liners to be sure that they don't slip down the wall. Fill the pool all the way to the top before proceeding to the next step.
Install New Faceplates & Gaskets: With the liner stretched into place, you can now screw on your skimmer and return faceplates, tightening down the screws as hard as you can. Be sure to use a properly sized Philips head, usually a #3, so you don't strip the screw heads. Once they are tight, use a razor knife to cut out the vinyl inside of the faceplate (connect your pump/filter hoses first!).
That's it! You are almost ready to jump in the pool! With the pool equipment connected and the water level full, you can test for chemical levels: chlorine, cyanuric acid, hardness, total alkalinity and pH. Begin filtering and sanitizing the pool water right away.
Enjoy your new pool liner ~ and the money you saved!