Transform blog posts into email newsletters. With Jetpack Newsletter, visitors to your site can subscribe and receive email notifications for new posts.
Many visitors reach your site once and never come back. However, you can convert more of these visitors into regular readers by making it easy to subscribe to your content. Jetpack makes this simple by letting your readers know whenever you’ve published a new post.
Activate Jetpack Newsletter
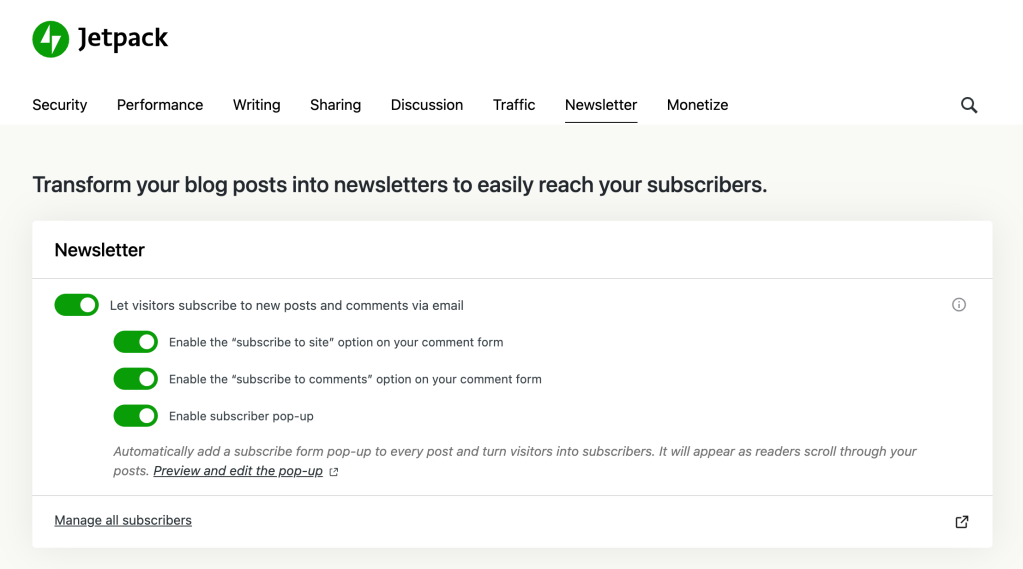
To activate Jetpack Newsletter:
- Navigate to Jetpack → Settings → Newsletter.
- From the Newsletter section, toggle
Let visitors subscribe to new posts and comments via emailto the on position.- To allow visitors to subscribe to receive notifications of all new posts when leaving a comment, activate the
Enable the “subscribe to site” option on your comment formoption. - To allow visitors to be notified of future comments on a post, activate the
Enable the “subscribe to comments” option on your comment formoption.
- To allow visitors to subscribe to receive notifications of all new posts when leaving a comment, activate the
If you’ve selected either of these options, you’ll see new checkboxes at the bottom of the comment form of each post and page.
Note: Jetpack will only send out notifications for new posts. Publishing other post types (like pages or a custom post type) or making updates to an already published post will not send a notification e-mail.
Customise the Newsletter experience
The Newsletter feature has more settings to configure, which are listed below.
Email configuration
You can set up how the newsletter will arrive in your subscribers’ email inbox. you can enable images appearing in the emails and whether to include the full text or an excerpt of your post:

Welcome message
If you want to customize the message your subscribers receive upon signing up to your blog, you can have a special box where to add your bespoke welcome message:

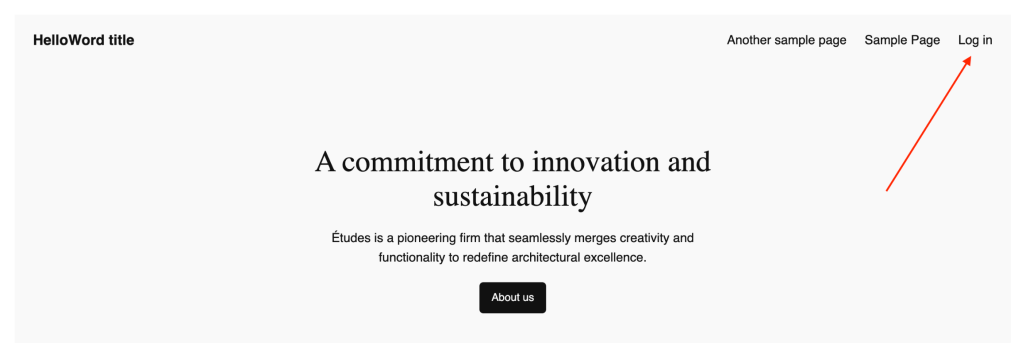
Subscriber Login Block
Effortlessly incorporate the Subscriber Login block into your site navigation.
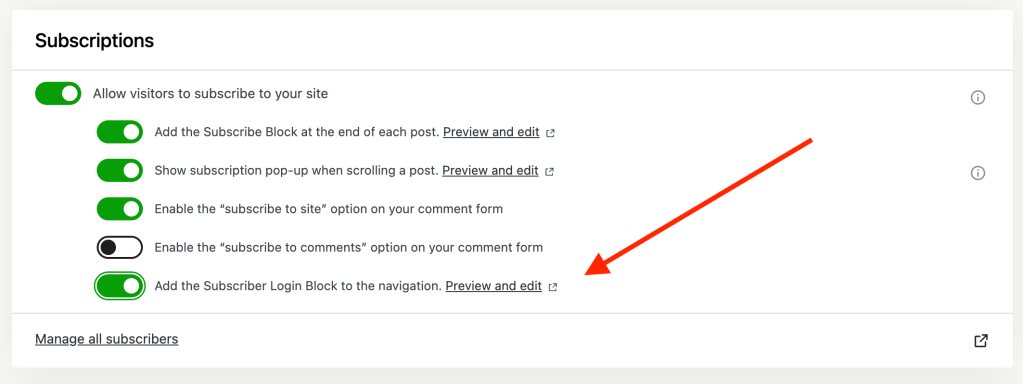
Once enabled, the Subscriber Login block will seamlessly integrate into your navigation, enhancing user experience and accessibility. The image below shows it in action:
If you want to tweak the appearance or functionality of the Subscriber Login block, you can click on the “Preview and edit” link to access customization options. From there, you can adjust styles, modify labels, and make any other desired changes to suit your preferences.
You can read more about that on the dedicated Subscribers Login Block page.
Please note: this feature is currently available exclusively for block themes and requires WordPress Core version 6.5 or higher.
Enable a subscriber pop-up for your posts
You can enhance reader engagement by adding a subscription form pop-up to your posts. A modal window will show up as readers scroll through your content. Here’s how to set it up:
- Navigate to Jetpack → Settings → Newsletter.
- In the Newsletter section, toggle
Enable subscriber pop-upto theonposition.
Where and when the subscriber pop won’t show
- Note that the pop-up is designed only for posts. It will not appear on pages or custom post types. Instead, you can use the Subscribe Block to add a subscription form to a page.
- Posts containing a Paid Content Block or a Paywall Block will also not display the pop-up.
- The pop-up will not show for logged-in users.
- The pop-up will not show for 24 hours after being dismissed.
- The pop-up will not show if the user has already subscribed.
Editing the subscriber pop-up
If you are using a block theme, you can preview and customize the pop-up in the templates editor. You can access this feature via the Preview and edit the pop-up link located beneath the Enable subscriber pop-up toggle. This option is exclusive to block themes.
Add the Subscribe Block
The Subscribe Block allows you to insert a subscription form within any post, page, or widget area, enabling your readers to get notifications when you publish new posts.
The block also allows you to set up paid plans so that you can offer premium newsletters to paying subscribers. For more information, see the Paid Newsletters support guide.
The Subscribe Block is part of the Jetpack Blocks suite. See our Jetpack Blocks article to learn about the available blocks and how to activate them.
Jetpack Blocks require the Block Editor (also referred to as the Gutenberg editor). If you’ve installed the Classic Editor plugin, you will need to switch back to the Block Editor either by:
- Deactivating the Classic Editor: Go to Plugins → Installed Plugins in your WP Admin and deactivate the Classic Editor plugin.
- Enabling both editors: If you prefer flexibility, navigate to Settings → Writing in your WP Admin. Set Allow users to switch editors to Yes.
See Using Blocks and the Classic Editor for more details.
It may happen that an editor that comes with a custom theme or plugin prevents you from using the Block Editor. In that case, please contact the respective plugin or theme author for further assistance.
Add the Subscribe Block at the end of each post
You can set the subscribe block to appear at the end of each post from the Newsletter settings:
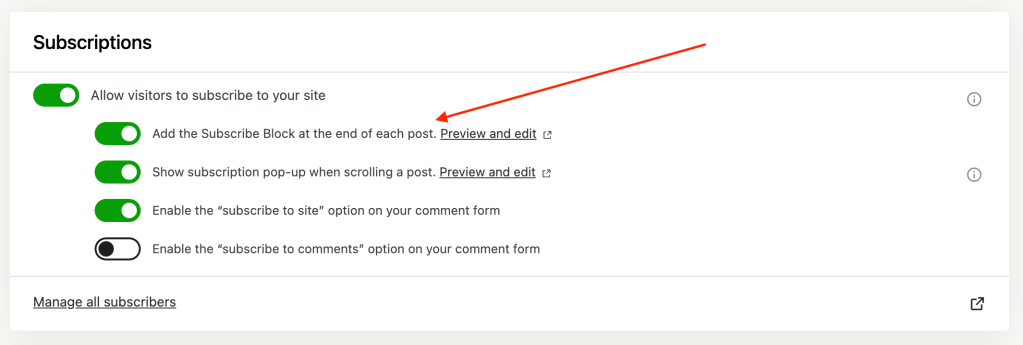
As the settings title says, you can automatically add the Subscribe block after each post.
You can read more about this on the Subscribe Block documentation page.
Add the subscription form with shortcode
If you do not use the block editor, you can still insert a subscription form using the jetpack_subscription_form shortcode. Here is an example of such an implementation:
[jetpack_subscription_form title="LET ME KNOW ABOUT NEW POSTS 🔔" subscribe_text="Enter your email address to subscribe to this blog and receive notifications of new posts by email." subscribe_button="Subscribe" show_subscribers_total="1"]Note that the jetpack_subscription_form shortcode does not support configurations for premium newsletters intended for paying subscribers.
WordPress.com accounts for subscribers
Previously, your site visitors who subscribed using their email addresses were added as email-only followers. Such accounts were limited in functionality. Now, by confirming their subscription to your site, your subscribers will be provided with a WordPress.com account. This change will not alter the subscriber’s basic experience or collect additional personal information; it simply enhances their access to features.
Subscribers will continue to manage their subscriptions and receive updates in the same manner as before. A WordPress.com account will enable your subscribers to interact with sites more fully once logged in, including the ability to interact with liked content, comment on posts, access subscriber-only content, and take advantage of the WordPress.com Reader and our mobile apps.
The WordPress.com integration also unifies subscription counts and management methods for site owners and subscribers alike. Merging these subscriber types into one comprehensive account also simplifies the interface for site owners on both Stats and Subscribers pages.
Existing email-only subscribers will have a WordPress.com account created on their next interaction, such as managing their subscriptions or accessing subscriber-only content.
Subscribers will not receive marketing notifications from WordPress.com or Jetpack as a result of this, nor will they be automatically subscribed to our blogs.
Customize the subscription confirmation email
Add your own voice by customizing the subscription confirmation email we send when a visitor subscribes to your website or blog comments. You can do this by following these steps:
- Go to your site’s WP Admin.
- Navigate to Settings → Reading.
- Scroll down to Follower Settings.
- Update the content in
Blog follow email textand/orComment follow email text. - Click Save Changes.
Customize the content of new post emails
You can customize some basic features of the emails we send when you publish a new post. There isn’t currently a way to customize the style/branding of the emails.
Content
Encourage more traffic to your site by including only a teaser of the blog post in the email. Choose what content to include in your subscription emails in a couple of different ways:
- Excerpt or Full Text: Go to Settings → Reading in the WP Admin to adjust the setting under
For each post in a feed, includeto either Full text or Excerpt. This will also change what shows in your RSS feed. - More Block: Everything that is above the More tag will appear in the subscription emails, followed by a link inviting users to click to continue reading. Everything that is below that tag will only appear on the post.
Featured Images
Include your post’s featured image at the top of the post notification email.
To activate the Featured Image setting:
- Go to WordPress.com and switch to your Jetpack-powered site.
- Navigate to Settings → Newsletter.
- Toggle
Enable featured image on your new post emailsto the on position.
Sender Name
You can change the sender name by:
- Go to Settings → General in WP Admin.
- Change the site title.
Avatar or Profile Picture
To change the email author image, add a Gravatar for each author on the site. You can make it one brand image, like your site logo, if you want to make the avatar consistent.
Choose Newsletter recipients
With Jetpack Newsletter, you can decide who receives the email (everyone, anyone subscribed or paid subscribers only). You can find the Newsletter visibility settings from the Post settings sidebar. The Newsletter settings will appear after you press the Publish button; they are part of the pre-publish checks.
To learn more about the available options, see this support guide. The Paid Newsletters support guide also explains how to get paid subscribers to your newsletter and how to set up paid plans.
‘Post & email’ vs ‘Post only’ options
Jetpack Newsletter provides a way to manage your post notifications with two clear options: Post & email and Post only. This allows publishers to decide whether to send a new post as an email to their subscribers. You can find these options under the Newsletter section during the pre-publish checks for your posts.
The toggle is enabled by default for sending an email when you publish a post. If you do not wish to send the post as an email, simply switch the toggle to Post only before publishing. By selecting Post & email, your post will be sent out as an email to your subscribers upon publishing.
View or remove subscribers
From WP Admin, you can view your subscribers with these steps:
- Navigate to Jetpack → Subscribers.
- That will take you to where you can view and manage your list of subscribers on your WordPress.com dashboard.
You can also view your subscribers by going directly to your WordPress.com dashboard and following these steps:
- Switch to your Jetpack-powered site.
- Navigate to Users → Subscribers. You will see a list of your subscribers and can manage the list there. The list contains some basic information about the subscriber: their subscription type and when they subscribed.
To see more information about a particular subscriber:
- Click the three dots (meatballs menu) icon next (to the right) to the particular subscriber.
- Select View to see more details about the subscriber.
- Click Remove to delete that subscriber.
The Subscriber > Details page shows data about:
- Emails sent to the subscriber
- Open rate
- Click rate
- Subscription details: subscription date and subscription plan information
- Subscriber information: email, country and acquisition source
Import subscribers
You can import subscribers manually or import a CSV list of existing followers from another email platform or list. While you can only add up to 100 subscribers this way for free, you can add up to 10,000 subscribers if you upgrade your plan to a Jetpack Social or bundled Jetpack plan.
Export subscribers
You can download a CSV containing your email subscribers by:
- Go to WordPress.com → My Site(s) → Jetpack → Subscribers.
- Click the three dots icon next to the Add subscribers button.
- Click Download email subscribers as CSV to export your list of subscribers.
Track growth and performance
Analyze your subscriber growth and newsletter performance with Jetpack Stats. Jetpack Stats provides a dedicated Subscriber Stats view with insights and data about your subscriber base.
Still need help?
Please contact support directly. We’re happy to advise.
Privacy Information
Jetpack Newsletter is deactivated by default. It can be activated any time by toggling the Allow users to subscribe to your posts and comments and receive notifications via email setting in the Subscriptions section from Jetpack → Settings → Discussion in your dashboard.
| Data Used | |
|---|---|
| Site Owners / Users
To set up and process subscriptions, we use the subscriber’s email address, as well as the ID of the post or comment (depending on the specific subscription being processed).In the event of a new subscription being initiated, we also collect some basic server data, including all of the subscribing user’s HTTP request headers, the IP address from which the subscribing user is viewing the page, and the URI which was given in order to access the page ( Additionally, for toggle activity tracking (detailed below): IP address, WordPress.com user ID, WordPress.com username, WordPress.com-connected site ID and URL, Jetpack version, user agent, visiting URL, referring URL, timestamp of event, browser language, country code. |
Site Visitors
To set up and process subscriptions, we use the subscriber’s email address, as well as the ID of the post or comment (depending on the specific subscription being processed).In the event of a new subscription being initiated, we also collect some basic server data, including all of the subscribing user’s HTTP request headers, the IP address from which the subscribing user is viewing the page, and the URI which was given in order to access the page ( |
| Activity Tracked | |
| Site Owners / Users
Functionality cookies are set for a duration of 347 days to remember a visitor’s blog and post subscription choices if, in fact, they have an active subscription.Additionally, we track when, and by which user, the feature is activated and deactivated. We also track when, and which, configuration settings are modified. |
Site Visitors
Functionality cookies are set for a duration of 347 days to remember a visitor’s blog and post subscription choices if, in fact, they have an active subscription. |
| Data Synced (Read More) | |
| Site Owners / Users
We sync options that identify whether or not the feature is activated and how its available settings are configured. |
Site Visitors
None. |
