Lagunitas Field Trip


Lagunitas
Lagunitas

Last weekend we went to Petaluma.  We’d only been talking about going for about four years!  But now that the kids are older and can be trusted not to burn the house down, well, we thought an overnight stay, just the two of us, would  be a good thing.

Lagunitas Sampler
Lagunitas Sampler

What made the occasion a must this time round, was that it was Kevin’s b’day. His wish was to go to his favourite brewery in the whole wide world and as luck would have it, it’s only a couple of hours away.  So, just like I celebrated my b’day with my favourite goats, it was only fair that he should celebrate it with his favourite beer!

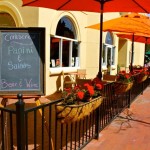
Having lived here for so long,  I’m still surprised at how much there is still left to see and experience! I was totally delighted by what Petaluma had to offer.   Nobody has ever said that this place is a must see, so my expectancies were kinda low.  Besides, I honestly thought that the whole weekend was only going to about beer and more beer.   But when we started walking around town and saw the cute little antique shops and people just lapping up the sun outside the charming Bistros,  I wanted to stop and savour every minute.  We couldn’t have asked for a more beautiful day either.  The sky was blue and the air was warm…and what was that????  Is that French I hear??

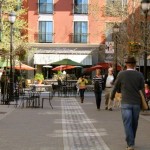
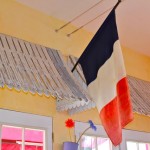
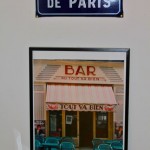
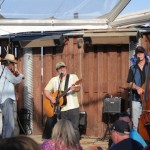
Sacre Bleu!! It was!!   It seemed to me that for the most part, the locals were actually french! I could catch snippets of french conversations going on at every corner and bar!  And with French music playing in the air and french decor in every restaurant, I felt like I had just stepped into Woody Allen’s Midnight In Paris!  And I fell in love!!

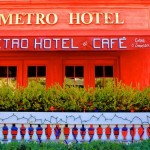
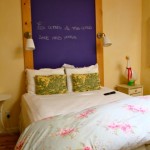
I had almost booked us a room at a Days Inn or Best Western, as Kevin’s only priority was that we were close enough to Lagunitas Brewery so he could have his pint and drink it…literally…and not worry about the driving part.  So I almost did not see this quaint little Metro Hotel just down the road from Petaluma’s Town Center.  It was perfect!! The french decor just added to our french experience and next time we go…and I’m pretty sure there will be a next time…we will definitely stay there again.

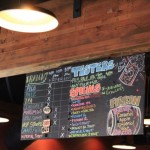
The Lagunitas Tour was also very entertaining. We could hear the boisterous laughter from the parking lot which became louder and louder and more enticing as we neared the entrance of the bar!  It was full…the inside bar, the outside beer garden…pretty much every space was taken…but for a tiny corner  at the end of the room.  We sampled some beer while we waited for our tour…well one of us did…and then were led to where the magic happens.

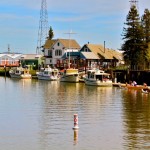
Before we left, we paid a visit to Sonoma which is another very interesting and charming town.  You find anything from Cheese Shops to Hat Shops, and Pottery Shops to Restaurants.

Maybe it was because it was our first get away together with no kids in like ever…but what a marvelous weekend that was…and we both hope to return very very soon!

Happy Birthday Kevin!!

Cheers
Cheers

Meyer Lemon Cake

Meyer Lemon Tree
Meyer Lemon Tree

Now that my baby hummingbirds are no more and I don’t have to tip toe around my lemon tree anymore, I have been thinking of ways that I can use up the numerous lemons it still has left on it.

Meyer Lemons
Meyer Lemons

Lemon marmalade~Check

Lemon Marmalade Truffles~Check

Lemon Salt~Check

Lemon Olive Oil~Check

Endless Amounts of Lemonade~Check

I have a few lemon cake recipes that are a staple in my collection but I’m always on the look out for new ones that may come my way.  So when my friend Karen graciously shared some of her lemon cake with me last week, my eyes lit up.  And when she shared her recipe…well!! I then quickly picked some lemons and got started.

I was blown away with the tanginess and moistness of this cake.  I tweaked the recipe just a tiny bit…and I think if you like a strong lemon taste in cakes and baked goods, then you can’t go wrong with this one!

Meyer Lemon Cakes
Meyer Lemon Cakes

Ingredients

4oz butter
2oz sour cream
3 eggs
8oz sugar
8oz self raising flour
1tsp baking powder
about half a cup of lemon juice (according to taste)
zest of one lemon

Cream butter, sour cream  and sugar together until light and fluffy.

Add eggs, one at a time.

Slowly add in flour, baking powder and salt. Then add lemon juice and zest of one lemon.

Butter and flour a pan of your choice and pour the batter in the pan. You can make into cupcakes or use a Bundt pan. I divided my batter into three five inch cake pans.

Place in a cold oven.  Set the oven to 350 degrees and bake for one hour if putting in a Bundt pan.  Check after 45 mins. Allow to cool for 10 minutes and turn out onto a cake platter.

Prepare Lemon Glaze
Prepare Lemon Glaze

Glaze

juice of a lemon
4oz sugar

In a small bowl, combine the juice of one lemon and ½ cup sugar.

While still warm, drizzle the cake with the lemon glaze and let cool.

Meyer Lemon Cake
Meyer Lemon Cake

Kevin just reminded me that the best way to use meyer lemons is squeezed into a glass of gin…Cin Cin Kevin!!

Our Wedding Song~My Best Girl

20 Years On
20 Years On

And since we’re on the subject of Anniversaries and Weddings and all that mushy stuff, I thought I’d share with you our Wedding Song.  Never fails to bring tears to my eyes.  Very Special Time and Very Special Memories!  To 20 Wonderful Years!


Potato Gnocchi


potatoes

Oh potato gnocchi!!  You don’t bring me the good memory that you should…but it is a memory…and kind of funny too although it didn’t seem to be at the time!

Kevin and I had just gotten married and moved in Mr Daniel’s flat where we just had the essentials…couple of pots and pans, a kettle, two plates and two mugs!  It was all we needed.  We ate out the first few nights…but then I wanted to show my new husband what I could do.

Fresh Gnocchi
Fresh Gnocchi

I remembered an Italian friend had made these delicious gnocchi for a group of us once.  He was like the maestro on one side ofthe table, with a bunch of girls surrounding him, watching him orchestrate this magnificent dish.  It looked so easy…but then so does gymnastics and ice skating.

So that was it…that’s what I’d make for our first dinner I thought, as I set about this joyful task!  I worked and slaved all day long in the kitchen while my new husband was slaving away at his job. And then the moment of truth!  I boiled the gnocchi  I’d made, but no amount of sauce could hide the mess underneath!  I was in tears!

Kevin
Kevin

My lovely husband sat down and got ready for his meal and just like the trooper he’s always been and still is, he put that first bite in his mouth and with a smile told me how good it was!!  He never did make it to the second bite though because  I snatched it from his hand, and took the plate from the table and with a whoosh, and a few sobs,  they ended down the toilet!  He still does not know what he had said to get that reaction from me and still insists to this day, that they were jolly good gnocchi…but wouldn’t you say that to your new wife?

So it’s been 20 yrs since that fateful day!!  I never made them again and still get the shivers when I hear the word GNOCCHI!! But since I have a blog, and since it’s our 20th Wedding Anniversary today, I think it’s about time I gave it another go, this time with the help of foodnetwork.

Ingredients
Kosher salt
1 pound russet potatoes (two medium sized potatoes)
3 to 4 large egg yolks
1/2 cup freshly grated Parmesan
1/4 teaspoon freshly grated nutmeg
1/2 teaspoon gray salt
1/4 teaspoon freshly ground black pepper
1 cup all purpose flour

Directions

Preheat oven 425 degrees.  Bake the potatoes for about 45 mins.

When cool enough to handle, take off the skins and grate the potatoes in a bowl.  You should have about two cups.

Add the rest of the ingredients and form into a ball.  Let rest for half an hour.

Keeping your work surface and the dough lightly floured, cut the dough into 4 pieces. Roll each piece into a rope about 1/2-inch in diameter. Cut into 1/2-inch-long pieces. Lightly flour the gnocchi as you cut them. Roll each piece into a ball.

Using the back of a grater, roll each piece down the back.  This creates a rough surface for the sauce to cling to.  Do this with each piece. Place on a well floured (or well sprinkled with semolina).

At this point you can freeze them.

Or if you want to cook on the same day, you need to let dry for about half an hour under a fan.  Turn each one and let dry for another half an hour.

When ready to cook, bring a large pot of water to a boil and add salt. Drop in the gnocchi and cook for about 90 seconds from the time they rise to the surface. Remove the cooked gnocchi with a skimmer, shake off the excess water, and serve as desired.

Delicious with tomato sauce and I’m sure it’s just as nice with just butter and cheese and some herbs of your liking.

Moment of Truth
Moment of Truth

This time, I must say, the gnocchi got two thumbs up.  Not just from Kevin…but also from me:)  I wish I hadn’t waited 20 years to try these again.  I will sure not wait another 20!! Happy Anniversary my qalbi…here’s to many many more!! Love you with all my heart!

Our Honeymoon Dinner


Sad Sunday

Sunday's Empty Nest
Sunday’s Empty Nest


Went to check on Peter and Paul today and found the nest on the floor.  I’d like to think that they flew away on their own but I doubt they were old enough.  So here are the last photos from the last couple of days.

You Shall Be Missed !!

Dukkah


Dukkah
Dukkah


I know right??  I had never heard of it before either…

It so happened that I was in a chat with a group of friends comparing things we love that are made with nuts.  Lots of sweet pastries and cookies were mentioned in our conversation and then Dukkah came up!  My ears perked up and I had to know what it was.

Turns out, Dukkah (pronounced DOO-kah) is an  Egyptian spice blend of toasted nuts and seeds that can be served as a dip with bread and olive oil, or sprinkled on roasted vegetables, pasta, feta cheese, and even peaches.  My friend Leslie also uses it as a thickening for sauces…so with so many uses, I say this is a must have in every kitchen.

It is easy to make at home but if you’re in a rush or something, you can also find it at Trader Joe’s.

Here’s my own version…

Nuts
Nuts

For Dukkah:

1/4 cup hazelnuts, toasted
1/4 cup pistachios, toasted
1/4 cup almonds, toasted
1/4 cup pine nuts, toasted
5 teaspoons coriander seeds
4 teaspoons sesame seeds
1 tablespoon cumin seeds
1 teaspoon whole black peppercorns
1/2 teaspoon fennel seeds
1 tablespoon paprika (hot or sweet)
1/2 teaspoon ground cinnamon
kosher salt to taste

To make dukkah: toast nuts together in a 350° F oven for 7 to 10 minutes, stirring occasionally, until just golden and fragrant.  Let cool to room temperature.  Meanwhile, toast remaining spices (except for paprika, cinnamon, and salt) in a large pan over medium heat for 5 to 8 minutes, or until fragrant and toasted.  In a food processor or an electric coffee or spice grinder, pulse all ingredients until very finely ground, about 3 minutes.  Leave a little powdery; do not grind to a paste. Refrigerate to store because nuts do go rancid after a while.

Dukkah
Dukkah

To try it out, I made my ftira.  I rolled out a piece of dough about 6 inches across and as thin as possible.  I drizzled some oil and liberally sprinkled some dukkah and a dash of kosher salt on top.  I baked at 425 degree oven for 5 mins.  Rotated the pan and baked for a further 5 mins.  It’s ready when it baked golden colour.

Next time, I might leave some of the sesame seeds whole and also add a touch of chili or cayenne pepper to the mix…

Caught in Action


Baby Beaks
Baby Beaks

I’m still high on adrenalin writing this post.  I went outside to check on Peter and Paul and could see that Mama Bird was not too thrilled to see me there.  She just buzzed around making sure I got the message without taking her eyes off me.

Watching Me Watching You

So I honored her sentiment and went in the bedroom, camera in hand and shot these pics to share with you…mama bird feeding her babies!!  The photos are not that clear because I had to take them from behind the windows…but you get the picture!

Well Done Mama Bird
Well Done Mama Bird

This all happened within 10 seconds! Just amazing to see!


Chevre Ravioli ~ It’s What’s For Dinner


Chevre Filled Ravioli

I still had half a pound of goat cheese in the fridge waiting to be magically turned into some kind of snack/lunch/salad/dinner type thingie.

I  love having prepared frozen dinners ready for when I’m either are too lazy to cook or maybe running late or when I just can’t even be bothered to call for pizza!

Goat Cheese Ravioli!  Perfect answer to my dilemma!

How hard could it be to find a recipe for goat cheese filled ravioli?  

Oh, there are tons of fancy ones…from heart shaped ravioli filled with goat cheese and beets or butternut squash or pumpkin but I was hoping for something simpler.  Something that if I offered it to my kids, I won’t be met with the same wrinkly nose I used to give my mum when she offered stuffed cabbage for dinner!

I was just about to give up my search, when I saw this recipe which was just what I was looking for.  I used my own fresh pasta dough recipe and made some minor adjustments with the filling to cater for my family’s taste.

This recipe makes about two dozen.

Dough

Flour Eggs Oil Salt
Flour Eggs Oil Salt

2 cups all purpose flour

1tsp salt

3 large eggs

1tbsp extra virgin oil

semolina for dusting

Combine the flour and salt on a flat work surface; shape into a mound and make a well in the center. Add the eggs and 1 tablespoon of the olive oil to the well and lightly beat with a fork. Gradually draw in the flour from the inside wall of the well in a circular motion. Use 1 hand for mixing and the other to protect the outer wall. Continue to incorporate all the flour until it forms a ball. Cover and let rest for about a half an hour.

Filling

Nutmeg
Nutmeg

6 oz. fresh goat cheese

1/2 cup whole milk

1 tablespoon Italian parsley, chopped (plus more for garnish)

1/2 teaspoon grated nutmeg

1/4 cup pecorino romano

salt and fresh ground black pepper

 Cut dough into four pieces.  Take one piece and pass it through the pasta machine on no.1 setting a few times.  Then on 2nd, then 3rd, then 4th, then 5th. Cut in half.  Place a tbsp of filling about an inch apart on one piece of dough.  Brush surface with a bit of water or egg wash, around the filling. Take the other piece of dough and place on top. Secure around the filling and using a ravioli cutter or knife, cut into ravioli forms. Circles or squares or wherever your imagination takes you.

Cook the ravioli in plenty of boiling salted water for 4 minutes; they’ll float to the top when ready, so be careful not to overcrowd the pot. Lift the ravioli from water with a large strainer or slotted spoon.

Set aside

Sauce

3 tablespoons olive oil

1 tablespoon butter

1/4 cup dry white wine

3-4 cloves of garlic, chopped finely

Melt butter in a saucepan.  Add oil.  Fry the garlic.

Once all that is bubbling (without burning – turn it down if it is!) and the pasta has cooked in boiling water for 3-4 minutes, drain the pasta and then add it to the saute pan.

Once the pasta is coated with the sauce in the pan, add 1/2 cup dry white wine and simmer for a couple more minutes, stirring occationally.

Remove the pasta from the heat.  Place on the plate. 

Add parmesan and chopped parsley and serve!

Makes an ideal first course meal when served three on a plate!

Garnish and Serve
Garnish and Serve

I have tried plain goat cheese and a combination of goat cheese and ricotta which are both very good. Would be very happy to hear your ideas!

Figolli ~ Traditional Maltese Easter Cookies

Figolli
Figolli


Figolli
Figolli


Hey, it’s that time of year again!  Time to make figolli!

There are a handful of occasions  throughout the year that my kids look forward to!  And they have to be Birthdays, Halloween, Christmas and Easter time! And this is probably because each holiday has something sweet attached to it.

Halloween Figolli
Halloween Figolli


The funny thing is, we have been known celebrate each occasion with Figolli.  I have made pumpkin and ghost  figolli for Halloween, Christmas Tree figolli for Christmas and even a birthday cake figolla for Dylan’s birthday.  Yes, any day can be figolli day at my house!  We love them that much!


Broken Ear
Broken Ear

Traditionally, figolli were given to kids on Easter Sunday after 40 days of lent.  They come in all shapes and sizes, from ducks and lamb to guitars and cars.  As kids we’d look forward to the broken ones because that meant we could scoff it straight out of the oven!

So get your work station ready.  It’s not a hard recipe to make.  Just time consuming so I suggest you divide the work over a few days.  I usually start with making the dough and the filling, forming the figolli and baking them on day 1.  I leave the decorating for day 2.  Then I wrap them on day 3! And best part is eating them on day 4!  They will vanish like magic…you’ll see!!


Dough

400g self raising flour

400g all purpose flour

400g margarine

300g sugar

juice and zest of one lemon

1tsp vanilla

4 egg yolks

milk or orange juice to bind

If you don’t have self raising flour, you can use 800g of all purpose flour and add two tsp of baking powder.

Sieve flour into a large bowl or stand mixer. Rub in the margarine to a bread crumb consistency. Add the sugar and lemon rind and mix again. Lightly mix in the eggs, juice, vanilla essence and enough milk to form a soft dough. Let rest in the refrigerator.

Filling

Almond Meal and Sugar

500g almond meal

300g sugar

4 egg whites

2tsp almond essence

Mix all the ingredients together in a bowl.

Add the egg whites and stir.  If it’s too dry, add some orange juice to the mixture.

Dust a work surface with flour and roll out the pastry. Use cookie cutters or custom-created cardboard shapes to cut out two identical shapes for each figolla.

Spread a thick (about 1 centimeter) layer of the almond filling onto half the pastry shapes you’ve made, leaving about 1 cm of space around the edges of each one. Brush edges with some evaporated milk. Then cover each with its corresponding half. Push the edges together slightly and bake for about 30 mins in a moderate oven (325-350F, 175C).

Allow to cool and decorate with chocolate or icing as desired.

Icing
Icing