Category Archives: baking

Braided Buns

Braided Bun
Braided Bun

Seems like Fall is in the air as I’m finding myself seeking all kinds of excuses to stay home and bake.

Yesterday I stumbled upon this blog  Almond Corner and was absolutely thrilled by the recipes on there and fascinated by the photography.  A Maltese saying goes L-ewwel Ma Tiekol L-Ghajn…and it is so true with anything.  Loosely translated, it means that the eye is the first to eat…as now I’m completely hooked.

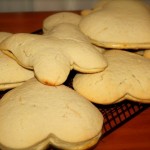
As soon as I saw these braided buns, I knew I had to make them.  I felt slightly uneasy at first as I had to convert the weight to my lbs and ozs…I know, I’m still living in the middle ages.  But besides that, I also halved the recipe and used my bread machine.  I thought the recipe called for a bit too much yeast so I adjusted it to what I thought was a good amount.  And even after all that, I was blown away by the result!

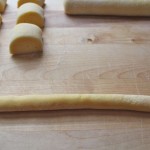
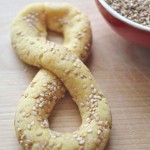
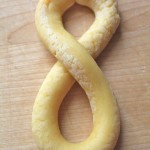
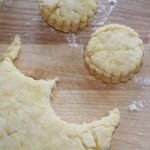
So here’s my adaptation for these delightful buns.  As you can see from my photos, I attempted braiding them but after the second try, I aborted the mission and resorted to forming them my way as I was getting myself into a knot too.
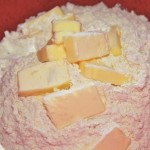
Ingredients

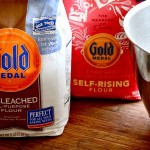
1lb all purpose unbleached flour
1 oz sugar
1/2 tsp salt
10 oz milk
4 1/2 oz butter
3 tbs oil
1 egg
2 1/4 tsp yeast

Preheat oven at 375 degrees.

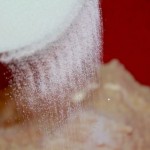
Warm the milk until it’s luke warm.

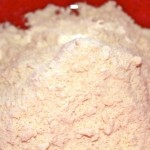
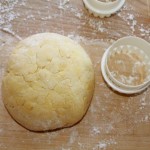
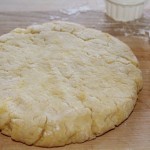
Put all the ingredients in your bread machine and set on the dough cycle.

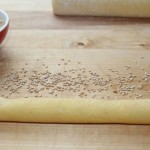
When the cycle is done, take out the dough, cut into about sixteen equal portions and form into rolls or if you’re brave enough, into braids.  You can find instructions on here

Brush each with a beaten egg and bake.  After they’re done baking for about 15-18 mins, brush with some melted butter and put them back in the oven for a short while. (I skipped this step this time, but will definitely do it next time.)  These are best eaten on the first day.

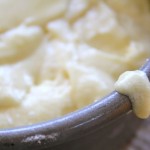
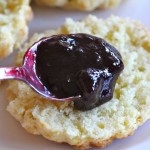
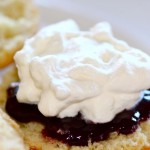
I had mine with a bit of cream and jam…mmm


Not Braided Bun
Not Braided Bun

Torta Tal-Marmurat ~ Almond and Chocolate Tart

Torta Tal-Marmurat
Torta Tal-Marmurat

Hello again!  I hope you’re all having a lovely summer whatever you’re doing and wherever you are. I know Summer is all about salads and baking is probably the last thing on anybody’s mind in this heat, but I’m a baker at heart and nothing, not even the worst heatwave will deter me from my beloved oven.

So since my last post, I have been working hard on this recipe, trying to get it the way I remember it to be growing up.  There are a few recipes online that looked promising but somehow neither of them seemed to be authentic to my memory…so after about a dozen try outs, and with the help of all my friends who have tried this and given me their honest opinions, I think I am ready to post it.

Nanna Kelina
Nanna Kelina

This recipe has a special place in my heart as it reminds me of my beloved nanna.  Every Saturday, I used to stop by the Kiosk at the entrance of Valletta and get one to take to her on my way home from the disco (ha ha…disco…those were the days).  Then we’d sit down and have a cuppa tea and a chat together while we shared the pastry. To tell the truth, I always ended up eating most of the tart as it was my favourite but Nanna didn’t seem to mind and we were both glad of the chance to spend some time together.

I have to say that this is a very rich dessert and a little goes a long way.  One 4″ tart serves 6-8 people.  They are usually sold in little four inch tarts but you can make one big tart if you prefer. This recipe makes exactly four 4″ tarts.

Crust

200g flour
50g butter
50g shortening
grated rind of half a lemon
1 egg yolk
pinch of salt
little bit of milk

Torta Tal-Marmurat
Torta Tal-Marmurat

Filling

75g almond meal
50g pure ground almonds
75g crushed rusks
60g chopped candied peel
1tbsp marmalade
1 egg
50g sugar
1/2 cup orange juice
12g cocoa powder
pinch of cinnamon and cloves optional

Fudge Frosting

50g of bittersweet dark chocolate
50g sugar
2 tbsp milk
2 tbsp butter 


Ready to Bake

Crust

Make the crust by putting the dry ingredients in a bowl.  Rub in the butter and shortening. Add the egg yolk and bind until the dough comes together nicely.  Add some milk if you see the dough is too dry.

Filling

Put everything in a bowl and mix together.

Using your dish of choice, roll out the dough and place in your dish.  Add the filling and bake in 375 degree oven for about 20 mins depending on your oven.

Fudge Frosting
Fudge Frosting

Prepare the Fudge Frosting

Put the chocolate, sugar, milk and butter in a pot and stir until melted.  When the pies are done, cover with the frosting.

Let cool until the frosting sets.

This is a very heavy type dessert so a little goes a long way.  Best served with some strong black coffee or espresso.


Torta Tal-Marmurat


One tip I have for you is to make your own candied peel…it takes time, about three days to make it from start to finish, but it does not compare to what you get from the store.

Kannoli ~ Cannoli

Cannoli
Cannoli


Rose
Rose

This recipe has been in my to do list for about three months and the reason I had not attempted it before now is because it is a recipe shared with me by my very talented baker friend Rose and I was so blown away by the taste and presentation of her Cannoli that I felt a bit intimidated to try them myself in case I did not do it justice.

But now that the kids are off from school and I have a lot more time on my hands, I thought I’d give it a try and hope hope hope that I make them half as good as you Rose!

I am probably the only living soul on this planet that is not crazy about cannolis. I love ricotta but mainly in savoury  dishes and find ricotta desserts to  be a bit too heavy for my liking.

So when offered dessert at one of our get togethers at Rose’s house, I opted for the fruit salad, but couldn’t help eyeing the cannoli which were on the top tier of the dessert stand looking down on the other pastries acting holier than thou. But as I reached over for a taste, it took me all of two seconds to realise why.

Cannoli Molds
Cannoli Molds

Cannoli Shells

1 3/4 cups all purpose flour
2 tbsp sugar
1/2 tsp salt
2 tbsp butter
1 egg slightly beaten
1/4 cup Sauterne wine
egg white + tbsp of water

Cut in the 2 tbsp cold butter in with the flour, sugar and salt.

Add 1 egg slightly beaten.

Add the wine and form into a dough.

Roll out the dough to a 5 setting on the pasta machine.  If you don’t have a pasta machine, then roll the dough quite thin, as you would ravioli.

Cut dough into 4″ circles and form loosely onto metal tubes.

Beat the egg white and brush the ends of the dough to glue the ends making sure not to get any on the metal tube. Make sure you seal properly.

Deep fry in melted Crisco when it reaches 400 degrees, until golden brown and drain the shells on paper towels.

These make about 30 shells depending on how big you make them.

Cannoli Filling

Candied Peel
Candied Peel

2lbs ricotta
2-4 tbsp powdered sugar to taste
2 tsp vanilla
1/2 cup chopped orange candied peel
1/2 cup chopped candied citron peel
1/2 cup chopped good quality milk or dark chocolate
1-2 drops of cinnamon oil or to taste

Mix all the ingredients until well combined

To assemble Cannolis :

Pipe or spoon ricotta filling into the shells and sprinkle powdered sugar on top.

Perfect dessert to have on hand when you’re hosting a dinner because you can prepare both the shells and ricotta ahead of time and assemble them just before dessert time.

Thank you Rose!

Yummmmm!!
Yummmmm!!

Cannoli Tips :

I did not have cinnamon oil so I used ground cinnamon instead.  I hear it makes a difference and it’s on my list of things to add to my baking ingredients for sure. Some people prefer the taste of Fiori di Sicilia…I still have to try that one too.  Apparently it’s a wonderful addition to a lot of baked goods.

Do yourselves a favour and make sure to use egg whites to seal the cannoli dough before you fry them cause they do unfurl if you don’t.

Another tip is, that if you have a pasta machine, USE it.  It gives the cannoli perfect thickness and consistency.  I was a bit lazy to take mine out at first and tried to roll it out with a rolling pin.  It worked ok…BUT towards the end, I decided to use the machine and and realised how much better the shells turned out.

I fried the shells one at a time as they brown really quick and a few seconds makes all the difference between golden brown to charcoal black.

If you made the ricotta from scratch, do not let it drip too dry.  If that happens, add some whey to make it creamy.

If it’s not sweet enough, add more sugar to taste.

Follow all this and you’ll be left with cannolis to be proud of…

Zucchini Bread ~ An Old Faithful

Zucchini Tops
Zucchini Tops

I can’t think of a more appropriate time to post this recipe than now.

This is the first year that I planted zucchini…or rather that the zucchini that I planted are actually rewarding me with its fruit.  Did you know that?? Zucchini is actually a fruit?   A fruit that is prepared as a vegetable.  I thought that was very interesting, because to me, anything green is a vegetable…except watermelon of course.

Happy Birthday Dylan

So this is a quite an old recipe…18 yrs old in fact! As old as my first born and it’s a known fact that I spent the better part of nine months eating this bread.  I’d go visit my family out on Long Island and my  cousin Dianne would never let me go back home without a loaf, all sliced up and ready to eat on the one hour long trip back home. And by the time I got home, there’d be nothing left but a few crumbs.

Dylan Graduation
Dylan Graduation

So this morning, when I went out to the garden and noticed that some zucchini were ready for picking, I had to use it to make this bread.  Also, it’s Dylan’s b’day next week…18 yrs young!!  Where has the time gone??  Seems like only yesterday we were so excited at welcoming our newborn.  And now it’s almost time to say goodbye as he heads off to a new beginning…the college years.

And it all started with zucchini bread!

It’s a simple recipe and makes two medium sized loaves.  Perfect for sharing with friends…your friends will love you for it! Also freezes very well.


Ingredients

3 cups flour
2 tsp baking powder
1 tsp baking soda
1 tsp salt
2 tsp cinnamon
2 tsp vanilla extract
2 cups peeled and grated zucchini
2 cups sugar
1 cup salad oil
3 eggs

Just mix everything together.

Pour into prepared greased and floured loaf pans.

Bake in preheated oven at 375 for about 45 mins.

Zucchini Bread
Zucchini Bread

In my opinion, the next best thing to cookies and a glass of cold milk is zucchini bread and a glass of cold milk.  So satisfying and comforting anytime.  Thank you Dianne for sharing this with me…still one of my favourites and not just for the memories!

Ottijiet ~ Figure Eight Cookies

Ottijiet
Ottijiet

I have to tell you that today’s recipe goes against everything I believe in  and that is using boxed cake mixes in baking.  I have used them maybe twice in my life and it was only because my kids begged me to.  Does that make me a cake snob I wonder…

Even though they have a nice light and moist texture and they keep for such a long time unlike most home baked cakes, I find them to be very artificial.  If I do come across a recipe, and one of the ingredients says “one boxed yellow cake mix”, I run as fast as I can.

So when my friend Mary offered me some of her home made biscotti with my tea, my eyes lit up until she said those dreaded words!!

“It was such an easy recipe Georgina!  It calls for one boxed cake mix…….” and everything started fading after that.  My ears shut out the rest of the recipe, and my nose wrinkled and I just nodded and smiled as though everything was ok in the world.

Original Recipe
Original Recipe

But I felt I owed it to Mary to try them out because she did make them especially for me…and was prepared to politely say something like…

“Mmm, nice Mary”…
…but instead found myself actually saying…
“OMG…these biscotti remind me of the Ottijiet we used to have in Malta growing up…please please share the recipe”

So now I am a snob no more and you will find at least three boxed cake mixes at any given time in my kitchen.

Today was a rather cool day and I really felt the need for something sweet with my nice cuppa tea. Something to dunk…whatever it was, it had to be strong enough to withstand a three second dunk in my hot beverage and not fall apart before it makes its way to my mouth.

Ottijiet, which translated means the figure eights are perfect for such a deed.  They are hard and crunchy Maltese type cookies and can be dunked with success every time.   I used to make these Ottijiet using the Figolli dough  but have since converted to using this recipe.  The original recipe is used to make biscotti but I’ve adapted the recipe to make these lovely dunkers.

Ottijiet

1 package yellow cake mix
2 large eggs
1 egg yolk
8 tbsp cooled melted butter
1 cup all purpose flour
zest of half a lemon
sesame seeds optional

Preheat oven to 350 degrees
Form the dough by putting all the ingredients together and forming into a ball.
Let rest for half an hour.
Cut the dough in half.
Form into 2 equal rolls.
Cut into two inch sections.
Form each section into a foot long thin rope.
If using sesame seeds, sprinkle some on the cutting board and roll the dough over them so they will stick and not fall off.
Form into the figure 8
Bake for about 18 minutes until golden in colour
Makes 2 dozen 8’s

Pastini Di Mandorla ~ Almond Cookies

Pastini Di Mandorla
Pastini Di Mandorla

Aaron once asked me if almonds were a national source of income in Malta.  I wondered how he’d come to that conclusion until he pointed out that the desserts I tend to make always have some kind of  almonds or marzipan in them.  It is quite true that I do do that, but I think the reason why I love working with almonds so much is because they are so darn good.

Blanched Almonds
Blanched Almonds

Pastini Di Mandorla means Almond Cookie and it is another recipe I love to make from the book by Edward Calleja Success Bil-Helu 2, the other one being Pastini Bic-Cirasa…not only because they are super delicious, but also because they are a cinch to make.  

They require only one egg white, which means, you’re not left wondering what to do with so many  left over egg yolks.  Even better,  if you use liquid egg whites, then you’re left with no egg yolks at all!!

Also, as opposed to other almond cookies, these require no drying time at all…so if you fancy these cookies at 2pm, you can be happily eating them by 3pm.

Ingredients

Pastini Di Mandorla
Pastini Di Mandorla

200g pure ground almond
200g powdered sugar
zest of a lemon
one egg
one tsp almond essence
one egg white beaten for dipping
about 3/4 slivered almonds to use as topping
rice paper (optional if you use a silpat)

Method

Preheat the oven to 350 degrees

Place the rice paper if using, on the baking dish.

Mix all the ingredients except for the slivered almonds together in a bowl to form a ball.  Do not be tempted to add more liquid as this is supposed to be on a dry side. If you add more liquid, the cookies will flatten and you don’t want that.  If you see that the result is too sticky, add more ground almonds.

Cut the mixture into four equal pieces. Roll into four long ropes.  Cut into two inch pieces.

Form into crescents.

Beat the egg white in a small bowl.  Place the slivered almonds in a flat plate.

Dip the crescents in the egg white, then again in the slivered almonds and then place on the prepared baking dish.

Bake for 15 mins until just golden.

Cool on wire tray and sprinkle some powdered sugar for presentation.

Pastini Di Mandorla

Next time I see Aaron, I’ll be making these for him!

Meyer Lemon Cake

Meyer Lemon Tree
Meyer Lemon Tree

Now that my baby hummingbirds are no more and I don’t have to tip toe around my lemon tree anymore, I have been thinking of ways that I can use up the numerous lemons it still has left on it.

Meyer Lemons
Meyer Lemons

Lemon marmalade~Check

Lemon Marmalade Truffles~Check

Lemon Salt~Check

Lemon Olive Oil~Check

Endless Amounts of Lemonade~Check

I have a few lemon cake recipes that are a staple in my collection but I’m always on the look out for new ones that may come my way.  So when my friend Karen graciously shared some of her lemon cake with me last week, my eyes lit up.  And when she shared her recipe…well!! I then quickly picked some lemons and got started.

I was blown away with the tanginess and moistness of this cake.  I tweaked the recipe just a tiny bit…and I think if you like a strong lemon taste in cakes and baked goods, then you can’t go wrong with this one!

Meyer Lemon Cakes
Meyer Lemon Cakes

Ingredients

4oz butter
2oz sour cream
3 eggs
8oz sugar
8oz self raising flour
1tsp baking powder
about half a cup of lemon juice (according to taste)
zest of one lemon

Cream butter, sour cream  and sugar together until light and fluffy.

Add eggs, one at a time.

Slowly add in flour, baking powder and salt. Then add lemon juice and zest of one lemon.

Butter and flour a pan of your choice and pour the batter in the pan. You can make into cupcakes or use a Bundt pan. I divided my batter into three five inch cake pans.

Place in a cold oven.  Set the oven to 350 degrees and bake for one hour if putting in a Bundt pan.  Check after 45 mins. Allow to cool for 10 minutes and turn out onto a cake platter.

Prepare Lemon Glaze
Prepare Lemon Glaze

Glaze

juice of a lemon
4oz sugar

In a small bowl, combine the juice of one lemon and ½ cup sugar.

While still warm, drizzle the cake with the lemon glaze and let cool.

Meyer Lemon Cake
Meyer Lemon Cake

Kevin just reminded me that the best way to use meyer lemons is squeezed into a glass of gin…Cin Cin Kevin!!

Figolli ~ Traditional Maltese Easter Cookies

Figolli
Figolli


Figolli
Figolli


Hey, it’s that time of year again!  Time to make figolli!

There are a handful of occasions  throughout the year that my kids look forward to!  And they have to be Birthdays, Halloween, Christmas and Easter time! And this is probably because each holiday has something sweet attached to it.

Halloween Figolli
Halloween Figolli


The funny thing is, we have been known celebrate each occasion with Figolli.  I have made pumpkin and ghost  figolli for Halloween, Christmas Tree figolli for Christmas and even a birthday cake figolla for Dylan’s birthday.  Yes, any day can be figolli day at my house!  We love them that much!


Broken Ear
Broken Ear

Traditionally, figolli were given to kids on Easter Sunday after 40 days of lent.  They come in all shapes and sizes, from ducks and lamb to guitars and cars.  As kids we’d look forward to the broken ones because that meant we could scoff it straight out of the oven!

So get your work station ready.  It’s not a hard recipe to make.  Just time consuming so I suggest you divide the work over a few days.  I usually start with making the dough and the filling, forming the figolli and baking them on day 1.  I leave the decorating for day 2.  Then I wrap them on day 3! And best part is eating them on day 4!  They will vanish like magic…you’ll see!!


Dough

400g self raising flour

400g all purpose flour

400g margarine

300g sugar

juice and zest of one lemon

1tsp vanilla

4 egg yolks

milk or orange juice to bind

If you don’t have self raising flour, you can use 800g of all purpose flour and add two tsp of baking powder.

Sieve flour into a large bowl or stand mixer. Rub in the margarine to a bread crumb consistency. Add the sugar and lemon rind and mix again. Lightly mix in the eggs, juice, vanilla essence and enough milk to form a soft dough. Let rest in the refrigerator.

Filling

Almond Meal and Sugar

500g almond meal

300g sugar

4 egg whites

2tsp almond essence

Mix all the ingredients together in a bowl.

Add the egg whites and stir.  If it’s too dry, add some orange juice to the mixture.

Dust a work surface with flour and roll out the pastry. Use cookie cutters or custom-created cardboard shapes to cut out two identical shapes for each figolla.

Spread a thick (about 1 centimeter) layer of the almond filling onto half the pastry shapes you’ve made, leaving about 1 cm of space around the edges of each one. Brush edges with some evaporated milk. Then cover each with its corresponding half. Push the edges together slightly and bake for about 30 mins in a moderate oven (325-350F, 175C).

Allow to cool and decorate with chocolate or icing as desired.

Icing
Icing

Cherry On Top ~ Pastini biċ-Ċirasa


Pastini biċ-Ċirasa

My mum knows me more than I know myself and lucky for me, she takes what I say with a grain of salt.

IMG_9985
Success Bil-Helu 2
By Edward Calleja

She had been telling me about this Maltese Recipe Book  for months and just how good the recipes were. We’d be sharing a cup o’ coffee together over skype when I’d catch a glimpse of a tray of cookies she’d just made and every time she would say that she had followed  a recipe from Edward’s  Book!  And every time she’d say that she’ll send it to me, and every time I tell her not to.  It was a game we played quite often, with me having the last word of course!

Or so I thought because she sent it to me anyway…knowing fully well that she’d get told off for it but also that I’d love it and sure enough, my mum was right as she always is.

This book is fast becoming my go to book for Maltese Baking.  I have had excellent results with all the recipes I’ve tried so far and I thought I’d share this one with you.  These are my favourite traditional Almond Cookies.  They are a staple at weddings and baptisms and  Cafes any time of the year!

Almond Cookies
Almond Cookies

So for those of us who can’t just pop into a cafe and order a dozen or two to take home, this is a simple recipe that will definitely satisfy your craving.  One thing you have to remember is that you need to start these the night before as they need to dry overnight or from 6-8 hours!

Another thing is that even though these are easy to make, you do need a bit of muscle as the consistency of the dough does not pipe easily. So consider yourselves warned!!


The recipe makes about 3 dozen and is adapted from Suċċess Bil-Helu by Edward Calleja.

Ingredients

250g pure ground almond

250g powdered sugar

3/8 cup egg whites or the whites of 3 eggs

rind of half a lemon

1tsp almond essence

rice paper optional

cherries for decoration

Place the dry ingredients together in a bowl.

Beat egg whites in a separate bowl.

Slowly pour egg whites in with the almonds and sugar and stir until you see it’s well mixed.  The mixture should not be too soft.

Put rice paper in the pan.

Scoop the mixture and put in a 16-18 inch piping bag with a Wilton 1M tip. Pipe the mixture on top of rice paper or silpat as shown about an inch apart.

Place a quarter cherry on top.

Let dry overnight.

IMG_0001
Let them dry overnight

Next morning preheat oven at 375 degrees and bake for about 10-12 mins until light golden colour depending on your oven.

Cherry On Top
Cherry On Top


Scones

English Tea Flag

When I think of England, I think of scones!! The two just go together just like Malta and Pastizzi! Kevin and I are not planners!! We knew that from the get go.  He proposed over the phone on New Year’s Eve  and we were married in March!  We did not even have any idea where we were going to live  We tried  Malta for a month and when that didn’t work out, we thought we’d see if England would be a better match.

Leaving on a Jet Plane

We packed few bits in a suitcase, boarded Air Malta and all we knew was that we’d be landing in Heathrow in three hours!! We winged everything else after that. It was a beautiful May day and all I kept thinking was “WOW!! I can do this!!”  “I can live in England!”  “Why does everyone complain about the weather!” “What a beautiful place!”…as we drove our little rented car from London to???? It was one of the best days ever!! Just married…beautiful day…with the excitement of what lies ahead!  Whatever it was, we were going to make it work!

The Hoe, Plymouth
The Hoe, Plymouth

There were a few places we passed along the way that were possibilities and I still wonder what would’ve happened if we’d laid our hats in  Somerset or Bath.   But we kept on driving until we could drive no more! Plymouth Devon!!  Doesn’t Devon just shout out Cream Teas and Scones? We got out of the car on Plymouth Hoe and the view of The Sound with clear blue skies is still exhilarating to me to this day. We both fell in love with The Barbican and the little shops and restaurants and decided that it was the perfect place to start our new lives together.  Found a flat to rent across the street from a Greek Restaurant and made it our home! It was the stinkiest and had the most godawful decor, but it was perfect! And that was where I had my first Cream Tea experience!! A little place called Tudor Rose Tea Room  Just the whole teapot and cup and scone and jam and cream and mix it all up and you feel like the queen!

So of course, since then, I’ve been looking for the perfect scone recipe.  I’ve tried making them with milk/buttermilk/sour cream and cream and my kids  and best critics have confirmed that this recipe is one of the best ones…YET!!  I have my friend Rose to thank for sharing her recipe AND scones with me!

Scones are very simple to make and are pretty much fool proof if you follow these easy steps.  I suggest you don’t use your stand mixer for this recipe and make them by hand because the less you handle the dough, the better.

Ingredients
Ingredients

Ingredients

  • 1 1/2 cup all purpose flour
  • 1/4 cup sugar
  • 2 tsp baking powder
  • 1/4 tsp salt
  • 1/4 cup whipping cream
  • 6 tbsp unsalted butter
  • 1 beaten egg

Using the rubbing in method, combine and flour and butter and salt and work it until it looks like bread crumbs. Mix in the sugar. Put a well in the middle and pour in the cream and eggs and very lightly, bring the mixture together until just combined. Let it rest for about half an hour.

Also with your hands, pat the dough down to about 1 1/4″ thickness.  Using your scone/biscuit cutter, cut out and place on the prepared dish.

Bake at 375 for about 18 mins until golden.

Serve with jam and cream and tea of course…

Cream Tea
Cream Tea