PDFill PDF Ink Annotator:(See Example PDF  and Example PDFill Project File and Example PDFill Project File  ) ) You can use PDF Ink or PDF Annotator function to easily annotate PDF documents. You can write, draw, mark or highlight PDF documents on PC with mouse or on Tablet PC using the pen input. You can change ink's color and width. It can support Pressure-Sensitive Pen and automatically smooth Free Hand to Straight lines. There are 3 ink inserting modes:
| |
Ink Mode |
Default Tip Shape |
Common Color |
Appearance |
Purpose |
|
 |
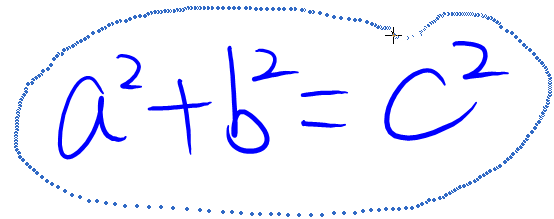
Pen |
Blue Ball Tip with 1 point in Diameter |
Blue or Black |
Opaque |
Note taking, Writing and Diagramming |
The inking by Pen and Marker Mode belongs the same layer which is opaque |
 |
Marker |
Red Rectangle Tip with 4 points in Width, 8 points in Height |
Red or Green |
Opaque |
Mark up |
 |
Highlighter |
Yellow Rectangle Tip with 6 points in Width, 12 points in Height |
Yellow, Pink, or Light Green |
Transparent |
Highlight text or Writing |
The inking by Highlighter Mode belongs to another layer which is transparent |
PDFill PDF Inking function is similar to PDFill PDF Comment's Pencil Tool and PDFill PDF Drawing's Curve Tool, which are designed for mouse input only. It does utilize a pen support for writing on tablet and use very smooth inking interface found in Windows 8/7, Windows XP and Vista. As the result, this function provides a much better and unique user experience. Note: If this Ink function doesn't work, please install Microsoft Ink Component. You can also test Microsoft Ink examples. 1. Ink Insertion
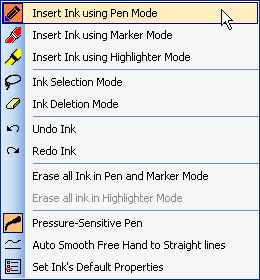
- Choose Insert Menu > Select Ink, Select Pen Mode , Marker Mode or Highlighter Mode :
or click Pen Mode , Marker Mode or Highlighter Mode Button in the Ink Toolbar.


- To exit the ink inserting state, click the Arrow Button
 in the Ink Toolbar. The ink will be converted into an image so that it can be saved into the new PDF. Then, you can then select and edit other PDFill Objects. in the Ink Toolbar. The ink will be converted into an image so that it can be saved into the new PDF. Then, you can then select and edit other PDFill Objects.
- Here are the buttons in the Ink Toolbar:
| |
Click left mouse button to Select and Edit Non-Ink PDFill Objects |
| |
Insert Ink using Pen Mode |
| |
Insert Ink using Marker Mode |
| |
Insert Ink using Highlighter Mode |
 |
Ink Selection Mode |
 |
Ink Deletion Mode |
 |
Undo Ink |
 |
Redo Ink |
 |
Ink Color |
 |
Ink Width |
 |
Pressure-Sensitive Pen (Supporting hardware required) |
 |
Auto Smooth Free Hand to Straight lines |
 |
Set Ink's Default Properties Properties |
2. Ink Selection
- To select inks, make sure that it is under ink inserting state. If the selection icon is disabled, you must click the insertion icon.
- Click the Selection button in the Ink Toolbar to enter the selection state.
- Draw a Lasso-based curve around the inks like this:
- After selection, it will look alike the following picture.

- You can do the following operations:
Drag inside the box to move the selected inks.
Drag one of the 8 small border boxes to scale the selected inks.
Press "Delete" key to delete the selected inks.
Cut, Copy and Paste the selections.
3. Ink Deletion
- To delete inks, make sure that it is under ink inserting state. If the deletion icon disabled, you must click the insertion icon first.
- Click the Deletion button in the Ink Toolbar to enter the deletion state. Click the ink to erase it.
- You can select inks under Ink Selection, then, click the Delete Button to delete the selected inks.
4. Ink Undo/Redo
Click the Undo Button in the Ink Toolbar to Undo the last ink action that you made.
Click the Redo Button in the Ink Toolbar to Redo the ink action that you undid.
PDFill support Multilevel Undo that allows undoing of more than one action in sequence, usually back to the last point you saved or when you first enter the ink state. If you exit the ink state, all the undo and redo will be cleared.
The inking by Pen and Marker Mode belongs the same layer which is Opaque while the inking by Highlighter Mode belongs to another layer which is transparent. So, when you switch between Pen/Marker and Highlighter mode, all the undo and redo will be cleared.
5. Set the properties for PDF Ink:
Click Button in the Ink Toolbar or from Format Menu, Select PDFill Options. Click the Ink tab.
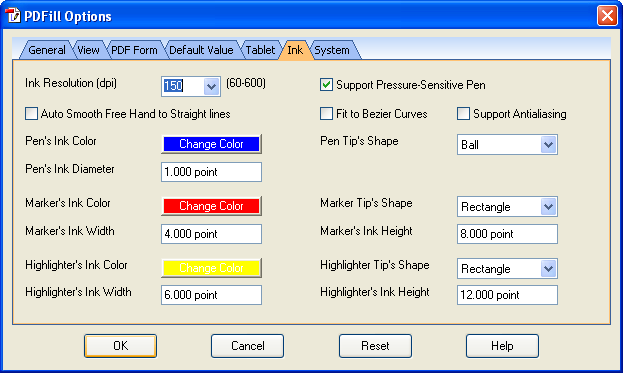
| Ink Resolution (dpi) |
Ink resolution defines the image quality when ink objects is saved into PDF as image objects. The default is 150 dpi. |
| Support Pressure-Sensitive Pen |
Whether to avoid varying the thickness of ink with pressure data (ON) or not (OFF). Hardware is required to have this function. |
| Auto Smooth Free Hand to Straight lines |
Auto Smooth Free Hand to Straight lines if the stroke curve is close to a vertical or horizontal lines. |
| Fit to Bezier Curves |
Whether ink is rendered as a series of straight lines (OFF) or Bezier curves (ON). |
| Support Antialiasing |
Anti-aliasing refers to a number of techniques to combat the problems of aliasing. |
| Pen's Ink Color |
The color used to draw ink. The default color is Blue in Pen Mode. |
| Pen's Ink Shape, Width, Height or Diameter |
The style of ink tip used to draw: Ball or Rectangle. Width and Height specify the thickness of ink when using the rectangle ink tip; Diameter specifies the thickness of ink when using the ball ink tip. The default shape in Pen Mode is Ball with 1 point in Diameter. |
| Marker's Ink Color |
The color used to draw ink. The default color is Red in Marker Mode. |
| Marker's Ink Shape, Width, Height or Diameter |
The style of ink tip used to draw: Ball or Rectangle. Width and Height specify the thickness of ink when using the rectangle ink tip; Diameter specifies the thickness of ink when using the ball ink tip. The default shape in Marker Mode is Rectangle with 4 points in Width, 8 points in Height. |
| Highlighter's Ink Color |
The color used to draw ink. The default color is Yellow in Highlighter Mode. |
| Highlighter's Ink Shape, Width, Height or Diameter |
The style of ink tip used to draw: Ball or Rectangle. Width and Height specify the thickness of ink when using the rectangle ink tip; Diameter specifies the thickness of ink when using the ball ink tip. The default shape in Highlighter Mode is Rectangle with 6 points in Width, 12 points in Height. |
4. Screenshot:
|