
Blog Starter Kit lets you instantly deploy a Next.js and Tailwind powered frontend for your Hashnode blog. It consumes Hashnode's Public APIs, and gives you a fully customizable blog that can be deployed anywhere, including a subpath of a custom domain. Combined with Hashnode's headless mode, it unlocks entirely new possibilities. You can now use Hashnode's world class editor and dashboard to author content and collaborate. And use blog starter kit to customize the frontend to your liking.
The recommended approach is deploying to Vercel. If you don't have an account already, you can sign up for a free plan.
Fork this repo
Create a new project on Vercel and connect this repo
It's a monorepo. So, choose either
packages/blog-starter-kit/themes/enterprise,packages/blog-starter-kit/themes/hashnodeorpackages/blog-starter-kit/themes/personalas the root directory while importing on Vercel.Choose
Next.jsas framework preset (just above Root Directory setting).Set the following environment variables

NEXT_PUBLIC_HASHNODE_GQL_ENDPOINT=https://gql.hashnode.com
NEXT_PUBLIC_HASHNODE_PUBLICATION_HOST=engineering.hashnode.com -> Change this to your Hashnode blog URL i.e. handle.hashnode.dev
NEXT_PUBLIC_BASE_URL=/blog -> This could be /blog if you are installing on subpath; otherwise remove this var
NEXT_PUBLIC_MODE=production
Once this is deployed, just visit Vercel's auto generated domain to ensure it loads fine. Initially you won't see any posts. But you can always point NEXT_PUBLIC_HASHNODE_PUBLICATION_HOST to a different domain such as engineering.hashnode.com to visualize.
Follow the steps below if you would like to install your blog under a custom domain subpath. If not, you can directly map a custom domain to your project on Vercel and have a production-ready blog up and running.
If your main project is deployed on Vercel, add the following rewrite to next.config.js:
async rewrites() {
    return [
      {
        source: "/blog",
        destination: "https://starter-kit-rose-seven.vercel.app/blog", -> Replace https://starter-kit-rose-seven.vercel.app with your own Vercel deployment URL from step 1
      },
      {
        source: "/blog/:path*",
        destination: "https://starter-kit-rose-seven.vercel.app/blog/:path*", -> Replace https://starter-kit-rose-seven.vercel.app with your own Vercel deployment URL from step 1
      },
    ];
  },
Once you deploy your project, the subpath installation should work successfully.
Note: If you are updating your environment variables in Vercel, make sure to manually redeploy to see the changes.
In case you are using Cloudflare in proxy mode (orange cloud on), you can deploy the following worker script and map it to yourdomain.com/*:
const subpath = '/blog'; // Replace with your subpath
const blogBaseUrl = 'https://blog-woad-six-17.vercel.app'; // Replace with your blog URL from step 1

addEventListener('fetch', event => {
  event.respondWith(handleRequest(event.request))
})

/**
 * Respond to the request
 * @param {Request} request
 */
async function handleRequest(request) {
  const url = new URL(request.url)

  if (url.pathname.startsWith(subpath)) {
    // Proxy blog requests
    return proxyBlog(request)
  } else {
    // Passthrough everything else
    return fetch(request)
  }
}

/**
 * Proxy blog requests
 * @param {Request} request
 */
async function proxyBlog(request) {
  const path = new URL(request.url).pathname;
  return fetch(`${blogBaseUrl}${path}`, request)
}
After the above step is done, follow these steps to add the worker route:
- Go to
Websitesthen click on your website and selectWorker Routesfrom the left pane. - Click on
Add routeand addhttps://yourdomain/*, then select the worker you just added above and clickSave. - Go to
https://yourdomain/yoursubpathand now you should be able to see your blogs.
Be sure to replace the values of subpath and blogBaseUrl in the above code snippet. This way cloudflare will proxy all the requests starting with yourdomain.com/blog to your headless blog, and other requests will hit your origin as usual.
If your main domain is hosted elsewhere, you need to involve engineers from your team to create above rewrites.
Now that you have deployed the starter kit on your own domain, you need to tell Hashnode not to generate a UI for your blog. You can do that by visiting your blog dashboard -> advanced tab. Scroll down and locate the section "use Hashnode as a headless CMS". Enable it and enter your blog base URL.
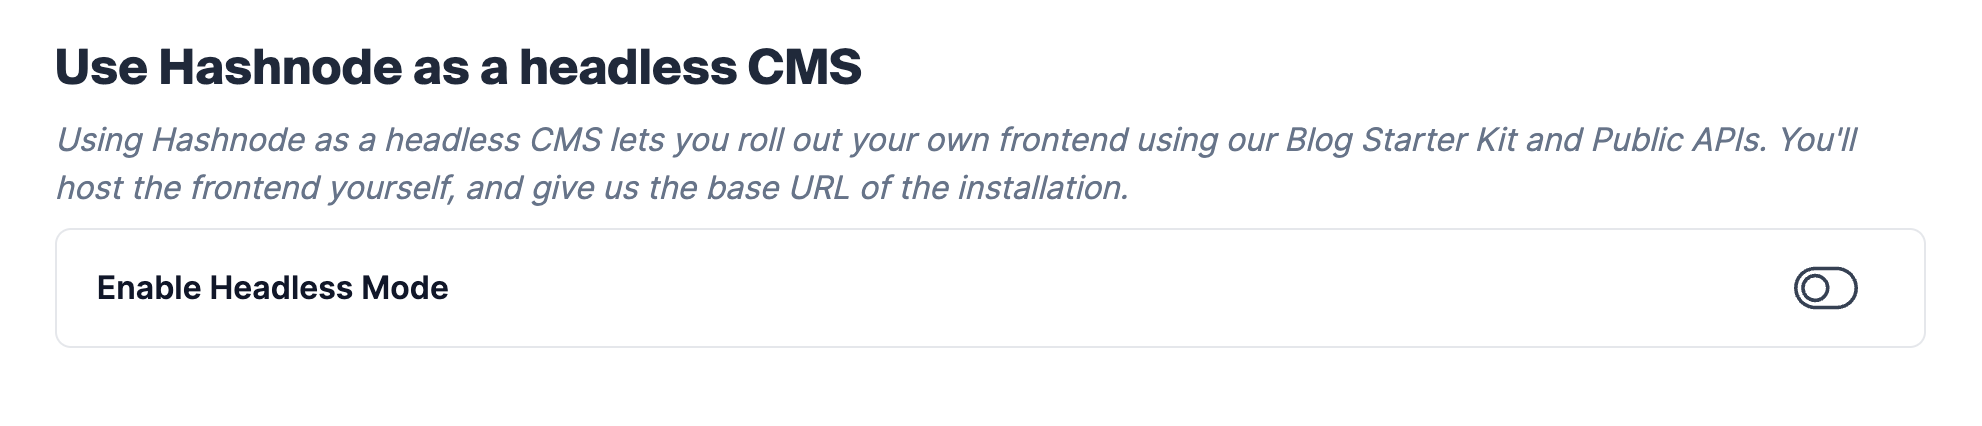
After enabling, enter your blog URL like the following and save.

Congrats 🎉! Hashnode will now treat your blog as a headless blog and send readers directly to the origin.
- cd into either
packages/blog-starter-kit/themes/enterprise, orpackages/blog-starter-kit/themes/hashnodeorpackages/blog-starter-kit/themes/personal - Copy
.env.exampleto.env.local pnpm installpnpm dev
Visit http://localhost:3000!
If you prefer to build your frontend from scratch, you can use our public GraphQL APIs to do so:
For individual devs: Hashnode's Headless CMS is free for individual bloggers! Grab our starter kit and start building your blog – no license is needed.
For teams and enterprises: Access to headless mode, multiple team members, real-time collaboration, AI, and enterprise reliability. Request access and get a quote. We will be in touch within the next 24hrs to get you onboarded.
If you have found an issue or bug, please create an issue.
If it's a quick fix, such as a misspelled word or a broken link, feel free to skip creating an issue. You can create a pull request directly.
Feel free to create an issue with the feedback label. Our team will take a look and get back to you as soon as we can!
You can discuss ideas, ask questions, and meet other members from the Hashnode community in our Discord. You can also create tickets on our intercom to find support.
If you like, you can also DM us on X!